Volvo V70X, C70 (2010 year). Instruction - part 5


  Index      Volvo     Volvo V70X, C70 - instruction 2010 year in english


Search            


Content   ..  3  4  5  6   ..


Volvo V70X, C70 (2010 year). Instruction - part 5


03 Your driving environment

Seats 

03

82

The right (passenger's side) section can be
folded down together with the center sec-
tion.

All three sections can be folded down
together.

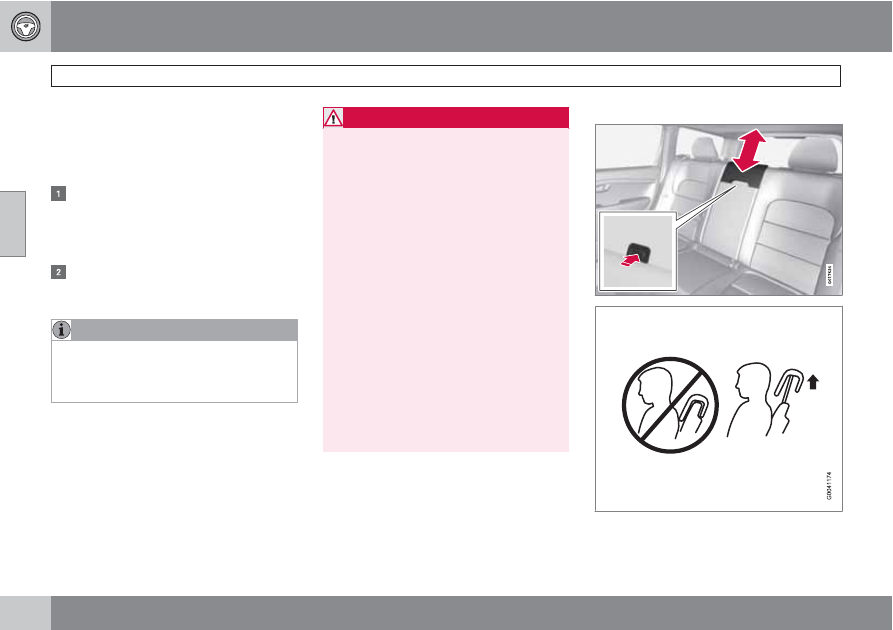
Release and lower the center head
restraint (see page 82) if the center and/
or right section of the backrest is to be
lowered. The outboard head restraints fold
down automatically.

Pull up the backrest release control on the
respective section(s) and fold the sec-
tion(s) down.

NOTE

It may be necessary to move the front seats
forward or put their backrests in a more
upright position before folding down the
rear seat backrests.

WARNING

When the backrest(s) are returned to the
upright position, check that it is properly
locked in place. The red indicators
should not be visible.

Return the outboard head restraints to
the upright position.

Long loads should always be securely
anchored to help avoid injury in the
event of a sudden stop.

Always turn the engine off and apply the
parking brake when loading/unloading
the vehicle.

Place the transmission in the Park (P)
position to help prevent inadvertent
movement of the gear selector.

On hot days, the temperature in the
vehicle interior can rise very quickly.
Exposure of people to these high tem-
peratures for even a short period of time
can cause heat-related injury or death.
Small children are particularly at risk.

Rear center head restraint

The center head restraint should be adjusted
according to the passenger's height. The

03 Your driving environment

 Seats

03

83

restraint should be carefully adjusted to sup-
port the occupant's head.

Pull the head restraint up as required.

To lower, press and hold the button
(located at the center, between the back-
rest and the head restraint) while pressing
the head restrain down.

WARNING

The center rear seat head restraint should
only be in its lowest position when this seat
is NOT occupied. When the center position
is occupied, the head restraint should be
correctly adjusted to the passenger’s
height. The upper edge of the head restraint
should be at least on a level with the upper-
most point of the seat occupant's ear.

Manually lowering the rear seat's
outboard head restraints

G018760

Pull the handle closest to the head restraint
to fold it down.

To return the head restraint to the upright
position, push it up until it clicks into place.

NOTE

The head restraint must be returned to
the upright position manually.

The outboard head restraints cannot be
folded down on models that are not
equipped with this button.

WARNING

For safety reasons, no one should be
allowed to sit in the outboard rear seat posi-
tions if the head restraints are folded down.
If these positions are occupied, the head
restraints should be in the upright (fixed)
position.

03 Your driving environment

Steering wheel 

03

84

*


Option/accessory, for more information, see Introduction.

Adjusting

G021138

Adjusting the steering wheel

Lever for releasing/locking the steering
wheel

Possible positions

The steering wheel can be adjusted for both
height and reach:

1.

Pull the lever toward you to release the
steering wheel.

2.

Adjust the steering wheel to the position
that suits you.

3.

Push back the lever to lock the steering
wheel in place. If the lever is difficult to
push into place, press the steering wheel
lightly at the same time as you push the
lever.

WARNING

Never adjust the steering wheel while driv-
ing.

With the optional speed-dependent power
steering the level of steering force can be
adjusted, see page 156.

Keypads

Keypads in the steering wheel

Cruise control, see page 157. Adaptive
cruise control*, see page 165.

Audio controls, see page 131.

Horn

Horn


Press the steering wheel hub to sound the
horn.

03 Your driving environment

 Lighting

03

``

85

Lighting panel

G022854

Overview, light switches

Thumb wheel for adjusting display and
instrument lighting

Rear fog light

Front fog lights

Headlights/parking lights

Instrument lighting

Illumination of the display and instrument lights
will vary, depending on ignition mode.

The display lighting is automatically subdued
in darkness and the sensitivity is set with the
thumb wheel.

The intensity of the instrument lighting is
adjusted with the thumb wheel.

High/low beam headlights

2

1

G022855

Headlight switch and lever

Daytime running lights/no
high beams

Parking lights

Low beams

Low beams

When the engine is started, the low beams are
activated automatically (daytime running lights)
if the headlight control is in position 0 or

.

Daytime running lights can be deactivated by
a trained and qualified Volvo service techni-
cian.

NOTE

The use of daytime running lights is
mandatory in Canada.

Continuous high beams cannot be acti-
vated when the headlight switch is in
position 

 or 0. High beam flash will

function in these positions.

High beam flash


Move the lever toward the steering wheel
to position 

. The high beams come on

until the lever is released.

High/low beam headlights

Continuous high beams

1.

Set the ignition to mode II.

2.

With the light switch in position 

, pull

the turn signal lever toward the steering
wheel to position 

 to toggle between

high and low beams (this also applies on
models equipped with the optional Active
Bending Lights).

> The symbol 

 illuminates in the

instrument panel to indicate that the
high beams are on.

03 Your driving environment

Lighting 

03

86

*


Option/accessory, for more information, see Introduction.

Active Bending Lights (ABL)*

Headlight pattern with the Active Bending Light
function deactivated (left) and activated (right)

When this function is activated, the headlight
beams adjust laterally to help light up a curve
according to movements of the steering wheel
(see the right-pointing beam in the illustration).

ABL is activated automatically when the engine
is started and it can be deactivated/reactivated
in the menu system under 

Car settings

Light settings

Active bi xenon lights

.

NOTE

This function is only active in twilight or dark
conditions, and only when the vehicle is in
motion.

If a fault should occur in the system, the symbol
will illuminate and a message will be displayed
as shown in the table.

Symbol

Display

Explana-
tion

Headlamp
failure
Service
required

The system
is not func-
tioning
properly and
should be
inspected/
repaired by
a trained
and qualified
Volvo serv-
ice techni-
cian.

Parking lights

G022907

Headlight control in position for parking lights

The front and rear parking lights can be turned
on even when the ignition is switched off.

Turn the headlight control to the center posi-
tion (the license plate lighting comes on at the
same time).

The lighting also comes on when the tailgate is
opened in order to alert anyone traveling
behind your vehicle.

03 Your driving environment

 Lighting

03

``

87

Brake lights

The brake lights come on automatically when
the brakes are applied.

Emergency brake lights (EBL)

Emergency Brake Lights, EBL, activate in the
event of sudden braking or if the ABS system
is activated. This function causes an additional
taillight on each side of the vehicle to illuminate
to help alert vehicles traveling behind.

The EBL function activates if:

The ABS system activates for more than
approximately a half second

In the event of sudden braking while the
vehicle is moving at speeds above approx-
imately 6 mph (10 km/h)

When the vehicle has come to a stop, the brake
lights and additional taillights remain on for as
long as the brake pedal is depressed or until
braking force on the vehicle is reduced.

Front fog lights

G014402

Button for front fog lights

The front fog lights can be switched on
together with high/low beams or the parking
lights. However, the fog lights switch off and
remain off while the high beams are on.


Press the button to switch the fog lights on/
off. The light in the button comes on when
the fog lights are on.

NOTE

Regulations regarding the use of the front
fog lights may vary, depending on where
you drive.

Rear fog light

G014403

Button for rear fog light

The single rear fog light is located in the driver's
side taillight cluster. The rear fog light will only
function in combination with the high/low
beam headlights or the optional front fog lights.


Press the button to switch the rear fog light
on/off.

> The rear fog light indicator symbol

 on the instrument panel and the

light in the button come on when the
rear fog light is switched on.

03 Your driving environment

Lighting 

03

88

NOTE

The rear fog light is considerably brighter
than the normal tail lights and should be
used only when conditions such as fog, rain,
snow, smoke or dust reduce visibility for
other vehicles to less than 500 ft.
(150 meters).

Hazard warning flashers

Location of the hazard warning flasher button

The hazard warning flasher should be used to
indicate that the vehicle has become a traffic
hazard.


To activate the flashers, press the button
in the center dash. Press the button again
to turn off the flashers.

NOTE

Regulations regarding the use of the
hazard warning flasher may vary,
depending on where you live.

The hazard warning flashers will be acti-
vated automatically if an airbag
deploys.

Turn signals

Turn signals

When changing lanes

 The driver can automatically flash the turn

signals 3 times by moving the turn signal lever
up or down to the first position and releasing it.

When turning

 Move the lever as far up or down as possi-

ble to start the turn signals. The turn signals will
be cancelled automatically by the movement of
the steering wheel, or the lever can be returned
to its initial position by hand.

NOTE

This automatic flashing sequence can
be interrupted by immediately moving
the lever in the opposite direction.

If the turn signal indicator flashes faster
than normal, check for a burned-out
turn signal bulb.

03 Your driving environment

 Lighting

03

``

*


Option/accessory, for more information, see Introduction.

89

Interior lighting, front

G021149

Light switches, front roof lighting

Drivers side front reading light, on/off

Passenger's side front reading light, on/off

Overhead courtesy lighting.

The lighting in the front part of the passenger
compartment is controlled with the buttons (1)
and (2) in the roof console.

Switch (3) has three positions for all passenger
compartment lighting:

Off – right side depressed, automatic light-
ing off.

Neutral position.

On – left side depressed, passenger com-
partment lighting on.

Interior lighting, rear

G021150

Rear reading lights

The lights are switched on or off by pressing
each respective button.

Courtesy lights/door step lighting*

The courtesy lights/door step lighting switch
on/off automatically when one of the front
doors is opened/closed.

Glove compartment lighting

The glove compartment lighting switches on/
off automatically when the lid is opened/
closed.

Overhead courtesy lighting

The passenger compartment lighting is
switched on and off automatically when button
(3) is in the neutral position.

The lighting comes on and remains on for
30 seconds if:

the vehicle is unlocked from the outside
with the key or remote control

the engine is switched off and the ignition
is in mode 0.

The lighting switches off when:

the engine is started

the vehicle is locked from the outside.

The lighting comes on and remains on for two
minutes if one of the doors is open.

The passenger compartment lighting can be
switched on and off manually within 30 minutes
after the vehicle has been unlocked.

If the lighting is switched on manually and the
vehicle is locked, the courtesy lighting will
switch off automatically after one minute.

Home safe lighting

When you leave your vehicle at night, you can
make use of the home safe lighting function to
illuminate the area in front of the vehicle.

1.

Remove the key from the ignition slot.

2.

Pull the direction indicator lever as far as
possible towards the steering wheel and
release it.

3.

Exit the vehicle and lock the doors.

03 Your driving environment

Lighting 

03

90

The headlights, parking lights, turn signals,
lights in the door mirrors, license plate lights,
and footwell lighting will illuminate and remain
on for 30 

1

, 60 or 90 seconds. The time interval

can be set under 

Car settings

Light

settings

Home safe lighting

. For a

description of the menu system, see
page 120.

Approach lighting

Approach lighting is activated by pressing the
approach light button on the remote key (see
the illustration on page 54).

When the function has been activated, the
parking lights, indicator lights, door mirror
lights, license plate lighting, dome lighting and
door step lighting come on.

The time interval for this lighting can be set
under 

Car settings

Light settings

Approach lighting

. For a description of the

menu system, see page 120.

1

Factory setting

03 Your driving environment

 Wipers and washers

03

``

*


Option/accessory, for more information, see Introduction.

91

Windshield wipers/washers

Windshield wipers and washers

Rain sensor* on/off

Thumb wheel sensitivity/frequency

CAUTION

Use ample washer fluid when washing
the windshield. The windshield should
be thoroughly wet when the wipers are
in operation.

Before using the wipers, ice and snow
should be removed from the wind-
shield/rear window. Be sure the wiper
blades are not frozen in place.

Windshield wipers off

Move the lever to position 0 to switch
off the windshield wipers.

Single sweep

Move the lever upward from position
0 to sweep the windshield one stroke

at a time for as long as the lever is held up.

Intermittent wiping

With the lever in this position, you can
set the wiper interval by twisting the

thumb wheel upward to increase wiper speed
or downward to decrease the speed.

Continuous wiping

The wipers operate at normal speed.

The wipers operate at high speed.

Rain sensor*

The rain sensor automatically regulates wiper
speed according to the amount of water on the
windshield. The sensitivity of the rain sensor
can be adjusted moving the thumb wheel up
(the wipers will sweep the windshield more fre-
quently) or down (the wipers will sweep the
windshield less frequently).

NOTE

The wipers will make an extra sweep each
time the thumb wheel is adjusted upward.

When the rain sensor is activated, the symbol

 will illuminate in the instrument panel.

Activating and setting the sensitivity

When activating the rain sensor, the vehicle
must be running or in ignition mode II and the
windshield wiper lever must be in position 0 or
in the single sweep position.

Activate the rain sensor by pressing the button

. The windshield wipers will make one

sweep.

Press the lever up for the wipers to make an
extra sweep. The rain sensor returns to active
mode when the stalk is released back to posi-
tion 0.

Deactivating

Deactivate the rain sensor by pressing the but-

ton 

 or press the lever down to another

wiper position.

The rain sensor is automatically deactivated
when the key is removed from the ignition slot
or five minutes after the ignition has been
switched off.

03 Your driving environment

Wipers and washers 

03

92

*


Option/accessory, for more information, see Introduction.

CAUTION

The rain sensor should be deactivated when
washing the car in an automatic car wash,
etc. If the rain sensor function is left on, the
wipers will start inadvertently in the car
wash and could be damaged.

Windshield washing

Washing function

Move the lever toward the steering wheel to
start the windshield and headlight washers.
After the lever is released the wipers make sev-
eral extra sweeps.

Heated washer nozzles*

The washer nozzles are heated automatically
in cold weather to help prevent the washer fluid
from freezing.

High-pressure headlight washing*

High-pressure headlight washing consumes a
large quantity of washer fluid. To save fluid, the
headlights are washed using two alternatives:

Low/high beam headlights on. The head-
lights will be washed the first time the wind-
shield is washed. Thereafter, the head-
lights will only be washed once for every
five times the windshield is washed within
a 10-minute period.

Parking lights on. Optional Active Bend-
ing Lights will be washed once for every
five times the windshield is washed. Nor-
mal halogen headlights will not be washed.

CAUTION

Use ample washer fluid when washing the
windshield. The windshield should be thor-
oughly wet when the wipers are in opera-
tion.

NOTE

One headlight is washed at a time.

Tailgate wiper/washer

G017632

1.

Intermittent wiping

2.

Normal (continuous) wiping

Move the lever forward (see the arrow in the
illustration) to start the tailgate washer.

Tailgate wiper and reverse gear

If the windshield wipers are on and the trans-
mission is put into reverse gear, the tailgate
wiper will go into intermittent wiping function

1

.

This function is deactivated when a different
gear is selected.

1

Consult your Volvo retailer if you would like to have this function deactivated.

03 Your driving environment

 Wipers and washers

03

*


Option/accessory, for more information, see Introduction.

93

NOTE

On vehicles with the optional rain sensor,
the tailgate wiper will be activated when
reverse is selected, if the rain sensor is acti-
vated and it is raining.

If the tailgate wiper is in the normal (continuous)
wiping mode, selecting different gears will not
affect its function.

IR-reflecting windshield*

Section of the windshield where the IR-coating is
not applied

An optional factory-installed infrared (IR) coa-
ting can be applied to the windshield to help
protect the cabin from the sun's heat and the

fading effect of sunlight on upholstery, panels,
etc.

Electronic equipment such as garage door
openers, electronic toll tags and similar devi-
ces should not be placed on sections of the
windshield with the IR coating because this
could affect their function and limit their range.

For best performance, place the device on the
section of the windshield without the IR coating
(see the area marked in the illustration).

03 Your driving environment

Power windows 

03

94

*


Option/accessory, for more information, see Introduction.

Power windows

G018516

Driver's door control panel

Switch for power child safety locks* and
disengaging rear power window buttons,
see page 49

Rear window controls

Front window controls.

WARNING

Always remove the ignition key when
the vehicle is unattended.

Never leave children unattended in the
vehicle.

Make sure that the windows are com-
pletely unobstructed before they are
operated.

Operating

G018517

Operating the power windows

Manual up/down

Auto up/down.

All power windows can be operated using the
control panel in the driver's door. The control
panels in the other doors only operate the win-
dow in the respective doors.

For the power windows to function, the ignition
must be in at least mode I. When the vehicle
has been running, the power windows can be
operated for several minutes after the remote
key has been removed from the ignition slot, or
until a door has been opened.

NOTE

Movement of the windows will stop if
they are obstructed in any way.

To reduce buffeting wind noise if the
rear windows are opened, also open the
front windows slightly.

Manual up/down


Move one of the controls up/down slightly.

> The power windows move up/down as

long as the control is held in position.

Auto up/down


Move one of the controls up/down as far
as possible and release it.

> The window will open or close com-

pletely.

Resetting

If the battery has been disconnected, the auto
open function must be reset so that it will work
properly.

1.

Gently raise the front section of the button
to close the window and hold it for one
second.

2.

Release the button briefly.

3.

Raise the front section of the button again
for one second.

03 Your driving environment

 Power windows

03

*


Option/accessory, for more information, see Introduction.

95

Laminated glass*

This glass is reinforced to help pro-
vide protection against break-ins and
improved sound insulation in the
passenger compartment.

The windshield, optional monroof and other
windows have laminated glass.

03 Your driving environment

Mirrors 

03

96

*


Option/accessory, for more information, see Introduction.

Power door mirrors

G018518

Door mirror controls

Adjusting

1.

Press the L button for the left door mirror
or the R button for the right door mirror.
The light in the button comes on.

2.

Adjust the position with the joystick in the
center.

3.

Press the L or R button again. The light
should no longer be on.

WARNING

Objects seen in the mirrors may appear fur-
ther away than they actually are.

Retractable power door mirrors*

The mirrors can be retracted for parking/driving
in narrow spaces:

1.

Press down the L and R buttons at the
same time.

2.

Release them after approximately one sec-
ond. The mirrors automatically stop in the
fully retracted position.

Fold out the mirrors by pressing down the L
and R buttons at the same time. The mirrors
automatically stop in the fully extended posi-
tion.

Storing the position*

The mirror positions are stored in the key mem-
ory when the vehicle has been locked with the
remote key. When the vehicle is unlocked with
the same remote control the mirrors and the
driver's seat adopt the stored positions when
the driver's door is opened.

The function can be activated/deactivated
under 

Car key memory

Seat & mirror

positions

. For a description of the menu sys-

tem, see page 120.

Tilting the door mirror when parking*

The door mirrors can be tilted down to help
give the driver a better view along the sides of
the vehicle, for example when parallel parking.

To acitvate this function, select reverse gear
and press the L or R mirror control button to tilt
the mirror down.

The door mirror will reset to its normal position:

after 10 seconds when reverse is disen-
gaged and the car remains stopped.

immediately when reverse is disengaged
and the vehicle's forward speed exceeds
approximately 6 mph (10 km/h).

immediately if you press the correspond-
ing L or R button again.

when the engine is turned off.

when the side mirrors are folded in.

NOTE

Only one mirror can be tilted down at a time.

Automatic retraction when locking

When the vehicle is locked/unlocked with the
remote key the door mirrors are automatically
retracted/extended.

The function can be activated/deactivated
under 

Car settings

Retract mirrors when

locking

. For a description of the menu system,

see page 120.

Resetting to neutral

Mirrors that have been moved out of position
by an external force must be electrically reset

03 Your driving environment

 Mirrors

03

97

to the neutral position for electric retracting/
extending to work.

Retract the mirrors with the L and R but-
tons.

Fold them out again with the L and R but-
tons.

The mirrors are now reset in neutral position.

Home safe and approach lighting

The light on the door mirrors comes on when
approach lighting or home safe lighting is
selected, see page 89.

Rear window and door mirror
defrosters

Use the defroster to quickly remove fog and ice
from the rear window and the door mirrors.

Press the button once to start simultaneous
rear window and door mirror defrosting. The
light in the button indicates that the function is
active. Defrosting is deactivated automatically
and its duration is controlled by the outside
temperature.

The rear window is defogged/de-iced auto-
matically if the vehicle is started in an outside
temperature lower than 45 °F (7 °C).

Defrosting can be selected under 

Climate

settings

Auto. rear defroster

. Select

between 

On

 or 

Off

.

Interior rearview mirror

Auto-dim function

An integrated sensor reacts to headlights from
following traffic and automatically reduces
glare in the mirror.


Content   ..  3  4  5  6   ..