Volvo V70X, C70 (2010 year). Instruction - part 3


  Index      Volvo     Volvo V70X, C70 - instruction 2010 year in english


Search            


Content   ..  1  2  3  4   ..


Volvo V70X, C70 (2010 year). Instruction - part 3


01 Safety

Integrated booster cushion 

01

46

*


Option/accessory, for more information, see Introduction.

Integrated two-stage booster
cushion*

1

Volvo's optional integrated booster cushions
are located in the outboard seating positions.
These booster cushions have been specially
designed to help safeguard children in the rear
seat. They should be stowed (folded down into
the seat cushion) when not in use. When using
an integrated booster cushion, the child must
be secured with the vehicle's three-point seat
belt.

Use these booster cushions only with
children whose weight is between:

Stage 1: 48 – 80 lbs (22 – 36 kg)

Stage 2: 33 – 55 lbs (15 – 25 kg)

and whose height is between:

Stage 1: 45 – 55 in. (115 – 140 cm)

Stage 2: 37 – 47 in. (95 – 120 cm)

In Canada, Transport Canada's
weight recommendation is 40 – 80 lbs
(18 – 36 kg).

The booster cushions are designed to raise the
child higher, so that the shoulder strap crosses
over the child's collarbone, not over the child's
neck. If using a booster cushion does not result

in proper positioning of the shoulder strap,
then the child should be placed in a properly
secured child restraint (see page 36). The
shoulder belt must never be placed behind the
child's back or under the arm.
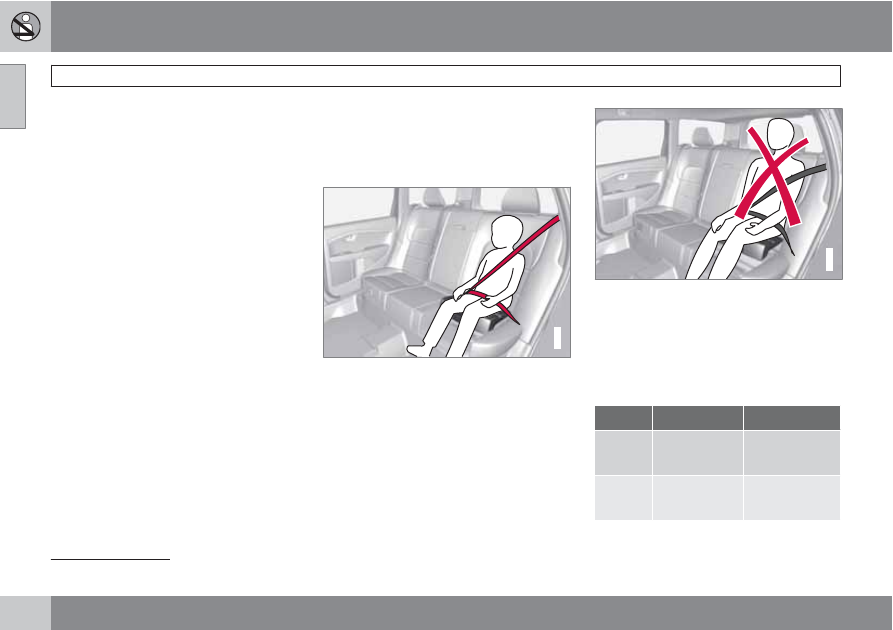
G017875

Correct seating position: child's head is below the
head restraint and the shoulder belt is across the
collarbone

G017719

Incorrect seating position: the child's head is
above the head restraint and the shoulder belt is
not across the collarbone

Before driving, check that:

The integrated two-stage booster cushion
is set in the correct position for according
to the child's height and weight (see the
table below) and is locked in position.

Stage 1

Stage 2

Weight

48 – 80 lbs

22 – 36 kg

33 – 55 lbs

15 – 25 kg

Height

45 – 55 in.

115 – 140 cm

37 – 47 in.

95 – 120 cm

1

Canada only: This cushion may be referred to as a built-in booster cushion.

01 Safety

 Integrated booster cushion

01

``

47

That the seat belt is properly positioned
and is taut.

The shoulder section of the seat belt is
across the child's collarbone, not over the
neck.

The lap section of the seat belt is across
the child's hips and not the abdomen.

Using an integrated booster cushion

Stage 1

G017697

Pull the handle (1) forward and upward (2)
to release the booster cushion.

Press the booster cushion rearward to lock
it in position.

Stage 2

G017784

With the booster cushion in the stage 1
position, press the button (see the arrow in
illustration 1).

Lift the front edge of the booster cushion
and press it rearward toward the backrest
to lock it in position.

01 Safety

Integrated booster cushion 

01

48

Stowing the two-stage integrated
booster cushion

The booster cushion can be folded down com-
pletely (stowed) from either the stage 1 or stage
2 positions.

NOTE

The booster cushion cannot be moved from
the stage 2 (upper) position to the stage 1
(lower) position. It must first be folded down
completely to the stowed position, and then
adjusted to stage 1.

Pull the handle forward to release the
booster cushion.

Press down on the center of the booster
cushion to return it to the stowed position.

NOTE

The booster cushion must be in the stowed
position before the rear seat backrests are
folded down.

CAUTION

Be sure there are no loose objects under the
booster cushion before it is stowed.

WARNING

DEATH or SERIOUS INJURY can
occur

Follow all instructions on the
booster cushion and in the vehi-
cle's owner's manual.

MAKE SURE THE BOOSTER
CUSHION IS SECURELY
LOCKED BEFORE THE CHILD IS
SEATED.

Use this booster cushion only with chil-
dren whose height and weight are
within the permitted limits shown in the
table see page 46.

In the event of a collision while the inte-
grated booster cushion was occupied,
the entire booster cushion and seat belt
must be replaced. The booster cushion
should also be replaced if it is badly
worn or damaged in any way. This work
should be performed by a trained and
qualified Volvo service technician only.

01 Safety

 Child safety locks

01

*


Option/accessory, for more information, see Introduction.

49

Child safety locks

G021077

Manual child safety locks – rear doors

The controls are located on the rear door
jambs. Use the remote control's key blade or a
screwdriver to adjust these controls.

The rear doors can only be opened from
the outside when the slot is in the horizon-
tal position.

The rear doors can be opened from the
inside when the slot is in the vertical posi-
tion.

G019300

Power child safety locks*

The power child lock function can be activated
by pressing the button shown in the inset illus-
tration above. The ignition must be in mode I
or II (see page 77).

When the function is activated, a message will
appear in the information display and the indi-
cator light in the button will light up.

With the function activated:

The rear door windows can only be opened
with the control in the driver's door.

The rear doors cannot be opened from the
inside.

NOTE

There are no manual child safety locks on
vehicles equipped with the optional power
child safety locks.

WARNING

Remember, in the event of an accident, the
rear seat passengers cannot open the doors
from the inside with the controls in position
A (manual child safety locks) or if the power
child safety lock function is activated.

02 Locks and alarm

Remote key and key blade 

02

52

Introduction

Two remote keys or optional Personal Car
Communicators (PCC) are provided with your
vehicle. They enable you to unlock the doors
and tailgate, and also function as ignition keys
to start the vehicle or operate electrical com-
ponents. The remote keys contain detachable
metal key blades for manually locking or
unlocking the driver's door and the glove com-
partment. Up to six remotes can be pro-
grammed for use on the same vehicle.

The PCCs have enhanced functionality com-
pared with the standard remote key.

NOTE

In the remainder of this chapter, all referen-
ces to the remote key also pertain to the
PCC unless otherwise stated.

WARNING

Never leave the remote key in the ignition if
children are to remain in the vehicle.

Detachable key blade

Each remote key or PCC contains a detachable
metal key blade for mechanically locking or
unlocking the driver's door and the glove com-
partment, and to enable the private locking
function. See page 57 for more information
on the key blade and page 59 for information

on the private locking function. The key blades
have a unique code, which is used if new ones
need to be produced. This code is available at
an authorized Volvo retailer.

Loss of a remote key

If a remote key is lost, the other one must be
taken with the vehicle to a trained and qualified
Volvo service technician. As an anti-theft
measure, the code of the lost remote must be
erased from the system.

The number of registered keys for the vehicle
can be found in the vehicle's menu under 

Car

settings

Car key memory

Number of

keys

. See page 120 for a description of the

menu system.

USA-5WK49264

FCC ID:KR55WK49264 + Siemens VDO
5WK49236

FCC ID:KR55WK49236, 5WK49266

FCC ID:KR55WK49266 + Siemens VDO
5WK49233

FCC ID:KR55WK49233

This device complies with part 15 of the FCC
rules and RSS-210. Operation is subject to the
following conditions: (1) This device may not
cause harmful interference, and (2) this device
must accept any interference received, includ-

ing interference that may cause undesired
operation.

Canada-5WK49264

IC:267T-5WK49264 + Siemens VDO
5WK49236

IC:267T-5WK49236, 5WK49266

IC:267T-5WK49266 + Siemens VDO
5WK49233

IC:267T-5WK49233

Operation is subject to the following condi-
tions: (1) this device may not cause interfer-
ence, and (2) this device must accept any inter-
ference, including interference that may cause
undesired operation of the device.

Key memory – door mirrors and driver's
seat

The position of the side door mirrors and
optional power driver's seat are stored in the
remote keys when the vehicle is locked. The
next time the driver's door is unlocked with the
same remote key and the door is opened within
2 minutes, the power driver's seat and side
door mirrors will automatically move to the
position that they were in when the doors were
most recently locked with the same remote
key. See page 80 for more information.

02 Locks and alarm

 Remote key and key blade

02

``

53

This feature can be activated or deactivated in
the vehicle's menu under 

Car settings

Car

key memory

Seat & mirror positions

. See

page 120 for a description of the menu sys-
tem.

See also page 60 for information regarding
vehicles with the optional keyless drive.

Confirmation when locking/unlocking
the vehicle

When the vehicle is locked with a remote key,
the turn signals will flash once to confirm that
this has been completed correctly.

When the vehicle is locked, confirmation will
only be given if all of the locks are locked after
the doors have been closed.

NOTE

If you do not receive confirmation when
locking the vehicle, check whether a door or
the tailgate is ajar, or if this feature has been
turned off in the menu.

This function can be activated or deactivated
under 

Car settings

Light settings

Lock

confirmation, light,

 or 

Car settings

Light

settings

Unlock confirmation, light

. See

page 120 for a description of the menu sys-
tem.

Immobilizer (start inhibitor)

Each of the keys supplied with your vehicle
contains a coded transponder. The code in the
key is transmitted to an antenna in the ignition
slot where it is compared to the code stored in
the start inhibitor module. The vehicle will start
only with a properly coded key. If you misplace
a key, take the other keys to a trained and
qualified Volvo service technician for reprog-
ramming as an antitheft measure. The follow-
ing messages (which may appear in the instru-
ment panel display) are related to the immobil-
izer:

Message

Meaning

Key error Reinsert
key

Remote key not rec-
ognized during start.
Try to start the vehi-
cle again.

Car key Not found

PCC with keyless
drive only. Remote
key not recognized
during start. Try to
start the vehicle
again.

Immobilizer See
manual

Remote key fault
during start. Contact
an authorized Volvo
workshop.

CAUTION

Never use force when inserting the remote
key in the ignition slot. The vehicle cannot
be started if the transponder is damaged.

USA–FCC ID: LTQWFS 125VO

This device complies with part 15 of the FCC
rules. Operation is subject to the following con-
dition: (1) This device may not cause harmful
interference, and (2) this device must accept
any interference received, including interfer-
ence that may cause undesired operation.

02 Locks and alarm

Remote key and key blade 

02

54

*


Option/accessory, for more information, see Introduction.

Canada–IC: 3659A-WFS125VO

Operation is subject to the following condi-
tions: (1) this device may not cause interfer-
ence, and (2) this device must accept any inter-
ference, including interference that may cause
undesired operation of the device.

See page 103 for information on starting the
vehicle.

Replacing the battery in the remote key

The batteries should be replaced if:

The information symbol illuminates and

Replace car key battery

 is shown in the

display and/or

if the locks do not react after several
attempts to unlock or lock the vehicle.

NOTE

The remote key's range is normally approx-
imately 60 ft (20 m) from the vehicle.

See page 57 for information on replacing the
battery.

Common functions – Remote key/
Personal Car Communicator (PCC)

G021078

Remote key

G021079

Personal Car Communicator (PCC)*

 Lock

 Unlock

 Approach lighting

 Tailgate unlock/open

 Panic alarm

 Information

Buttons on the remote

Lock – Press the Lock button on the remote
once to lock all doors and the tailgate. The turn
signals will flash once to confirm locking.

Unlock – Press the Unlock button on the
remote once to unlock the driver's door.

After a short pause, press the Unlock button a
second time within 10 seconds to unlock the
other doors and the tailgate.

This function can be changed so that all doors
unlock at the same time under 

Car settings

lock settings

Doors, unlock

. See page

120 for a description of the menu system.

Approach lighting – As you approach the
vehicle, press the button on the remote key to
light the interior lighting, parking lights, license
plate lighting and the lights in the door mir-
rors*.

These lights will switch off automatically after
30, 60 or 90 seconds, see page 120 for more
information.

02 Locks and alarm

 Remote key and key blade

02

``

55

Unlock tailgate – Press the button once to
disarm the alarm system and optional move-
ment sensor (the alarm indicator light on the
dashboard will go out), and unlock only the
tailgate.

NOTE

Pressing this button for several seconds
also opens the tailgate on models
equipped with the optional power tail-
gate.

As an added safety precaution, the
parking lights will come on automati-
cally for a short period when the tailgate
has been opened.

After closing, the tailgate will not automatically
relock. Press Lock to relock it and rearm the
alarm.

See also the section "Unlocking the tailgate
from the passenger compartment.

Panic alarm – This button can be used to
attract attention during emergency situations.

To activate the panic alarm, press and hold this
button for at least 3 seconds or press it twice
within 3 seconds. The turn signals and horn will
be activated. The panic alarm will stop auto-
matically after 2 minutes and 45 seconds.

To deactivate, wait approximately 5 seconds
and press the button again.

These lights will switch off automatically after
30, 60 or 90 seconds, see page 120 for more
information.

The Panic alarm button will not unlock the vehi-
cle.

Range

The remote key has a range of approximately
60 ft. (20 m) from the vehicle.

NOTE

Buildings or other obstacles may interfere
with the function of the remote key. The
vehicle can also be locked or unlocked with
the key blade, see page 57.

Functions – PCC

G021080

Information button

Indicator lights

Pressing the information button provides cer-
tain information about the vehicle with the help
of the indicator lights.

Using the information button

1.

Press the information button 

.

2.

All of the indicator lights will flash sequen-
tially for approximately 7 seconds to indi-
cate that the PCC is receiving information
from the vehicle. If any of the buttons are
pressed during this 7-second period,
transmission of information to the PCC will
be interrupted.

02 Locks and alarm

Remote key and key blade 

02

56

NOTE

If none of the indicator lights flash when the
information button has been pressed sev-
eral times from different places in relation to
the vehicle, contact an authorized Volvo
service technician.

The indicator lights 

 provide information

according to the illustration:

G030262

Steady green light: the vehicle is correctly
locked.

Steady yellow light: the vehicle is not
locked.

Alternatively flashing red lights (Heartbeat
sensor): if the two heartbeat sensor lights
flash, this indicates that someone may be

inside the vehicle. These lights are only
activated if the alarm has been triggered.

Steady red light: the alarm has been trig-
gered.

Range

The PCC's lock and unlock functions have a
range of approximately 60 ft. (20 m) from the
vehicle.

NOTE

The approach lighting, panic alarm, and
the functions controlled by the informa-
tion button have a range of approxi-
mately 300 ft (100 m) from the vehicle.

Buildings or other obstacles may inter-
fere with the function of the PCC.

Outside of the PCC´s range

If the PCC is more than approximately 300 ft
(100 m) from the vehicle when the information
button is pressed, no new information will be
received. The PCC most recently used to lock
or unlock the vehicle will show the vehicle's
most recently received status. The indicator
lights will not flash when the information button
is pressed while the PCC is out of range.

If more than one PCC is used to lock/unlock
the vehicle, only the one used most recently will
show the correct locking status.

NOTE

If none of the indicator lights illuminate when
the information button is pressed, this may
be because the most recent transmission
between the vehicle and the PCC was inter-
rupted or impeded by buildings or other
objects.

Heartbeat Sensor

The heartbeat sensor function 

 is a comple-

ment to the vehicle's standard alarm, and indi-
cates at a distance of up to 300 ft (100 m) that
someone may be in the vehicle. The heartbeat
sensor only functions if the alarm has been
triggered.

NOTE

The heartbeat sensor registers a person's
heartbeat in the form of vibrations in the
vehicle's chassis. For this reason, the sen-
sor's function may be impaired in areas with
high levels of noise or vibrations.

Keyless drive

Vehicles equipped with the optional Personal
Car Communicator have the keyless drive

02 Locks and alarm

 Remote key and key blade

02

``

57

function, see page 60 for detailed informa-
tion.

Detachable key blade

The key blade can be removed from the remote
key. When removed, the key blade can be used
as follows:

To lock/unlock the driver's door

To lock/unlock the glove compartment
(see page 63)

To enable/disable the private locking func-
tion (see page 59)

Unlocking the doors with the detached
key blade

Insert the key blade as far as possible in the
driver's door lock. Turn the key blade clock-
wise approximately one-quarter turn to unlock
the driver's door only.

NOTE

After unlocking the driver's door with the
key blade, opening the door will trigger the
alarm.

To disable the alarm:

Insert the remote key in the ignition slot.

Locking the doors with the detached key
blade

1.

Lock the rear doors and the front passeng-
er's door by pressing the lock button on
each door.

2.

Turn the key blade one-quarter turn coun-
ter-clockwise to lock the driver's door.

Removing the key blade

G021082

Slide the spring loaded catch to the side.

Pull the key blade straight out of the remote
key.

Reinserting the key blade in the remote
key

1.

Hold the remote key with the slot for the
key blade up.

2.

Carefully slide the key blade into its groove.

3.

Gently press the key blade in the groove
until it clicks into place.

Replacing batteries in the remote key/
PCC

The battery/batteries in the remote key/PCC
should be replaced if:

The information symbol lights up and a text
is shown in the information display.

and/or

the vehicle's locks repeatedly do not react
when a button on the remote key/PCC is
pressed within approximately 60 ft (20 m)
from the vehicle.

02 Locks and alarm

Remote key and key blade 

02

58

Battery type CR 2430, 3 V (one battery in the
remote key, two batteries in the PCC)

Opening the remote key/PCC

 Slide the spring loaded catch to the

side.

 Pull the key blade straight out of the

remote key.

 Insert a small screwdriver in the hole

behind the spring loaded catch and care-
fully pry up the cover.

NOTE

Turn the remote key with the buttons
upward so that the batteries do not fall out
when the cover is removed.

Replacing the batteries

CAUTION

When handling batteries, avoid touching
their contact surfaces as this could result in
poor battery function in the remote key.

Note the position of the battery's (+) or ()
sides.

Remote key (one battery)

1.

Use a screwdriver to pry out the old bat-
tery.

2.

Insert a new one with the (+) side down-
ward.

PCC (two batteries)

1.

Use a screwdriver to pry out the old bat-
teries.

2.

Insert the first new battery with the (+) side
upward.

3.

Insert the plastic spacer over the battery.
Insert the second new battery on top of the
plastic spacer, with the + side downward.

Re-assembling the remote key

1.

Press the remote key's cover into place.

2.

Hold the remote key with the slot for the
key blade up.

3.

Carefully slide the key blade into its groove.

4.

Gently press the key blade in the groove
until it clicks into place.

Old batteries should be properly recycled.

02 Locks and alarm

  Private locking

02

59

Tailgate compartment

G017869

Normal locking/unlocking points

G017870

Locking/unlocking points with private locking acti-
vated.

By utilizing the remote key with the key blade
removed, the private locking feature enables
you to block access to the glove compartment

and disconnect the tailgate from the central
locking system for e.g., valet parking or when
the vehicle is brought to the retailer for service.

With the private locking function activated:

The vehicle's doors can be locked or
unlocked with the remote

The engine can be started

The glove compartment cannot be
unlocked

The tailgate cannot be unlocked or opened
with the remote

The rear floor hatch cannot be opened

Activating the private locking function

G020508

Insert the key blade in the glove compart-
ment lock.

Turn the key blade180 degrees clockwise.

Remove the key blade from the lock. A
message will appear in the instrument
panel display.

Deactivating the private locking function

Turn the key blade 180 degrees counterclock-
wise in the glove compartment lock to deacti-
vate private locking.

See page 63 for information on locking the
glove compartment normally, without activat-
ing the private locking function.

02 Locks and alarm

Keyless drive 

02

60

Keyless drive (models with Personal
Car Communicator only)

Keyless locking and unlocking

Range of the keyless drive remote key–5 ft
(1.5 meters)

This system makes it possible to unlock and
lock the vehicle without having to press any
buttons on the Personal Car Communicators
(PCC). It is only necessary to have a keyless
drive remote key in your possession to operate
the central locking system.

NOTE

The buttons on the keyless drive remote key
can also be used to lock and unlock the
vehicle, see page 54 for more information.

Both of the PCCs provided with the vehicle
have the keyless function, and additional ones
can be ordered. The system can accommo-
date up to six PCCs.

The red rings in the illustration indicate the area
around the vehicle covered by the keyless drive
antennas.

Unlocking the vehicle

A keyless drive remote key must be on the
same side of the vehicle as the door to be
opened, and be within 5 feet (1.5 meters)
of the lock or the tailgate (see the shaded
areas in the illustration).

Pull a door handle to unlock and open the
door or pull the tailgate opening control.

The number of doors that are unlocked at the
same time can be set in the vehicle's menu
system, under 

Car settings

Lock settings

Keyless entry

. See page 120 for a descrip-

tion of the menu system.

NOTE

If the PCC does not function normally (weak
battery, etc.), the vehicle can be unlocked
with the detachable key blade, see
page 57.

Locking the vehicle

The doors and the tailgate can be locked by
pressing the lock button in any of the outside
door handles.

NOTE

On keyless drive vehicles, the gear selector
must be in the Park (P) position, all doors
and the tailgate must be closed and the igni-
tion must be switched off before the vehicle
can be locked.

Keyless drive remote key and driver's
seat/door mirror memory

When you leave the vehicle with a PCC in
your possession and lock any door, the
position of the driver's seat will be stored
in the seat's memory.

The next time a door is opened by a person
with the same PCC in his/her possession,
the driver's seat and door mirrors will auto-
matically move to the position that they
were in when the door was most recently
locked.

02 Locks and alarm

 Keyless drive

02

``

61

NOTE

If several people carrying PCCs approach
the vehicle at the same time, the driver's
seat and door mirrors will assume the posi-
tions they were in for the person who opens
the driver's door.

See also page 80 for information on adjusting
and storing the seat's position in the seat mem-
ory.

Keyless drive information messages

If all of the PCCs are removed from the vehicle
while the engine is running or if the ignition is
in mode II and all of the doors are closed, a
message will appear in the instrument panel
display and an audible signal will sound.

When at least one PCC has been returned to
the car, the message will be erased in the dis-
play and the audible signal will stop when:

A door has been opened and closed

The PCC has been inserted in the ignition
slot

The READ button (see page 122 for the
location of this button) has been pressed.

CAUTION

Keyless drive remote keys should never
be left in the vehicle. In the event of a
break-in, a remote found in the vehicle
could make it possible to start the
engine.

Electromagnetic fields or metal
obstructions can interfere with the key-
less drive system. Avoid placing the
remote key near cellular phones, metal-
lic objects or e.g., in a metal briefcase.

USA – FCC ID:KR55WK48952, KR55WK48964

NOTE

This device complies with part 15 of the FCC
Rules. Operation is subject to the following two
conditions: (1) This device may not cause
harmful interference, and (2) this device must
accept interference received, including inter-
ference that may cause undesired operation.

CAUTION

Changes or modifications not expressly
approved by the manufacturer could void the
user's authority to operate the equipment.

Siemens VDO

5WK48891

Tested To Comply With FCC Standards

For Automobile Use

Canada – IC:267T-5WK48952,
267T-5WK48964, 267T-5WK48891

NOTE

This device complies with RSS -210 of Industry
Canada. Operation is subject to the following
two conditions: (1) This device may not cause
harmful interference, and (2) this device must
accept interference received, including inter-
ference that may cause undesired operation.

CAUTION

Changes or modifications not expressly
approved by the manufacturer could void the
user's authority to operate the equipment.

Location of the keyless drive antennas

G021179

02 Locks and alarm

Keyless drive 

02

62

The keyless drive system has a number of
antennas located at various points in the vehi-
cle.

On the tailgate, near the wiper motor

Left rear door handle

Ceiling, above the center of the rear seat

Under the floor of the cargo area, near the
rear seat

Right rear door handle

Under the rear section of the center con-
sole

Under the front section of the center con-
sole.

WARNING

People with implanted pacemakers should
not allow the pacemaker to come closer
than 9 inches (22 cm) to any of the keyless
drive system's antennas. This is to help pre-
vent interference between the pacemaker
and the keyless drive system.

02 Locks and alarm

 Locks

02

``

63

Locking and unlocking the vehicle

From outside the vehicle

The remote key locks all of the doors and the
tailgate.

If the locks repeatedly do not react when the
unlock button is pressed, it may be necessary
to replace the batteries in the remote, see
page 54. In this case the vehicle can be
unlocked with the detachable key blade. See
page 57 for information on removing the key
blade from the remote key.

The first press on the unlock button unlocks the
driver's door and a second press unlocks the
other doors and the tailgate (see also page
54).

NOTE

The vehicle cannot be locked if a door is
open.

From inside the vehicle

The lock buttons on the door panel can be used
to lock or unlock all doors and the tailgate at
the same time.

Unlocking


Press the unlock button.

Locking


Press the lock button after the front doors
have been closed.

Each door can be locked individually with
the lock button on the respective doors.
The door must be closed first.

The door can be unlocked by pulling the
door handle once and opened by pulling
the handle again.

Automatic relocking

If the doors are unlocked, the locks will auto-
matically reengage (re-lock) and the alarm will
rearm after 2 minutes unless a door or the tail-
gate has been opened.

Automatic locking

When the vehicle starts to move, the doors and
tailgate can be locked automatically. This fea-
ture can be turned on or off under 

Car settings

Lock settings

Doors automatic lock

.

See page 120 for a description of the menu
system.

Glove compartment

G020548

The glove compartment can only be locked
and unlocked using the detachable key blade
in the remote key. See page 57 for information


Content   ..  1  2  3  4   ..