Volkswagen Golf / Golf GTI / Golf Variant. Manual - part 417


  Index      Volkswagen     Volkswagen Golf / Golf GTI / Golf Variant - service repair manual 2013 year


Search            copyright infringement  


Content   ..  415  416  417  418   ..


Volkswagen Golf / Golf GTI / Golf Variant. Manual - part 417


2.1.2

Component Locations Overview - Electric and Electronic Components,
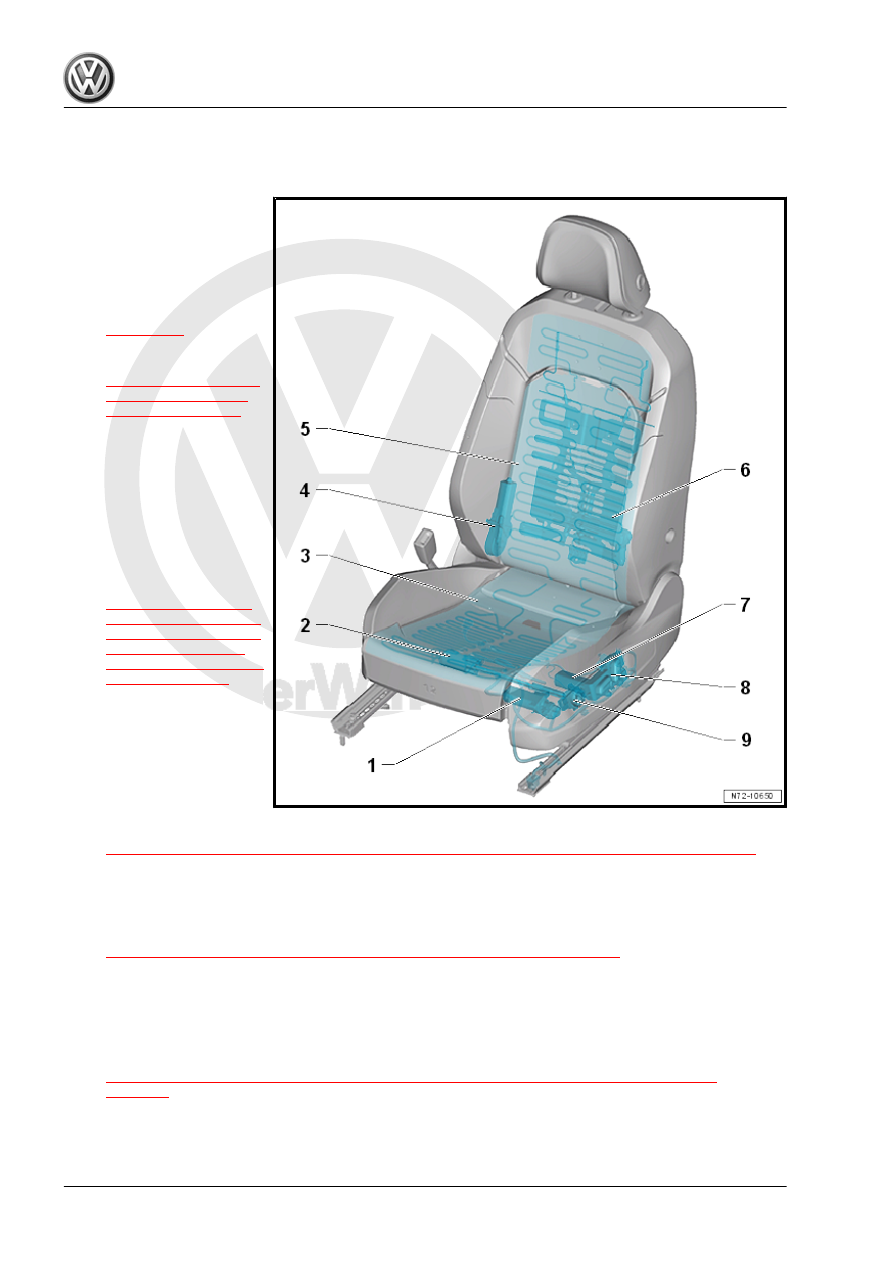
Power Seat

1 - Seat Angle Adjuster

❑ Driver Seat Angle Ad‐

justment Motor - V243-

❑ Front Passenger Seat

Angle Adjustment Motor

- V244-

❑ Overview. Refer to

⇒ page 333

 .

❑ Removing and instal‐

ling. Refer to

⇒ “2.17 Seat Angle Ad‐

juster, Removing and

Installing”, page 351

 .

2 - Seat Forward/Back Adjust‐

er

❑ Driver Seat Forward/

Back Adjustment Motor

- V28-

❑ Front Passenger Seat

Forward/Back Adjust‐

ment Motor - V31-

❑ Removing and instal‐

ling. Refer to

⇒ “2.20 Seat Pan with

Driver/Front Passenger

Seat Forward/Back Ad‐

justment Motor V28 /

V31 , Removing and In‐

stalling”, page 357

 .

3 - Seat Heating Element

❑ Driver Seat Heating El‐

ement - Z6-

❑ Front Passenger Seat

Heating Element - Z8-

❑ Depending on the vehi‐

cle equipment level

❑ Removing and installing. Refer to

⇒ “1.8 Driver/Front Passenger Seat Heating Element Z6 / Z8 , Removing and Installing”, page 414

 .

4 - Backrest Adjuster

❑ Driver Backrest Adjustment Motor - V45-
❑ Front Passenger Backrest Adjustment Motor - V46-
❑ Removing and installing. Refer to

⇒ “2.21.2 Backrest Adjuster, Removing and Installing, Power Seat”, page 358

 .

5 - Backrest Heating Element

❑ Driver Backrest Heating Element - Z7-
❑ Front Passenger Backrest Heating Element - Z9-
❑ Depending on the vehicle equipment level
❑ Removing and installing. Refer to

⇒ “1.9 Driver/Front Passenger Backrest Heating Element Z7 / Z9 , Removing and Installing”,

page 415

 .

6 - Lumbar Support

❑ Driver Seat Lumbar Support Curvature Adjustment Motor - V125-
❑ Driver Seat Lumbar Support Height Adjustment Motor - V129-

❑ Front Passenger Seat Lumbar Support Curvature Adjustment Motor - V126-
❑ Front Passenger Seat Lumbar Support Height Adjustment Motor - V130-
❑ Overview. Refer to 

⇒ page 326

 .

❑ Removing and installing. Refer to

⇒ “2.37 Lumbar Support Adjustment Motors V125 / V126 / V129 / V130 , Removing and Installing”, page

372

 .

7 - Seat Height Adjuster

❑ Driver Seat Height Adjustment Motor - V138-
❑ Front Passenger Seat Height Adjustment Motor - V246-
❑ Overview. Refer to 

⇒ page 332

 .

❑ Removing and installing. Refer to

⇒ “2.19.2 Seat Height Adjuster, Removing and Installing, Power Seat”, page 355

 .

8 - Seat Adjustment Control Head

❑ Driver Seat Adjustment Control Head - E470-
❑ Front Passenger Seat Adjustment Control Head - E471-
❑ Removing and installing. Refer to

⇒ “2.38 Driver and Front Passenger Seat Adjustment Control Head E470 / E471 , Removing and Instal‐

ling”, page 373

 .

9 - Lumbar Support Adjustment Switch

❑ Driver Seat Lumbar Support Adjustment Switch - E176-
❑ Front Passenger Seat Lumbar Support Adjustment Switch - E177-
❑ Removing and installing. Refer to

⇒ “2.36 Driver/Front Passenger Seat Lumbar Support Adjustment Switch E176 / E177 , Removing and

Installing”, page 372

 .

❑ Lumbar support, removing and installing. Refer to

⇒ “2.37 Lumbar Support Adjustment Motors V125 / V126 / V129 / V130 , Removing and Installing”, page

372

 .

2.2

Overview - Front Seat

⇒ “2.2.1 Overview - Front Seat, Except Power Seat”, page 318
⇒ “2.2.2 Overview - Front Seat, Power Seat”, page 320

2.2.1

Overview - Front Seat, Except Power Seat

Note

The illustration shows the driver side front seat. The front seat on the front passenger side is similar.

1 - Backrest

❑ Overview. Refer to

⇒ “2.4.1 Overview -

Front Backrest, Except

Power Seat”,

page 323

 .

❑ Removing and instal‐

ling. Refer to

⇒ “2.16 Front Backrest,

Removing and Instal‐

ling”, page 349

 .

❑ Backrest release/entry

assistance for vehicles

with two doors

❑ Backrest release/entry

assistance, removing

and installing. Refer to

⇒ “2.27 Connecting Ca‐

ble, Removing and In‐

stalling”, page 363

 .

2 - Headrest

❑ Removing and instal‐

ling. Refer to

⇒ “2.23 Headrest, Re‐

moving and Installing”,

page 360

 .

3 - Hand Wheel

❑ For manual backrest ad‐

justment

❑ Removing and instal‐

ling. Refer to

⇒ “2.21.1 Backrest Ad‐

juster, Removing and

Installing, Except Power

Seat”, page 358

 .

4 - Screw

❑ 40 Nm
❑ Quantity: 4

5 - Seat Height Adjuster

❑ Overview. Refer to 

⇒ page 331

 .

❑ Removing and installing. Refer to

⇒ “2.19.1 Seat Height Adjuster, Removing and Installing, Except Power Seat”, page 353

 .

❑ Seat Height Adjustment Handle, Removing and installing. Refer to

⇒ “2.18 Seat Height Adjustment Handle, Removing and Installing”, page 352

 .

6 - Sill-Side Seat Trim Panel

❑ Removing and installing. Refer to

⇒ “2.14.1 Door Sill Side Seat Trim, Removing and Installing, Except Power Seat”, page 345

 .

7 - Lumbar Support Adjustment Switch

❑ Driver Seat Lumbar Support Adjustment Switch - E176-
❑ Front Passenger Seat Lumbar Support Adjustment Switch - E177-
❑ Depending on the vehicle equipment level
❑ Removing and installing. Refer to

⇒ “2.36 Driver/Front Passenger Seat Lumbar Support Adjustment Switch E176 / E177 , Removing and

Installing”, page 372

 .

❑ Lumbar support, removing and installing. Refer to

⇒ “2.37 Lumbar Support Adjustment Motors V125 / V126 / V129 / V130 , Removing and Installing”, page

372

 .

8 - Cover

❑ For sill-side seat rail
❑ Installed in rear and front
❑ Quantity: 2
❑ Loosen and remove from the seat rail by carefully releasing the retaining tabs without breaking them

using a screwdriver.

❑ Carefully push onto the seat rail until it audibly latches

9 - Storage Compartment

❑ Depending on the vehicle equipment level
❑ Overview. Refer to 

⇒ page 334

 .

❑ Removing and installing. Refer to 

⇒ “2.35 Storage Compartment, Removing and Installing”, page 371

 .

10 - Seat Forward/Back Adjustment Handle

❑ Remove by hand or separate from the handle mount using a rubber or plastic mallet.
❑ Hit the seat forward/back adjustment handle all the way back on using a rubber mallet. Do not damage

the surface while doing so.

11 - Cover

❑ For tunnel side seat rail
❑ Quantity: 2
❑ Installed in rear and front
❑ Loosen and remove from the seat rail by carefully releasing the retaining tabs without breaking them

using a screwdriver.

❑ Carefully push onto the seat rail until it audibly latches

12 - Seat Pan

❑ Overview. Refer to 

⇒ “2.5.1 Overview - Seat Pan, Except Power Seat”, page 327

 .

13 - Seat Belt Latch

❑ Removing and installing. Refer to 

⇒ “1.14 Front Seat Belt Latch, Removing and Installing”, page 120

 .

14 - Tunnel-Side Seat Trim Panel

❑ Removing and installing. Refer to

⇒ “2.13 Tunnel-Side Seat Trim, Removing and Installing”, page 344

 .


Content   ..  415  416  417  418   ..