Volkswagen Golf / Golf GTI / Golf Variant. Manual - part 351


  Index      Volkswagen     Volkswagen Golf / Golf GTI / Golf Variant - service repair manual 2013 year


Search            copyright infringement  


Content   ..  349  350  351  352   ..


Volkswagen Golf / Golf GTI / Golf Variant. Manual - part 351


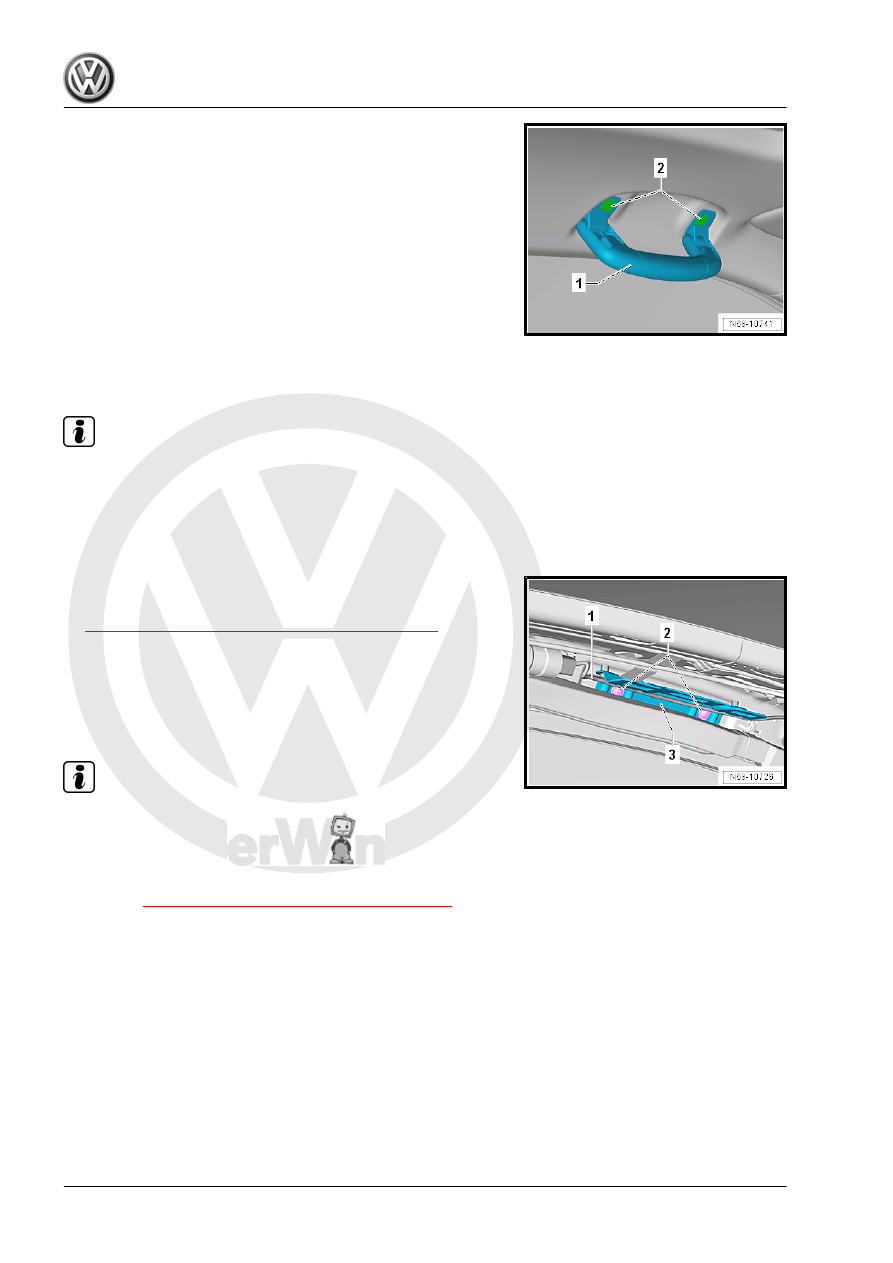
– Fold up the roof grab handle -1-. As a result, the caps -2- en‐

gage audibly into the locking position.

– Fold the roof grab handle down and check if both caps are

completely engaged in the roof grab handle. This is the case

if the caps and the respective roof grab handle base form a

flat surface.

2.11

Roof Grab Handle Bracket, Removing

and Installing

Note

The removal and installation for the left front roof grab handle

bracket is described. The removal and installation of the other roof

grab handle brackets is identical.

Special tools and workshop equipment required
♦ Torque Wrench 1783 - 2-10Nm - VAG1783-
Removing
– Remove the headliner. Refer to

⇒ “7.3 Headliner, Removing and Installing”, page 299

 .

– If equipped, unclip the wiring guide -1- from the roof grab han‐

dle bracket -3-.

– Remove the screws -2- and remove the roof grab handle

bracket -3-.

Installing

Note

Check all the fasteners for damage and replace if necessary.

Install in reverse order of removal.
Tightening Specifications
♦ Refer to 

⇒ “2.3 Overview - Roof Grab Handle”, page 44

6 - Service Door

❑ Clipped in the center

console

7 - Screw

❑ 1.5 Nm
❑ Quantity: 2

8 - Shift Mechanism Cover

❑ Removing and installing. Refer to 

⇒ “3.7 Center Console Cover, Removing and Installing”, page 57

 .

9 - Screw

❑ 1.5 Nm
❑ Quantity: 2

10 - Cap

❑ Clipped in the center console

11 - Clip

❑ Clipped in the center console

12 - Center Console

❑ Removing and installing. Refer to 

⇒ “3.8 Center Console, Removing and Installing”, page 59

 .

13 - Screw

❑ 6 Nm
❑ Quantity: 2

14 - Cap

❑ Left and right
❑ Push in the center console

15 - Center Console Rear Trim

❑ Removing and installing. Refer to

⇒ “3.3 Center Console Rear Trim, Removing and Installing”, page 55

 .

16 - Screw

❑ 6 Nm
❑ Quantity: 2

17 - Bracket Behind Shifting Mechanism

❑ Clipped on the gearshift mechanism noise insulation

18 - Shifting Mechanism Noise Insulation
19 - Bracket in Front of Shifting Mechanism

❑ For the center console
❑ Removing and installing. Refer to

⇒ “3.9 Center Console Bracket, Removing and Installing”, page 61

 .

20 - Screw

❑ 1.5 Nm
❑ Quantity: 2

21 - Screw

❑ 6 Nm

22 - Bracket

❑ For the footwell center console trim panel
❑ Clipped with the heater and A/C unit

3.2

Front Ashtray, Removing and Installing

Removing
– Remove the front ashtray -1- upward from the center console

-2-.

Installing
Install in reverse order of removal.

3.3

Center Console Rear Trim, Removing

and Installing

Special tools and workshop equipment required
♦ Backrest Panel Tool - 3370-
Removing
– Move the front seats all the way forward.
– Pull the rear trim -1- at the lower end off of the center console

-2- toward the rear.

– Pull the rear trim -1- upward off of the center console -2-

-arrow- and remove it.

Installing

Note

Check all the fasteners for damage and replace if necessary.

Install in reverse order of removal.

3.4

Front Footwell Center Console Trim

Panel, Removing and Installing

Note

Removal and installation are described for the footwell center

console trim panel on the driver side. The removal and installation

for the front passenger side is identical.

Special tools and workshop equipment required
♦ Torque Wrench 1783 - 2-10Nm - VAG1783-
Removing


Content   ..  349  350  351  352   ..