Volkswagen Golf / Golf GTI / Golf Variant. Manual - part 350


  Index      Volkswagen     Volkswagen Golf / Golf GTI / Golf Variant - service repair manual 2013 year


Search            copyright infringement  


Content   ..  348  349  350  351   ..


Volkswagen Golf / Golf GTI / Golf Variant. Manual - part 350


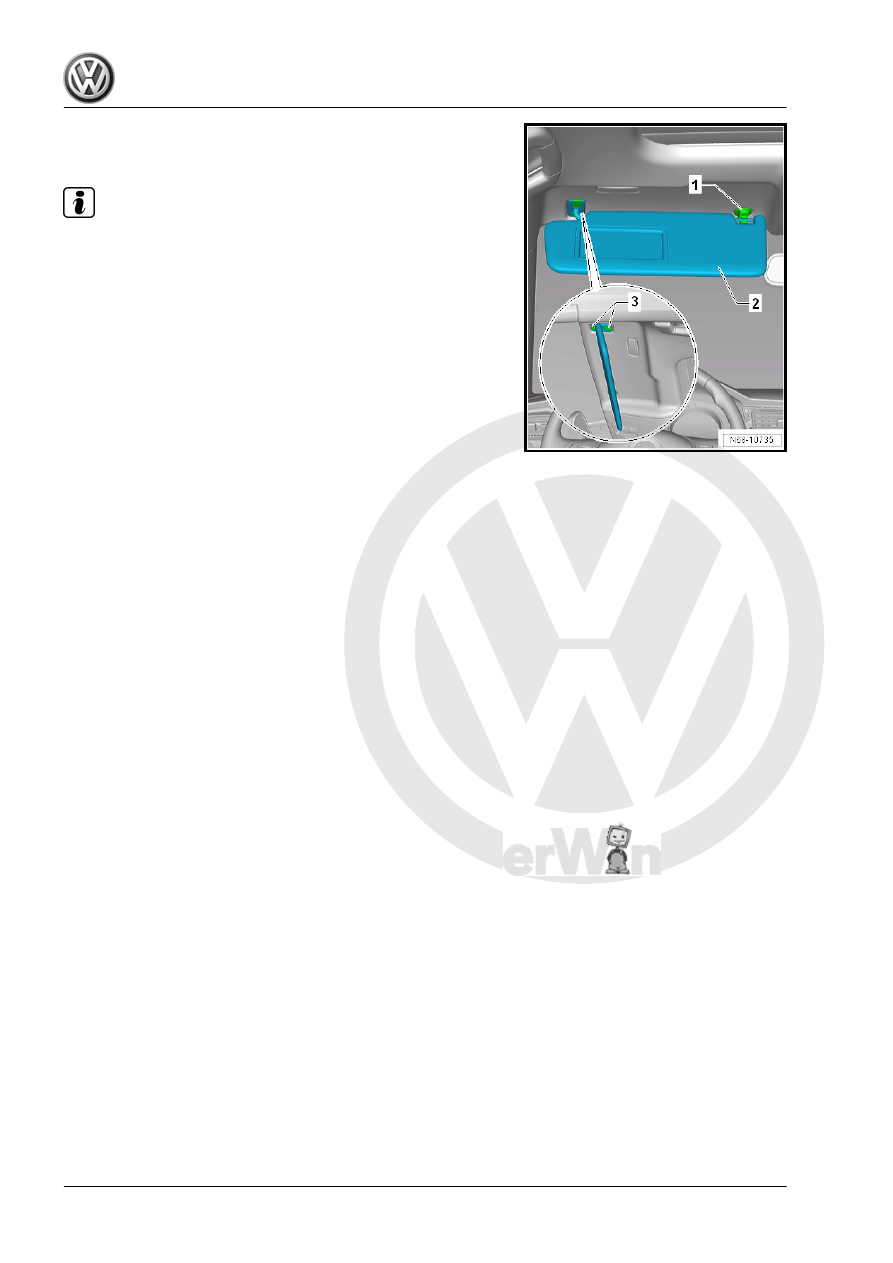
– Disengage the sun visor -2- at the center support -1-.
– Open the caps -3- in the sun visor mount.

Note

For the following steps, make sure that the Release Pliers -

VAS6427- are positioned in the center of the retainers.

– Using the Release Pliers - VAS6427- , loosen the front retainer

-3- in the sun visor mount -1- from the body mount.

– Keep tension on the sun visor to prevent the retainer from un‐

intentionally locking again.

– Using the Release Pliers - VAS6427- , loosen the rear retainer

-3- in the sun visor mount -1- from the body mount.

– Carefully remove the sun visor -2- with the sun visor mount

-3- downward from the body mount and remove the transpor‐

tation safeguard.

– Pull the wiring harness bonded to the headliner forward. Dis‐

connect the connector and remove the sun visor.

Note

If the wiring harness is torn off when »pulling forward«, lower the

headliner. To service the wiring harness, use the Wiring Harness

Repair Set - VAS1978B- .

Installing

Note

Check all the fasteners for damage and replace if necessary.

– Tape around the connector with a layer of foam tape.
– Using a finger, reach into the vanity mirror lighting opening.

Slightly pull the headliner downward.

– Slide the connector approximately 6 cm (2.3 inches) toward

the rear between the headliner and the roof crossmember.

– Engage the front retainer in the sun visor mount into the body

mount.

– Engage the rear retainer in the sun visor mount into the body

mount.

– Make sure both retainers are completely engaged in the ve‐

hicle body.

Install in reverse order of removal.

2.9

Sun Visor Center Support, Removing

and Installing

Note

The removal and installation of the driver side sun visor center

support is described. The removal and installation for the front

passenger side is identical.

Removing
– Detach the sun visor at the sun visor center mount and fold to

the side.

– Turn the sun visor center support -1- approximately 90° (

1

/4 of

a turn) counter-clockwise in direction of -arrow-.

– Remove the sun visor center support -1- downward.
Installing
Install in reverse order of removal.

2.10

Roof Grab Handle, Removing and In‐

stalling

Note

The removal and installation for the left front roof grab handle is

described. The removal and installation of the other roof grab

handles is identical.

Special tools and workshop equipment required
♦ Release Tool - T10518-
Removing
– Fold the roof grab handle -1- down and unclip the caps -2-.

– Fold the roof grab handle -1- downward and push the Release

Tool - T10518- all the way into the left retainer -arrow-.

– Using the inserted Release Tool - T10518- , carefully pull on

the roof grab handle -1- near the left retainer.

– Unclip the right retainer as described.
– The retainers -2- of the roof grab handle -1- are thus loosened

from the mounts in the roof grab handle bracket.

– Remove the roof grab handle from the mounts.

– Place the two caps in the roof grab handle, but do not lock in

place.

Installing

Note

Check all the fasteners for damage and replace if necessary.

• Roof grab handle -2- folded down during the assembly.
• Both caps -1- inserted in the roof grab handle -2-, but not

locked in place.

– Press the folded down roof grab handle -1- into the appropriate

installation opening in the vehicle roof using both retainers

-2-.


Content   ..  348  349  350  351   ..