Volkswagen Golf / Golf GTI / Golf Variant. Manual - part 349


  Index      Volkswagen     Volkswagen Golf / Golf GTI / Golf Variant - service repair manual 2013 year


Search            copyright infringement  


Content   ..  347  348  349  350   ..


Volkswagen Golf / Golf GTI / Golf Variant. Manual - part 349


2.3

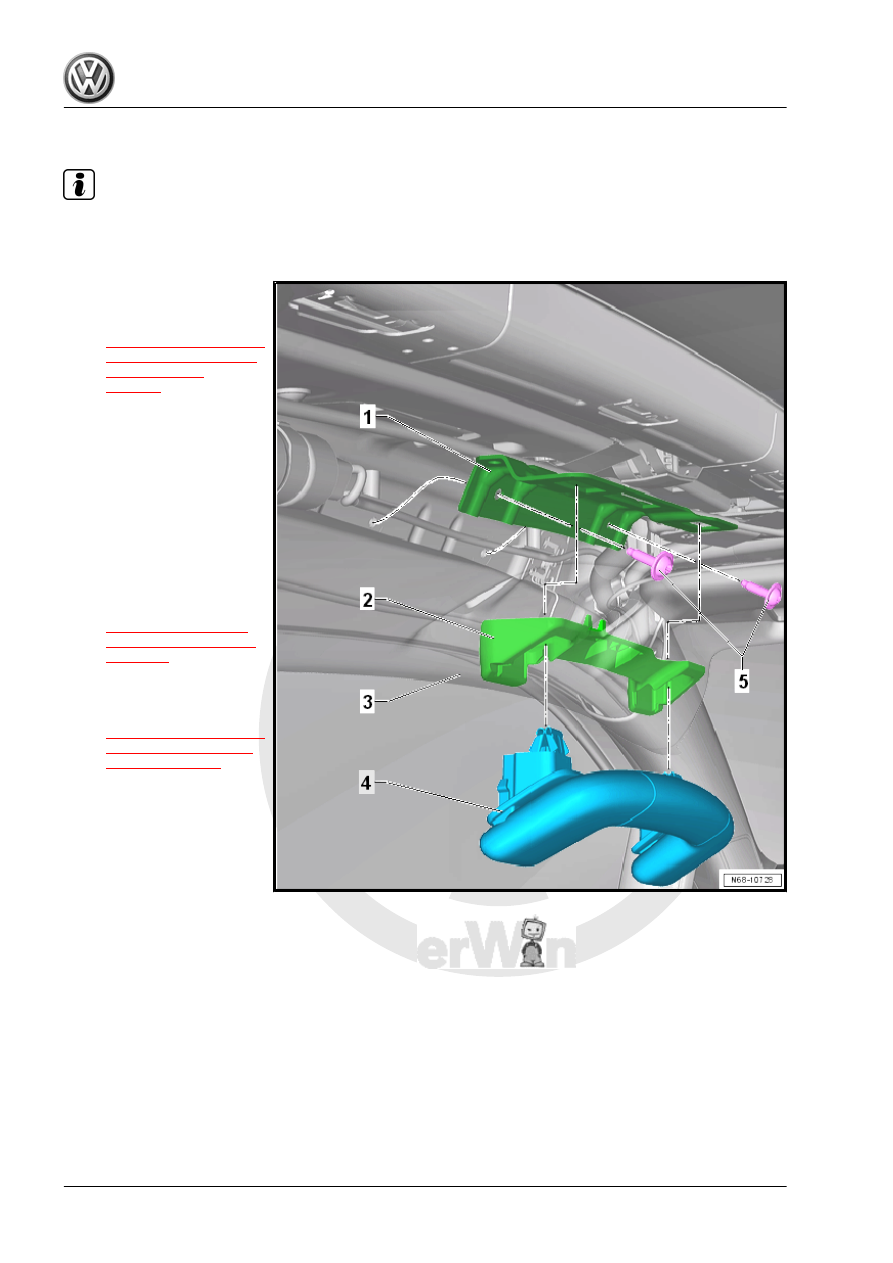
Overview - Roof Grab Handle

Note

The overview illustration shows the left front roof grab handle. The illustration for the remaining roof grab handles

is identical.

1 - Roof Grab Handle Bracket

❑ Removing and instal‐

ling. Refer to

⇒ “2.11 Roof Grab Han‐

dle Bracket, Removing

and Installing”,

page 52

 .

2 - Spacer

❑ Clipped to the roof grab

handle

❑ Before reinstalling, en‐

sure the correct installa‐

tion position, and cor‐

rect if necessary.

❑ Removing the spacer is

not permitted

3 - Headliner

❑ Removing and instal‐

ling. Refer to

⇒ “7.3 Headliner, Re‐

moving and Installing”,

page 299

 .

4 - Roof Grab Handle

❑ Removing and instal‐

ling. Refer to

⇒ “2.10 Roof Grab Han‐

dle, Removing and In‐

stalling”, page 50

 .

5 - Screw

❑ 4.5 Nm
❑ Quantity: 2

2.4

Screen Separator, Removing and Instal‐

ling

Removing
– Fold both rear seat backrests forward.

– Remove the screen separator -1- to the right from out of the

mounts -2- on the right 2/3 of the rear seat backrest.

Installing
– Position the screen separator -1- with the guides into the

mounts -2- on the right 2/3 of the rear seat backrest.

– Press the screen separator all the way to the left into the

mounts -2- on the right 2/3 of the rear seat backrest.

2.5

Screen Separator Mount, Removing

and Installing

Removing
– Remove the screen separator. Refer to

⇒ “2.4 Screen Separator, Removing and Installing”, page 44

 .

– Remove the bolts -2-.
– Remove the insert -3- and mount -1- from the right 2/3 rear

seat backrest.

Installing
Install in reverse order of removal while paying attention to the

following:

Note

Note the installation position of the insert -1- and the mount

-2-.

Secure the mount -2- in the left threaded holes.

Insert the tab on the insert -1- into the mount opening -2-.

Remove the locking fluid from the bolt threads using a wire

brush. Then insert the bolts with locking compound. Refer to

the Parts Catalog.

Remove the locking fluid from the bolt holes, for example using

a thread tap.

Tightening Specifications
♦ Refer to 

⇒ “2.1 Overview - Screen Separator”, page 41

2.6

Screen Separator Bracket, Removing

and Installing

Removing
– Remove the luggage compartment side trim panel. Refer to

⇒ “6.12.2 Luggage Compartment Side Trim Panel, Removing

and Installing, Wagon”, page 291

 .

– Pull the seat belt webbing to the side and remove the bolts

-2-.

– Pull the screen separator bracket -1- out of the seat belt guide

-3- in direction of -arrow- and remove it.

Installing
Install in reverse order of removal.
Tightening Specifications
♦ Refer to

⇒ “1.3 Overview - Outer Rear Three-Point Seat Belt”,

page 88

2.7

Screen Separator Mount, Removing

and Installing

Special tools and workshop equipment required
♦ Trim Removal Wedge - 3409-
Removing
Screen Separator Mount without Rear Reading Lamp

Note

The removal and installation of the left rear screen separator

mount is described. The removal and installation of the other

screen separator mounts is identical.

– Remove the bolt -2-.
– Loosen the trim -1- with the screen separator mount from the

headliner at the bottom using the Trim Removal Wedge -

3409- in direction of -arrow A-.

– Then slightly guide the trim -1- with the screen separator

mount downward out of the headliner in direction of

-arrow B-.

– Then guide the screen separator mount with the trim upward

out of the headliner and remove it.

Note

For vehicles with a sunroof, the retaining tabs are turned 180° and

attached to the rear trim -1-. The removing and installing proce‐

dure for these screen separator mounts is identical.

Screen Separator Mount with Rear Reading Lamp

Note

The removal and installation of the left screen separator mount is

described. Removing and installing the right screen separator

mount is identical.

– Remove the Left Rear Reading Lamp - W11- . Refer to ⇒ 

Electrical Equipment; Rep. Gr.  96 ; Controls; Rear Interior

Lamp/Reading Lamp, Removing and Installing .

– Remove the bolt -2-.
– Release the retaining tabs -3- on the trim -1- and loosen the

trim from the headliner using the Trim Removal Wedge - 3409-

in direction of -arrow A-.

– Then guide the trim -1- with the screen separator mount for‐

ward out of the headliner in direction of -arrow B- and remove

it.

Installing
Install in reverse order of removal while paying attention to the

following:

Note

Make sure that the guide tab -arrow- on the screen separator

bracket is resting properly in the opening for the screen separator

mount -1-.

Tightening Specifications
♦ Refer to 

⇒ “2.1 Overview - Screen Separator”, page 41

2.8

Sun Visor, Removing and Installing

Note

The removal and installation of the driver side sun visor is descri‐

bed. The removal and installation for the front passenger side is

identical.

Special tools and workshop equipment required
♦ Release Pliers - VAS6427-
Removing
– Pivot the sun visor forward.
– Using a flat-head screwdriver, carefully pry out the vanity mir‐

ror lighting -1- at the opening -arrow-.

– Disconnect the connector.


Content   ..  347  348  349  350   ..