Volkswagen Golf / Golf GTI / Golf Variant. Manual - part 352


  Index      Volkswagen     Volkswagen Golf / Golf GTI / Golf Variant - service repair manual 2013 year


Search            copyright infringement  


Content   ..  350  351  352  353   ..


Volkswagen Golf / Golf GTI / Golf Variant. Manual - part 352


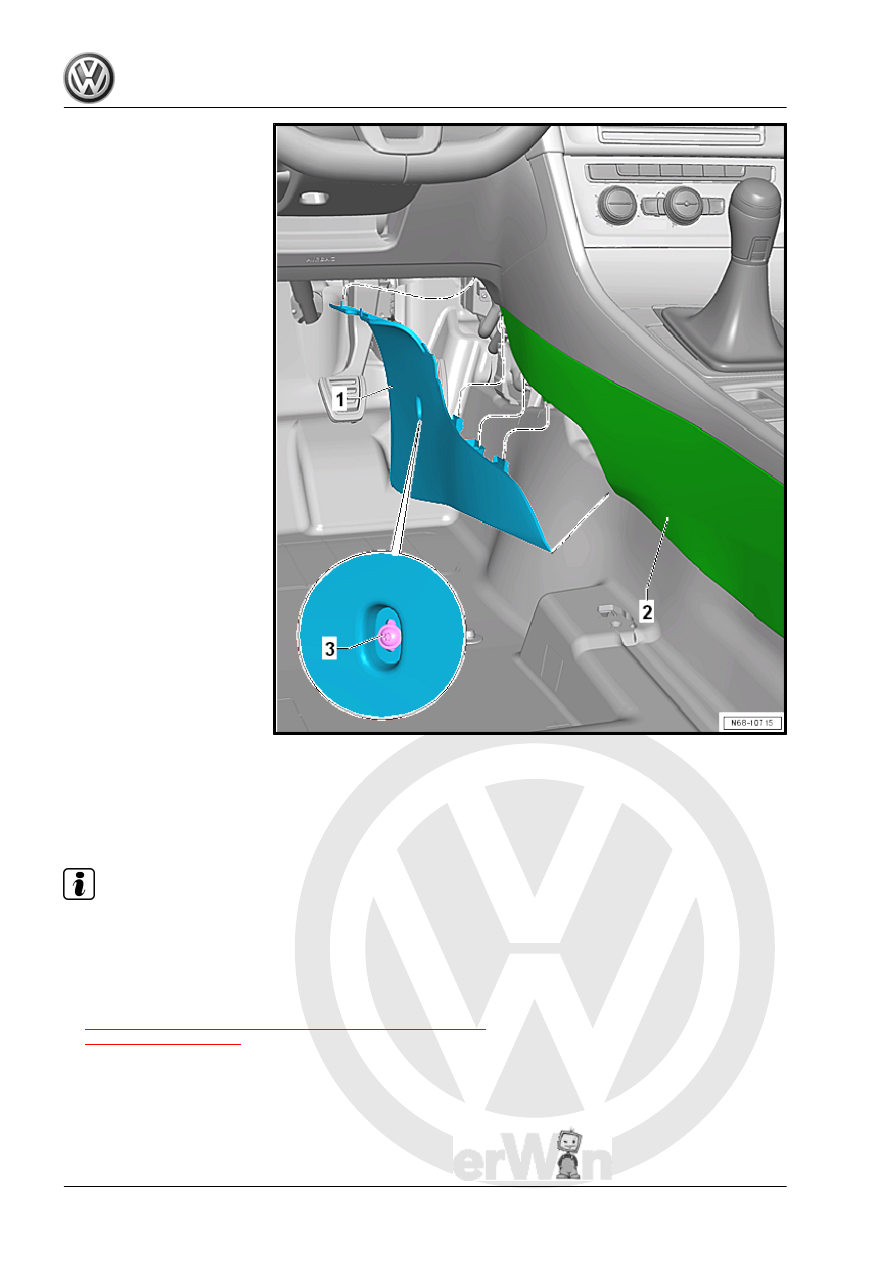
– Remove the bolt -3-.
– Pull the footwell center console trim panel -1- downward off of

the mounts for the center console -2- and remove.

Installing

Note

Check all the fasteners for damage and replace if necessary.

Install in reverse order of removal.
Tightening Specifications
♦ Refer to

⇒ “3.4 Front Footwell Center Console Trim Panel, Removing

and Installing”, page 55

3.5

Display and Control Unit Trim, Remov‐

ing and Installing

Special tools and workshop equipment required
♦ Trim Removal Wedge - 3409-

Removing
– Loosen but do not remove the center instrument panel panel

trim in the lower area using -3409- .

– Unclip the display and control unit trim -1- from the display and

control unit -2- starting at the bottom and remove.

Installing

Note

Check all the fasteners for damage and replace if necessary.

Install in reverse order of removal.

3.6

Front Center Console Storage Compart‐

ment, Removing and Installing

Removing
– Remove the display and control head trim. Refer to

⇒ “3.5 Display and Control Unit Trim, Removing and Instal‐

ling”, page 56

 .

– Unclip the front storage compartment -1- from the center con‐

sole -2- -arrows A-.

– Remove the front storage compartment -1- from the center

console -2- toward the rear -arrow B-.

– If equipped, disconnect the connectors from the front storage

compartment.

Installing

Note

Check all the fasteners for damage and replace if necessary.

Make sure the tab on the front storage compartment is seated

correctly in the center console hole.

Install in reverse order of removal.

Note

When installing, position the storage compartment at a slight an‐

gle in order to insert it into the rear guide. Then press the storage

compartment downward and lock in place.

3.7

Center Console Cover, Removing and

Installing

Special tools and workshop equipment required
♦ Torque Wrench 1783 - 2-10Nm - VAG1783-
Removing
– For vehicles with a Direct Shift Gearbox (DSG) transmission,

move the selector lever into “D/S”.

– Switch off the ignition.
– Carefully unclip the selector lever/shift lever boot from the

center console and fold it upward.

– Remove the front storage compartment. Refer to

⇒ “3.6 Front Center Console Storage Compartment, Remov‐

ing and Installing”, page 57

 .

– Remove the bolts -2-.
– Remove the gearshift mechanism cover -1- from the center

console in the direction of the -arrow- until the connectors are

accessible.

– Release and disconnect any existing connectors.
– Carefully remove the gearshift mechanism cover -1- over the

selector lever/gearshift lever.

Installing

Note

Check all the fasteners for damage and replace if necessary.

Install in reverse order of removal.
Tightening Specifications
♦ Refer to 

⇒ “3.1 Overview - Center Console”, page 53

3.8

Center Console, Removing and Instal‐

ling

Special tools and workshop equipment required
♦ Torque Wrench 1783 - 2-10Nm - VAG1783-
Removing
– Remove the center console rear trim. Refer to

⇒ “3.3 Center Console Rear Trim, Removing and Installing”,

page 55

 .

– Remove the gearshift mechanism cover. Refer to

⇒ “3.7 Center Console Cover, Removing and Installing”, page

57

 .

– Remove the parking brake lever trim. Refer to

⇒ “1.20 Parking Brake Lever Trim, Removing and Installing”,

page 38

 .

– Remove the left and right footwell center console trim panels.

Refer to

⇒ “3.4 Front Footwell Center Console Trim Panel, Removing

and Installing”, page 55

 .

– Remove the display and control unit. Refer to ⇒  Heating,

Ventilation and Air Conditioning; Rep. Gr.  87 ; Display and

Control Head; Display and Control Head, Removing and In‐

stalling .

– Remove the mounting bracket in front of the gearshift mech‐

anism. Refer to

⇒ “3.9 Center Console Bracket, Removing and Installing”,

page 61

 .

– Remove the bolts -1- for the center console -2-.
– If equipped, release and disconnect the connector -3- for the

12 V socket.

– Move the front seats as far forward as possible using the for‐

ward/back adjuster.

– Remove the left and right cap -1- from the center console

-3-.

– Remove the bolt -2- for the center console -3- on the left and

right sides.


Content   ..  350  351  352  353   ..