Volkswagen Golf / Golf GTI / Golf Variant. Manual - part 314


  Index      Volkswagen     Volkswagen Golf / Golf GTI / Golf Variant - service repair manual 2013 year


Search            copyright infringement  


Content   ..  312  313  314  315   ..


Volkswagen Golf / Golf GTI / Golf Variant. Manual - part 314


– Now screw an 8 mm screw (approximately 80 mm long) into

the spreader plug -4-.

Note

Do not apply excessive pressure on the plug when installing the screw into the plug. Otherwise it will fall inside

the door.

– Remove the spreader plug -3- from the window regulator guide

-2- and thereby from the door window.

– Remove the trim. Refer to

⇒ “3.7 Rear Door B-Pillar Trim, Removing and Installing”, page

415

 .

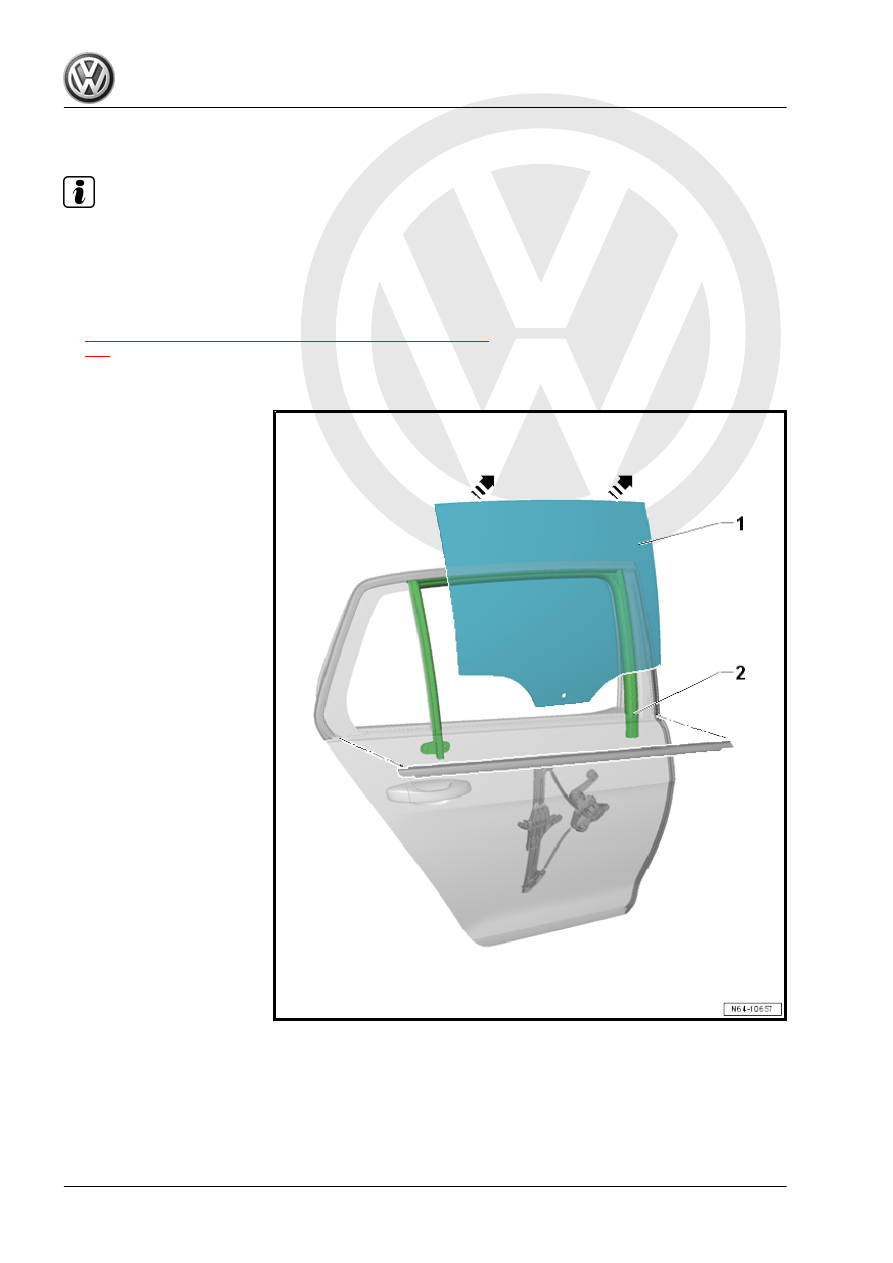
– Remove the front part of the window guide -2- from the mount.

– Remove the door window -1- upward at an angle in direction

of -arrows- with respect to the outside of the vehicle from the

window shaft.

Installing

Note

The spreader plug and expanding pin must be replaced when performing assembly work on the door window.

Check the window glass -8- for damage before installing the spreader plug -3- and the expanding pin -2-.

– Install the spreader plug -3- centered with the window glass

-8- removed.

– Press in spreader pin -2- flush into spreader plug -3-.
– Install the door window -8- in the door -arrows- and push in the

window regulator guide slot.

– Using light pressure from above engage the window glass

-8- in the window regulator -1-.

Installation is performed in reverse order of the removal.
– Check the function before installing the door inner cover -7-,

and the door trim panel.

5.6

Fixed Rear Door Window, Removing and Installing

Removing
– Remove the door trim panel. Refer to ⇒  Body Interior; Rep.

Gr.  70 ; Rear Door Trim Panels; Rear Door Trim Panel, Re‐

moving and Installing .

– Remove the outer window shaft strip. Refer to

⇒ “2.15 Outer Window Shaft Strip, Removing and Installing”,

page 186

 .

– Remove the window guide. Refer to

⇒ “2.14 Window Guide, Removing and Installing”, page 183

 .

– Lift out the caps -6-.
– Remove the screws -5-.
– Remove the seal -2- from the sheet metal flange.
– Guide the Window Release Tool - T10236- one after another

under both clips -3-.

– Push the door window -1- slightly out in direction of -arrow a-

until the clips -3- are pushed out of the door -4-.

– Remove the door window -1- with the bar -7- upward in direc‐

tion of -arrow b- from the door -4-.

Installing

– Push the door window -1- into the door in direction of

-arrow a-.

– Push the door window onto the door -5- until the clips -6- click

into place in direction of -b arrows-.

– Tighten the bolts -3-.
– Pull the seal -2- around the flange.
Installation is performed in reverse order of the removal.
Tightening Specifications


Content   ..  312  313  314  315   ..