Volkswagen Golf / Golf GTI / Golf Variant. Manual - part 309


  Index      Volkswagen     Volkswagen Golf / Golf GTI / Golf Variant - service repair manual 2013 year


Search            copyright infringement  


Content   ..  307  308  309  310   ..


Volkswagen Golf / Golf GTI / Golf Variant. Manual - part 309


3

Rear Window

⇒ “3.1 Overview - Rear Window”, page 368
⇒ “3.2 Rear Window, Removing and Installing”, page 369

3.1

Overview - Rear Window

⇒ “3.1.1 Overview - Rear Window, Sedan”, page 368
⇒ “3.1.2 Overview - Rear Window, Wagon”, page 369
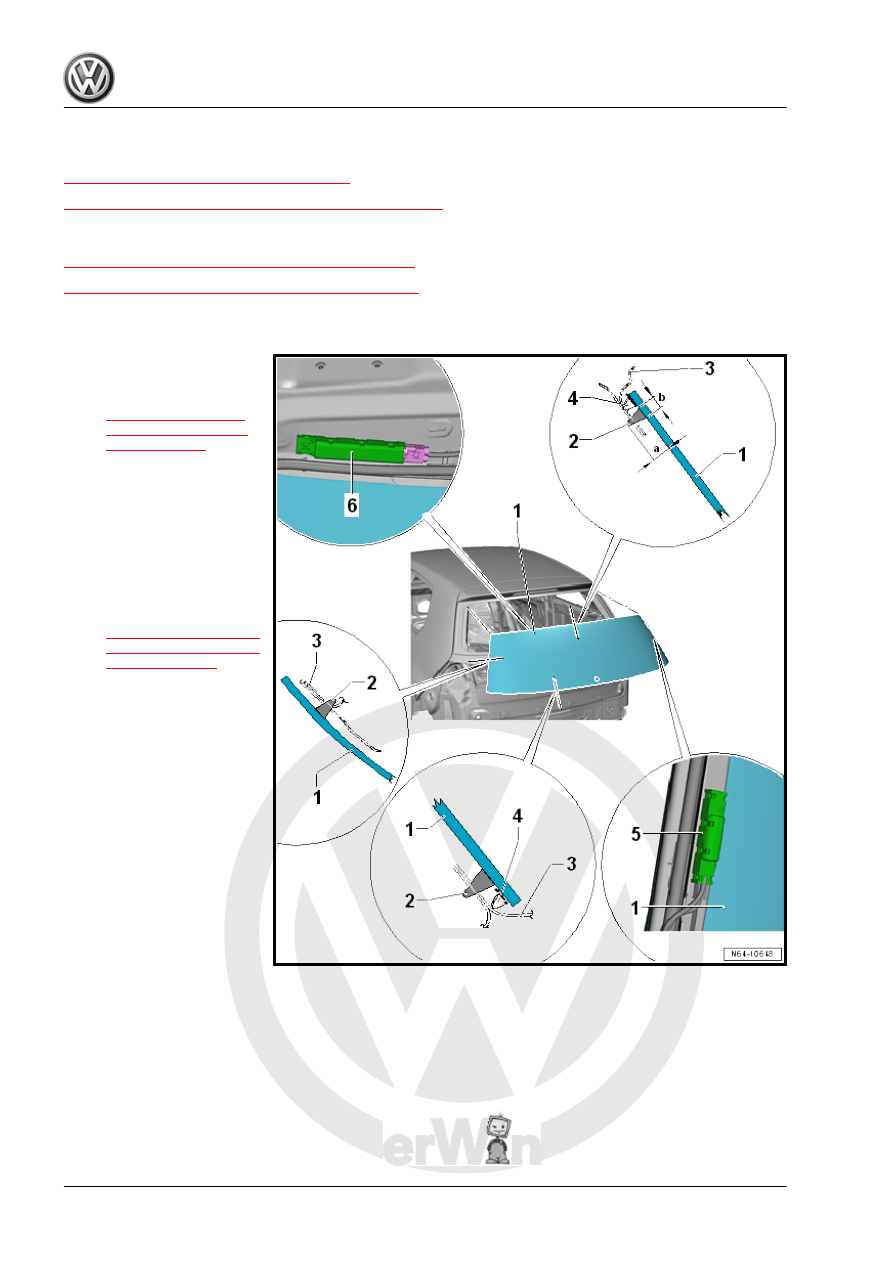
3.1.1

Overview - Rear Window, Sedan

1 - Rear Window

❑ Removing and instal‐

ling. Refer to

⇒ “3.2 Rear Window,

Removing and Instal‐

ling”, page 369

 .

2 - PUR Adhesive Sealant

❑ Bead diameter: Width

-b- = 7 mm Height -a-

Height = 10 mm (includ‐

ing the precoating, re‐

sidual material on the

window and the window

flange)

❑ Minimum curing time.

Refer to

⇒ “1.1 Minimum Curing

Times for Bonded Win‐

dows”, page 355

 .

3 - Body Flange
4 - Spacer
5 - Rear Window Defogger

Connection
6 - Antenna Connection

3.1.2

Overview - Rear Window, Wagon

1 - Rear Window

❑ Removing and instal‐

ling. Refer to

⇒ “3.2 Rear Window,

Removing and Instal‐

ling”, page 369

 .

2 - PUR Adhesive Sealant

❑ Bead diameter:

-Width b- = 7 mm

-Height a- Height = 10

mm (including the pre‐

coating, residual materi‐

al on the window and the

window flange)

❑ The width of the glass/

paint primer application

is 16 mm -dimension c-

❑ Minimum curing time.

Refer to

⇒ “1.1 Minimum Curing

Times for Bonded Win‐

dows”, page 355

 .

3 - Spacer
4 - Body Flange
5 - Rear Window Defogger

Connection
6 - Antenna Connection

3.2

Rear Window, Removing and Installing

⇒ “3.2.1 Rear Window, Removing and Installing”, page 369
⇒ “3.2.2 Damaged Rear Window, Removing”, page 372

3.2.1

Rear Window, Removing and Installing

Special tools and workshop equipment required
♦ Flush Bonded Window Kit - VAG1474B- / Cutting Tool for

Bonded Windows - VAS6452- / Window Removal Set -

VAS6888-

♦ Double Suction Lifter - VAG1344-
♦ Bonded Window Tool Kit - VAG1351-
♦ Window Removing Kit - VAG1755-
♦ Cartridge Gun - VAG1628 -
♦ Cartridge Heater - VAG1939-

Removing

Note

It is possible to remove bonded windows using Flush Bonded Window Kit - VAG1474B- , the Cutting Tool

for Bonded Windows - VAS6452- or the Window Removal Set VAS6888 - VAS6888- .

If windshield is to be used again, make sure that electrical connections for windshield heating and window

antenna are not damaged.

– Remove the windshield wiper arm. Refer to ⇒  Electrical Equip‐

ment; Rep. Gr.  92 ; Rear Window Wiper System; Windshield

Wiper Arm, Removing and Installing .

– Remove the rear lid lower trim panel. Refer to ⇒  Body Interior;

Rep. Gr.  70 ; Luggage Compartment Trim Panels; Rear Lid

Lower Trim Panel, Removing and Installing .

– Disconnect the connections for the heated rear window and

window antennas.

– Pull the cutting wire -1- with the Flush Bonded Window Kit -

Awl - VAG1474/2- through the adhesive at the position shown

in the illustration -arrow- toward the inside.

– Secure the cutting wire end with the Bonded Window Tool Kit

- Pull Handle - VAG1351/1- to prevent it from being pulled out.

– Lay the cutting wire -1- around the rear window -3- and guide

the second cord end toward the inside.

– Secure the cutting wire end on the Cutting Tool for Bonded

Windows - VAS6452- -4- or the Window Reel Device -

VAG1654A- .

Note

The protective film -4- or the Flush Bonded Window Kit - Plastic Trim - VAG1474/15- must always be used to

protect the positioned sheet metal flange.

– Carefully push the protective film -4- or the Flush Bonded Win‐

dow Kit - Plastic Trim - VAG1474/15- between the rear window

and the sheet metal flange.

– Position the Window Reel Device - VAG1654A- -5- as shown.
– Move the Window Reel Device - VAG1654A- -5- accordingly

and cut the rear window free at the top to both sides.


Content   ..  307  308  309  310   ..