Volkswagen Golf / Golf GTI / Golf Variant. Manual - part 308


  Index      Volkswagen     Volkswagen Golf / Golf GTI / Golf Variant - service repair manual 2013 year


Search            copyright infringement  


Content   ..  306  307  308  309   ..


Volkswagen Golf / Golf GTI / Golf Variant. Manual - part 308


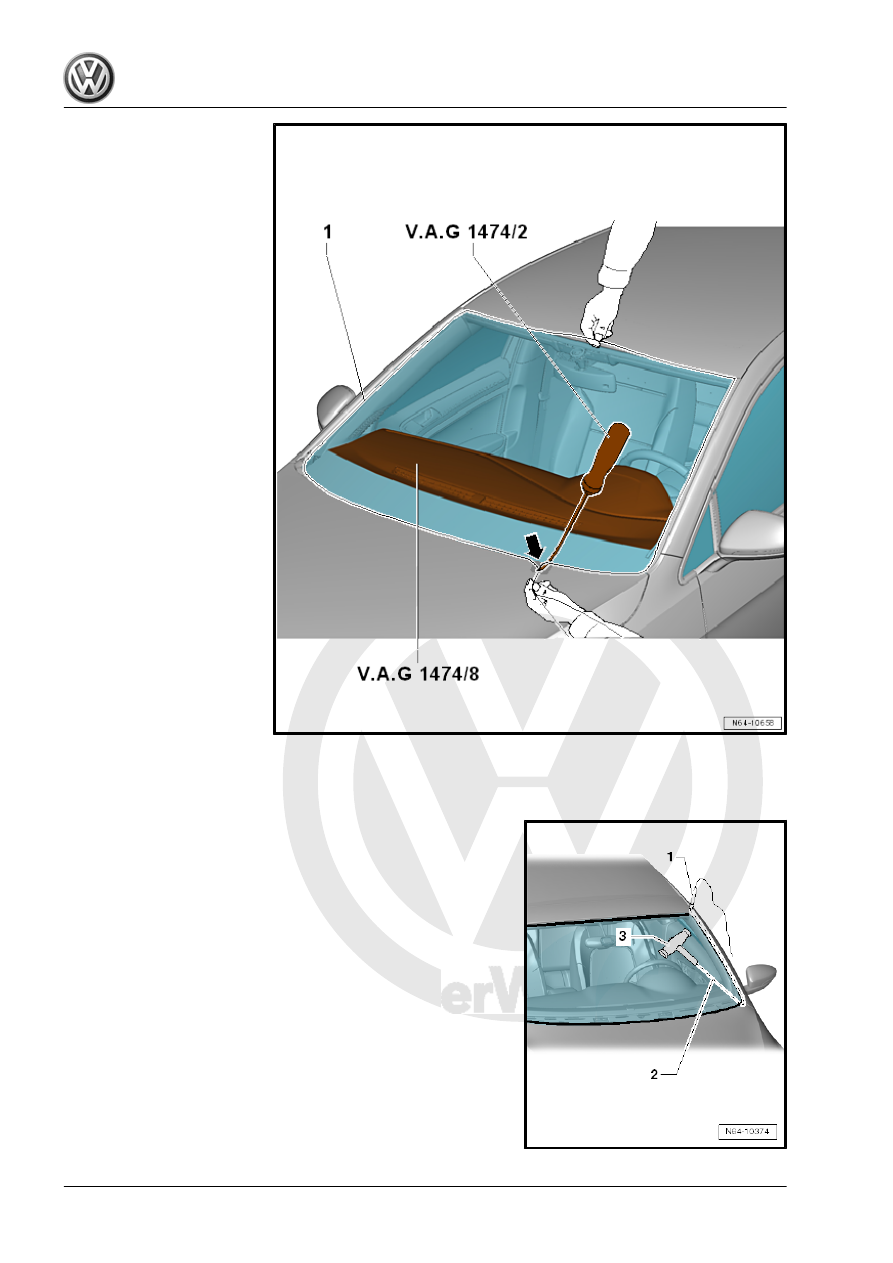
– Pull the cutting wire end -1- through the adhesive inside the

vehicle interior using the Flush Bonded Window Kit - Awl -

VAG1474/2- .

– Secure the cutting wire end from being pulled out using the

Bonded Window Tool Kit - Pull Handle - VAG1351/1- -3-.

– Insert the cutting wire -2- into the window flange using small

tube -1-.

– Lay the cutting wire around the windshield.
– Make sure that the cutting wire is inserted under windshield at

the corners.

– Secure the wire ends -4- on the Cutting Tool for Bonded Win‐

dows - VAS6452- -1-.

– Place the cutting wire around the reel device suction cups

-arrow-.

– While cutting free, press the cutting wire against the wind‐

shield using a plastic wedge -2- in order to have clearance on

the window glass flange and the instrument panel.

– Position the Cutting Tool for Bonded Windows - VAS6452- in

the lower corners of the windshield.

– Move the left Cutting Tool for Bonded Windows - VAS6452-

from “position I” through “position III” in sequence and cut the

windshield free.

– Move the right Cutting Tool for Bonded Windows - VAS6452-

from “position IV” through “position VI” in sequence and cut

the windshield free.

– Using two Double Suction Lifters - VAG1344- , lift the wind‐

shield from the vehicle.

Installing
– Prepare the undamaged window for glazing. Refer to

⇒ “1.4 Undamaged Window Glass, Preparing for Installation”,

page 357

 .

– Prepare the new window glass for glazing. Refer to

⇒ “1.5 New Window Glass, Preparing for Installation”,

page 357

 .

– Prepare the body flange for glazing. Refer to

⇒ “1.6 Body Flange, Preparing for Installation”, page 359

 .

– Installation instructions. Refer to

⇒ “1.3 Installation Instructions for Bonded Window Glass”,

page 356

 .

– Minimum curing time. Refer to

⇒ “1.1 Minimum Curing Times for Bonded Windows”,

page 355

 .

– For vehicles with a Driver Assistance Systems Front Camera

- R242- , install the front camera and calibrate. Refer to ⇒ 

Electrical Equipment; Rep. Gr.  96 ; Driver Assistance Sys‐

tems Front Camera; Driver Assistance Systems Front Cam‐

era, Removing and Installing and ⇒  Suspension, Wheels,

Steering; Rep. Gr.  44 ; Driver Assistance Systems Front

Camera; Driver Assistance Systems Front Camera, Calibrat‐

ing .

2.2.2

Damaged Windshield, Removing

The procedure for removing a damaged windshield is identical to

removing a damaged rear window. Refer to

⇒ “3.2.2 Damaged Rear Window, Removing”, page 372

 .


Content   ..  306  307  308  309   ..