Volkswagen Golf / Golf GTI / Golf Variant. Manual - part 306


  Index      Volkswagen     Volkswagen Golf / Golf GTI / Golf Variant - service repair manual 2013 year


Search            copyright infringement  


Content   ..  304  305  306  307   ..


Volkswagen Golf / Golf GTI / Golf Variant. Manual - part 306


1.3

Installation Instructions for Bonded Win‐

dow Glass

Installation Instructions. Refer to 

⇒ page 356

Materials. Refer to 

⇒ page 356

Installation Instructions
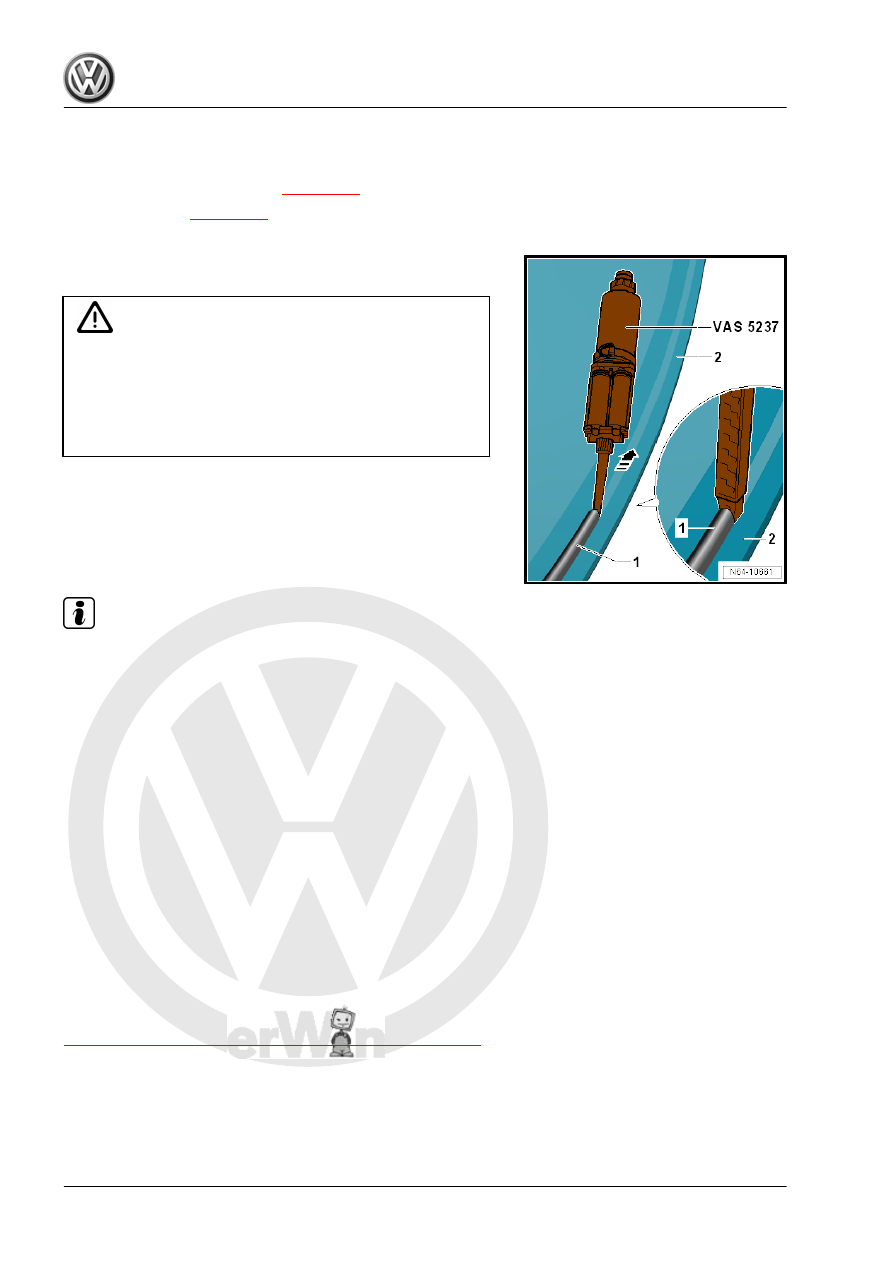
– Apply the adhesive -1- all around at a right angle to the window

glass -2-.

WARNING

The window must be installed within 10 minutes, otherwise the

window adhesive will not adhere properly.
Do not apply the adhesive bead too thickly and do not press

the window glass too firmly onto the body flange. Since the

windows no longer have a sealing lips, excess adhesive can

be seen in gap area.

♦ Using two Double Suction Lifters - VAG1344- , insert the win‐

dow glass into the window opening, center it and press it in up

to the spacer.

♦ Reapply any stickers (for example, for airbag).
Materials

Note

For material part numbers. Refer to the Parts Catalog.

♦ Two-part window adhesive 

1)


2)


3)

♦ One-part window adhesive 

1)


2)


4)


5)

♦ Activator 

1)

♦ Glass/Paint primer 

1)

♦ Cleaning solution 

1)

♦ Primer applicator 

1)

♦ Adhesive remover 

1)

♦ Cutting cord 

6)

♦ Cutting wire from the Cutting Tool for Bonded Windows -

VAS6452- 

6)

♦ Window Removal Set VAS6888 - VAS6888/1- 

6)

1)

 Follow the manufacturer processing guidelines supplied in the

packaging.

2)

 Note the minimum curing time. Refer to

⇒ “1.1 Minimum Curing Times for Bonded Windows”, page 355

 .

3)

 To apply this material, the Double Cartridge Gun - VAS5237-

must be used.

4)

 Heat according to manufacturer's instructions using the Car‐

tridge Heater - VAG1939A- .

5)

 180 ml small cartridge for sealing and/or when a 400 ml double

cartridge is not enough.

6)

 Cutting cord and cutting wires are an alternative These are only

meant to be used once.

1.4

Undamaged Window Glass, Preparing

for Installation

Adhesive Bead, Cutting

WARNING

Keep the adhesive surface free of dirt and grease.
Do not yet treat the cut adhesive surface with the activator. Do

not prime. Do not use a cleaning solution.

Note

When reusing an undamaged window, cut the remaining ad‐

hesive sealant back to 1 to 2 mm shortly before rebonding. Do

not damage the primer and ceramic coating while doing so.

The remaining material acts as a base for the new adhesive

to be applied.

WARNING

Exception: If the bonding is going to be performed longer than

one day after cutting back the adhesive bead, then the remain‐

ing material must be activated with the Activator .
Apply the activator evenly in a single stroke using the Applica‐

tor .
Do not let the activator come in contact with the paint, other‐

wise this will damage the paint.
Drying time is approximately 10 minutes

1.5

New Window Glass, Preparing for In‐

stallation

Note

The application area for the adhesive bead is not pre-coated

and not primed.

The sealing lip is a component of a new windshield.

Not all windows are pre-coated.

– Clean an area 20 mm wide around the edge of the window

using cleaning solution. Refer to the Parts Catalog.

– Then dry the window edge with a lint-free cloth.

WARNING

The ceramic coating on the glass is not a glass/paint primer.

The ceramic coating must always be primed before the apply‐

ing  the  adhesive.  Only  use  glass/paint  primer  (Refer  to  the

Parts Catalog)!

– Apply the glass/paint primer -2- evenly in one stroke using the

applicator -1-. Refer to the Parts Catalog.

♦ Drying time is approximately 10 minutes

Note

The distance of the glass/paint primer and the adhesive bead to the window outer edge changes at the bottom

the windshield.

– The dimension -b- is 6 mm to the outer edge, up to the dimen‐

sion -a- = 150 mm to the lower edge of the windshield.

– From there to the radius the distance grows to 20 mm dimen‐

sion -d-.

– At approximately half of the distance the dimension -c- should

be 10 mm.

1.6

Body Flange, Preparing for Installation

WARNING

Keep the adhesive surface free of dirt and grease.
Do not yet treat the cut adhesive surface with the activator. Do

not prime. Do not use a cleaning solution.


Content   ..  304  305  306  307   ..