Volkswagen Golf / Golf GTI / Golf Variant. Manual - part 305


  Index      Volkswagen     Volkswagen Golf / Golf GTI / Golf Variant - service repair manual 2013 year


Search            copyright infringement  


Content   ..  303  304  305  306   ..


Volkswagen Golf / Golf GTI / Golf Variant. Manual - part 305


Note

The spacer on the device must be set very precisely.

If the setting is too low, then the bracket will not be secured

correctly.

If the setting is too high, marks from the clips will accumulate

on the bumper cover.

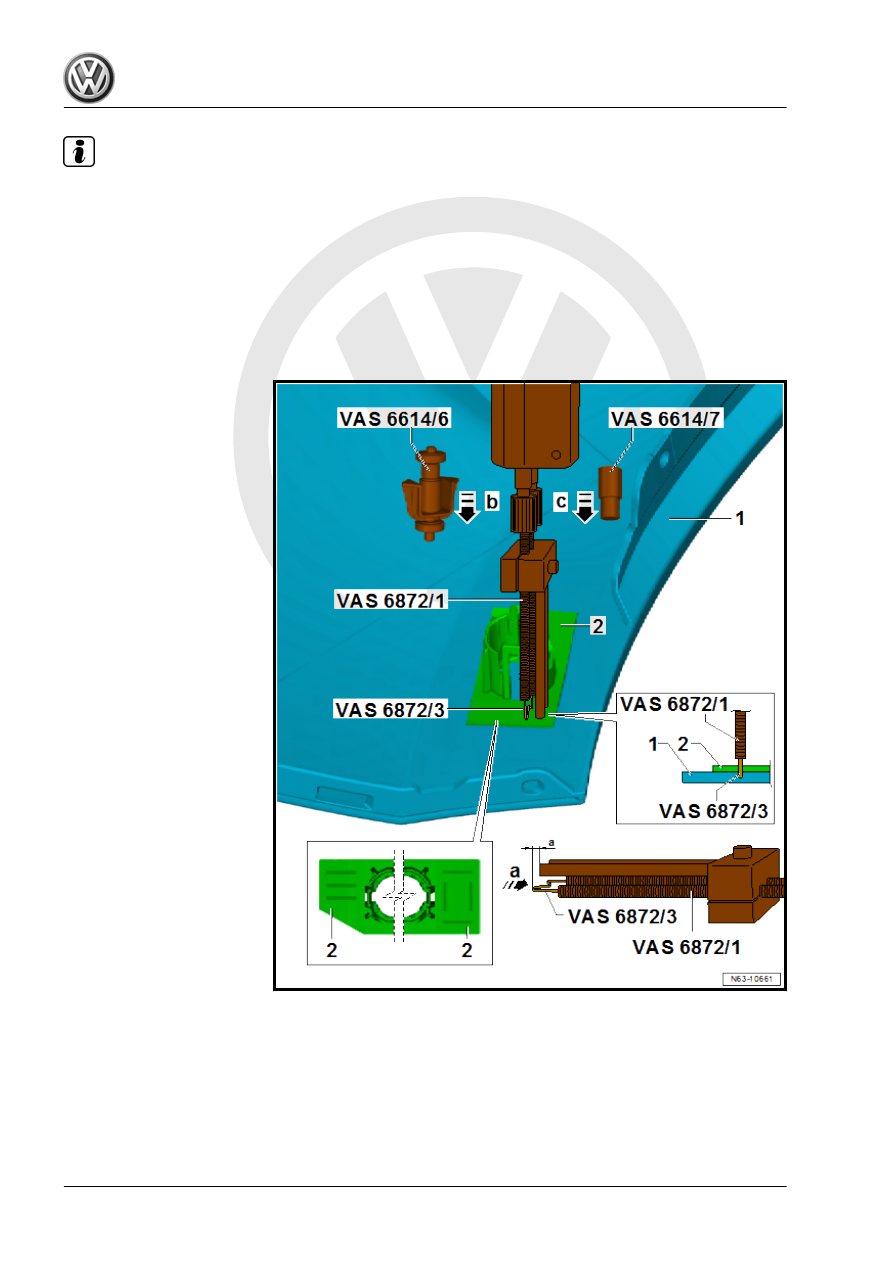
4 clips are placed on each side. Refer to the image for the

positions.

Attach 3 clips if the clips have beveled sides.

– Secure the Clip, M-shaped - VAS6872/3- in the Hand Set -

VAS6872/1- -arrow a-.

– Set the distance -a- to exactly 3 mm.
– Secure the bracket -2- using PDC Holder Tool Set - Attach‐

ment Aids - VAS6614/7- or 4 Attachment Aids for PDC holder

- VAS6614/6- to the hole -arrow b-.

– Let the clips melt down without pressure -arrow C-. Switch the

device off when the spacer is attached.

– Let it cool down for 10 seconds. Do not move the device during

this.

– Remove the device after the cool-down time position the next

clip.

– Cut off the ends of the clips after all of the clips are positioned.

3

Special Tools

Special tools and workshop equipment required
♦ Torque Wrench 1783 - 2-10Nm - VAG1783-

♦ Hand Cartridge Gun - VAS5155-

♦ PDC Holder Tool Set - VAS6614B-

♦ Thermal Clip Bonder Kit - VAS6872-
♦ Thermal Clip Bonder Kit - Hand Set - VAS6872/1-
♦ Thermal Clip Bonder Kit - Clip, M-shaped - VAS6872/3-

64 – Glass, Window Regulators

1

Repair Information

⇒ “1.1 Minimum Curing Times for Bonded Windows”, page 355
⇒ “1.2 Window Glass, Servicing”, page 355
⇒ “1.3 Installation Instructions for Bonded Window Glass”,

page 356
⇒ “1.4 Undamaged Window Glass, Preparing for Installation”,

page 357
⇒ “1.5 New Window Glass, Preparing for Installation”,

page 357
⇒ “1.6 Body Flange, Preparing for Installation”, page 359
⇒ “1.7 Adhesive, Removing”, page 360

1.1

Minimum Curing Times for Bonded Win‐

dows

WARNING

There are special requirements for replacing bonded windows.

This includes, for example, that a newly bonded windshield is

safe for vehicle operation and also in case of an accident after

a specified minimum curing time.

The minimum curing time for all windows is two hours for the two-

part window adhesive.
Minimum curing time means the time from when the window is

bonded to when the vehicle is put back into use. During this time,

the vehicle must be on a level surface at room temperature (at

least 15 °C (59 °F)).

WARNING

The vehicle is operationally ready only after the minimum cur‐

ing time has elapsed.

1.2

Window Glass, Servicing

Note

If the windshield is damaged, see if it is possible to repair the

glass before replacing.

Damaged windshields can be repaired with the Windscreen

Repair Set - VAS6092- .

The damage may not exceed a certain size and location.

Work instructions are included with every window repair kit.

Special tools and workshop equipment required
♦ Windscreen Repair Set - VAS6092-


Content   ..  303  304  305  306   ..