Volkswagen Golf / Golf GTI / Golf Variant. Manual - part 262
 

  Index      Volkswagen     Volkswagen Golf / Golf GTI / Golf Variant - service repair manual 2013 year


Search            copyright infringement  


Content   ..  260  261  262  263   ..


Volkswagen Golf / Golf GTI / Golf Variant. Manual - part 262


Note

♦

The following describes the removal and installation of the left door lock. The right side is identical.

♦

The door window must be closed for the following work procedures.

Removing

– Remove the rear door trim panel. Refer to ⇒  Body Interior;

Rep. Gr.  70 ; Rear Door Trim Panels; Rear Door Trim Panel,

Removing and Installing .

– Remove the door inner cover. Refer to

⇒ “2.8 Door Inner Cover, Removing and Installing”,

page 170

 .

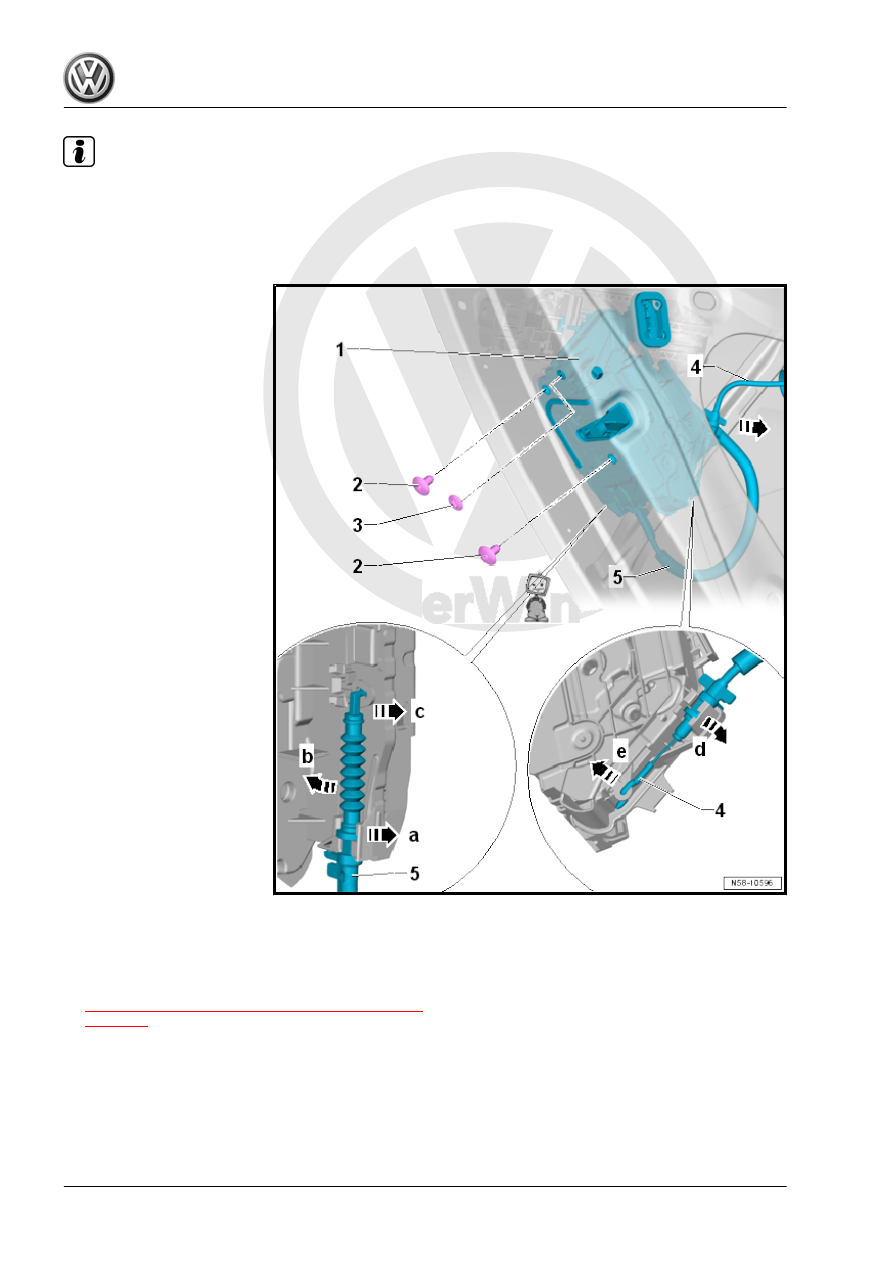
– Unlock and disconnect the connector.
– Remove the cap -3-.
– Remove the bolts -2-.
– Remove the door lock -1- from the door -arrow-.

Note

If it is necessary for the following work steps, loosen the cables.

Detach the Release Cable from the Mounting Bracket.
– Remove the cover. Refer to 

⇒ page 181

 .

– Turn the release cable -5- 90° and remove it in direction of

-arrow a-.

– Move the release cable in direction of -arrow b- until it can be

guided out of the eye in the door lock -1- in direction of

-arrow c-.

Detach the Release Cable to the Interior Door Mechanism.
– Turn the release cable -4- 90° and remove it.
– Move the release cable in direction of -arrow d- until it can be

guided out of the eye in the door lock -1- in direction of

-arrow e-.

Cover, Removing

– Release the hook -3- in direction of -arrow a-.

– Pull the cover -1- with the hook from the door lock -2- in di‐

rection of -arrow b-.

– Remove the cover -1- upward in direction of -arrow c- from the

door lock -2-.

Installing

– Install the removed cables -4 and 5- on the door lock -1-.
– Install the cover. Refer to 

⇒ page 182

 .

– Install the door lock -1- in the door -arrow-.
– Connect the connector.
– Install the bolts -2-.
– Install the cap -3-.
Installation is performed in reverse order of the removal.
Tightening Specifications
Cover, Installing

– Push the cover -1- onto the bracket -3- on the door lock -2- in

direction of -arrow a-.

– Engage the hook -4- with the door lock -2- in direction of

-arrow b-.

2.14

Window Guide, Removing and Installing

Note

♦

The following describes the removal and installation of the left window guide. Removing and installing the

right window guide is identical.

♦

Do not bend the window guide when removing it.


Content   ..  260  261  262  263   ..