Volkswagen Golf / Golf GTI / Golf Variant. Manual - part 29


  Index      Volkswagen     Volkswagen Golf / Golf GTI / Golf Variant - service repair manual 2013 year


Search            copyright infringement  


Content   ..  27  28  29  30   ..


Volkswagen Golf / Golf GTI / Golf Variant. Manual - part 29


– Slide the headlamp into the bumper cover guide.
– Uniformly adjust the headlamp gap distribution. Refer to

⇒ “1.4 Headlamp Installation Position, Correcting”,

page 105

 .

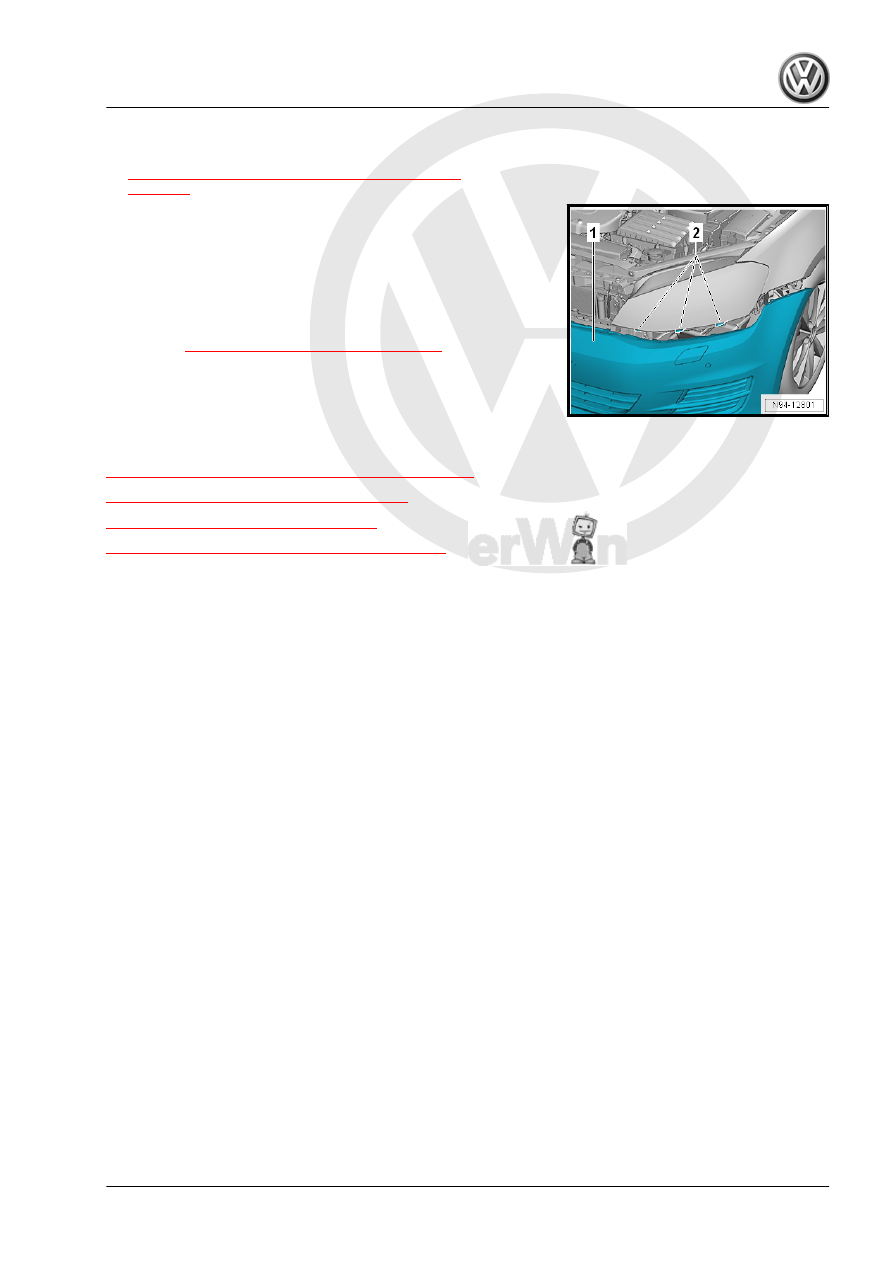
– Push on the bumper cover -1-. Pay attention that it is pushed

in the mounts -2- under the headlamp.

– Perform a function test.
– Check and correct headlamp adjustment, if necessary. Refer

to ⇒ Maintenance ; Booklet  36.1 ; Procedure Descriptions .

Tightening Specifications
♦ Refer to 

⇒ “1.1 Overview - Headlamp”, page 92

1.3

Headlamp, Adjusting

⇒ “1.3.1 Halogen Twin Headlamp, Adjusting”, page 105
⇒ “1.3.2 HID Headlamp, Adjusting”, page 105
⇒ “1.3.3 Fog Lamp, Adjusting”, page 105
⇒ “1.3.4 Auxiliary Headlamps, Adjusting”, page 105

1.3.1

Halogen Twin Headlamp, Adjusting

Adjusting the halogen twin headlamp. Refer to ⇒ Maintenance ;

Booklet  36.1 ; Procedure Descriptions .

1.3.2

HID Headlamp, Adjusting

HID headlamp, adjusting. Refer to ⇒ Maintenance ; Booklet  36.1 ;

Procedure Descriptions .

1.3.3

Fog Lamp, Adjusting

Adjusting the fog lamps. Refer to ⇒ Maintenance ; Booklet  36.1 ;

Procedure Descriptions .

1.3.4

Auxiliary Headlamps, Adjusting

Retrofitted auxiliary headlamps must be checked and adjusted

according to the guidelines used for other systems.

1.4

Headlamp Installation Position, Correcting

Procedure
– Loosen the bolts -3 through 6-.

– Uniformly adjust the gap distribution of the headlamp -1- to the

fender.

– Tighten the bolts -5 and 6-.
– Close the hood.
– Uniformly adjust the gap distribution of the banjo bolt for the

bolt -3- and the impact screw -2-.

– Open the hood.
– Tighten the bolt -3- in the bolt.
– Tighten the bolt -4-.
– Perform a function test.
– Check and correct headlamp adjustment, if necessary. Refer

to ⇒ Maintenance ; Booklet  36.1 ; Procedure Descriptions .

Tightening Specifications

1.5

Left/Right Front Turn Signal Bulb -M5- /

-M7- , Removing and Installing

⇒ “1.5.1 Left/Right Front Turn Signal Bulb M5 / M7 , Removing

and Installing, Halogen Dual Headlamp”, page 107
⇒ “1.5.2 Left/Right Front Turn Signal Bulb M5 / M7 , Removing

and Installing, HID Headlamps”, page 108

1.5.1

Left/Right Front Turn Signal Bulb -M5- /

-M7- , Removing and Installing, Halogen

Dual Headlamp

The removal and installation is described for the left side. Re‐

moving and installing on the right side is identical.
Removing
– Turn off the ignition and all electrical equipment.
– Remove the ignition key, if equipped.
– Remove the housing cover -1- from the headlamp.

– Remove the socket with bulb socket -1- from the reflector -2-

in the direction of the -arrow A-.

– Remove the Left Front Turn Signal Bulb - M5- -2- from the

socket -1-.

Installing
Install in the reverse order of removal while paying attention to

the following:

Caution

There is a risk of damaging the headlamp.

♦ Do not touch glass cone of bulb with bare fingers. Fingers

will leave traces of grease on the glass which, when the

bulb is switched on, will evaporate and cloud the glass.

♦ Use clean cloth gloves to insert the bulbs.
♦ During installation, ensure proper seating of the housing

cover. Water getting in the headlamp will cause damage.

– Perform a function test.
– Check and correct headlamp adjustment, if necessary. Refer

to ⇒ Maintenance ; Booklet  36.1 ; Procedure Descriptions .

1.5.2

Left/Right Front Turn Signal Bulb -M5- /

-M7- , Removing and Installing, HID

Headlamps

The removal and installation is described for the left side. Re‐

moving and installing on the right side is identical.
Removing
– Turn off the ignition and all electrical equipment.
– Remove the ignition key, if equipped.
If the left turn signal bulb cannot be removed as described, then

the air filter housing must be removed. Refer to ⇒  Rep. Gr.  23 ;

Air Filter; Air Filter Housing, Removing and Installing or ⇒  Rep.

Gr.  24 ; Air Filter; Air Filter Housing, Removing and Installing .
Vehicles with TDI Engine
If the right turn signal bulb cannot be removed as described, then

the fuel filter must be loosened. The fuel filter is set aside with the

wires connected. Refer to ⇒  Rep. Gr.  20 ; Fuel Filter; Fuel Filter,

Removing and Installing .
All Vehicles
– Turn the housing cover -1- in the direction of -arrow A- and

remove from the headlamp.


Content   ..  27  28  29  30   ..