Volkswagen Golf / Golf GTI / Golf Variant. Manual - part 28
 

  Index      Volkswagen     Volkswagen Golf / Golf GTI / Golf Variant - service repair manual 2013 year


Search            copyright infringement  


Content   ..  26  27  28  29   ..


Volkswagen Golf / Golf GTI / Golf Variant. Manual - part 28


1.1.5

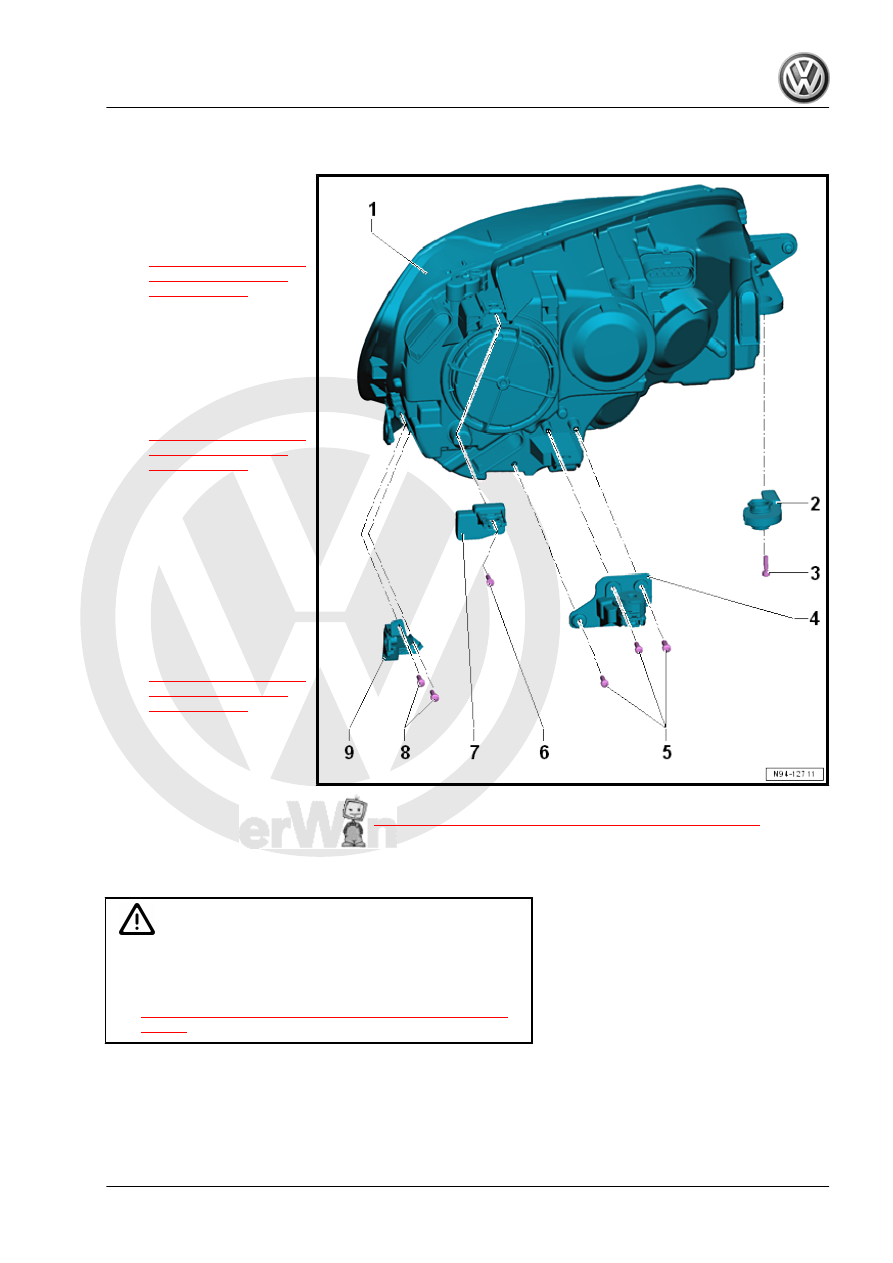
Overview - Headlamp Housing Repair Set

1 - Headlamp
2 - Inner Mounting Tab

❑ Removing and instal‐

ling. Refer to

⇒ “1.6 Headlamp Hous‐

ing Repair Kit, Instal‐

ling”, page 109

 .

3 - Screw

❑ 2 Nm
❑ Quantity: 1

4 - Rear Mounting Tab

❑ Removing and instal‐

ling. Refer to

⇒ “1.6 Headlamp Hous‐

ing Repair Kit, Instal‐

ling”, page 109

 .

5 - Screw

❑ 2 Nm
❑ Quantity: 3

6 - Screw

❑ 2 Nm
❑ Quantity: 1

7 - Upper Mounting Tab

❑ Removing and instal‐

ling. Refer to

⇒ “1.6 Headlamp Hous‐

ing Repair Kit, Instal‐

ling”, page 109

 .

8 - Screw

❑ 2 Nm
❑ Quantity: 2

9 - Outer Mounting Tab

❑ Removing and installing. Refer to 

⇒ “1.6 Headlamp Housing Repair Kit, Installing”, page 109

 .

1.2

Headlamp, Removing and Installing

WARNING

Life-threatening danger due to high voltage.

♦ Pay attention to usage and safety information for HID

headlamps. Refer to

⇒ “1.3 HID Headlamps Usage and Safety Precautions”,

page 2

 .

Note

♦

If only one headlamp was removed, then the front bumper

cover must be loosened only on the respective side.

♦

If both headlamps are removed, then the front bumper must

be completely removed. Refer to ⇒  Body Exterior; Rep. Gr. 

63 ; Front Bumper; Bumper Cover, Removing and Installing .

The removal and installation is described for the left side. Re‐

moving and installing on the right side is identical.
Removing
– Turn off the ignition and all electrical equipment.
– Remove the ignition key, if equipped.
– Remove the radiator grille. Refer to ⇒  Body Exterior; Rep. Gr. 

66 ; Radiator Grille/Front Trim; Radiator Grille, Removing and

Installing .

Caution

There is a risk of damaging the components.

♦ Carefully remove the bumper cover. Make sure that the

bumper cover is not deformed or ripped.

♦ When removing the headlamp the surface can be scratch‐

ed. Tape up those components which could be damaged.

– Remove the bolts -3- from the front wheel housing liner.

– Remove the bolts between the bumper cover and lock carrier

from below.

– If equipped, remove the bolts -1-.
– Detach the bumper cover -2- from the fender and remove in

the direction of the -arrow A-.

Note

The front bumper cover requires complete removal only when re‐

moval and installation of both headlamps are performed. Refer to

⇒  Body Exterior; Rep. Gr.  63 ; Front Bumper; Bumper Cover,

Removing and Installing .

– Tape off the marked areas -3- on the headlamp -2-.
– Tape off the bottom of the fender brace -4-.
– Tape off the marked area -5- on the bumper cover -1-.

– Remove the bolts -3, 5 and 6-.

– Loosen the bolt -4-.
– Disengage the connector and disconnect.
– Remove the headlamp -1- forward.
Installing
Install in the reverse order of removal while paying attention to

the following:


Content   ..  26  27  28  29   ..