Toyota Tundra (2015 year). Manual - part 2205


  Index      Toyota     Toyota Tundra (2015 year) - Service and Repair Manual


Search            copyright infringement  


Content   ..  2203  2204  2205  2206   ..


Toyota Tundra (2015 year). Manual - part 2205


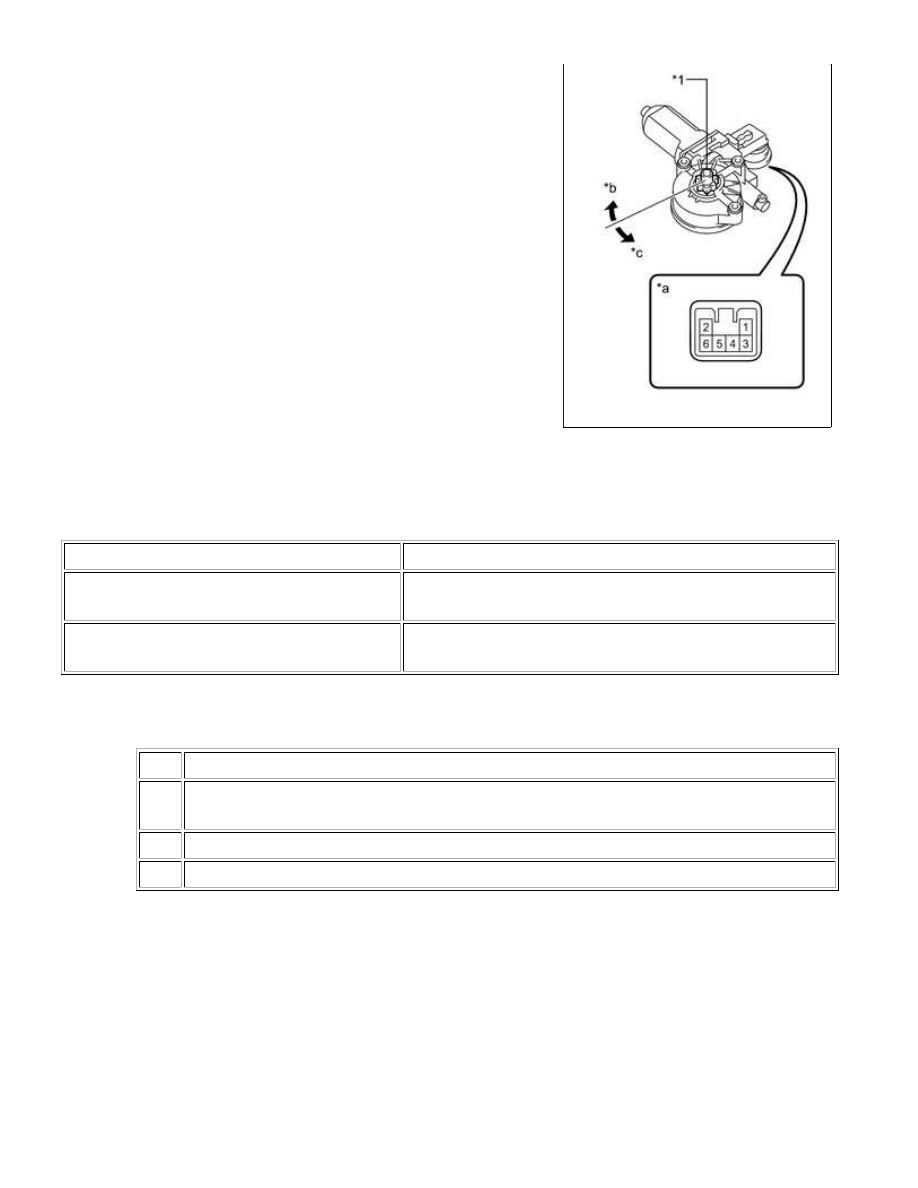
(a) Apply battery voltage to connector terminals 1 and 2.

OK:

MEASUREMENT CONDITION

SPECIFIED CONDITION

Battery positive (+) → 1
Battery negative (-) → 2

Motor gear rotates clockwise

Battery positive (+) → 2
Battery negative (-) → 1

Motor gear rotates counterclockwise

If the result is not as specified, replace the front power window regulator motor assembly RH.

Text in Illustration

*1

Motor Gear

*a

Component without harness connected

(Front Power Window Regulator Motor Assembly RH)

*b

Clockwise

*c

Counterclockwise

WINDSHIELD / WINDOWGLASS: POWER WINDOW REGULATO...

4. INSPECT FRONT POWER WINDOW REGULATOR MOTOR

ASSEMBLY RH (w/ Jam Protection Function)

NOTICE:

Do not apply positive (+) battery voltage to any terminals except
terminal 2, to avoid damaging the pulse sensor inside the motor.
Reset the power window regulator motor (initialize the pulse
sensor) after installing the power window regulator motor and
regulator assembly to the door.

(a) Apply battery voltage to the regulator motor and check the

OK:

MEASUREMENT

CONDITION

MOTOR

CONDITION

SPECIFIED CONDITION

Battery positive (+) →
Terminal 2

Battery negative (-) →
Terminal 1, 4 and 7

Auto

Motor gear rotates

clockwise

Battery positive (+) →
Terminal 2

Battery negative (-) →
Terminal 1, 4 and 10

Motor gear rotates

counterclockwise

Battery positive (+) →
Terminal 2

Battery negative (-) →
Terminal 1 and 7

Manual

Motor gear rotates

clockwise

Battery positive (+) →
Terminal 2

Battery negative (-) →
Terminal 1 and 10

Motor gear rotates

counterclockwise

If the result is not as specified, replace the front power window

regulator motor assembly RH.

Text in Illustration

*1 Motor Gear

*a

Component without harness connected

(Front Power Window Regulator Motor Assembly RH)

*b Clockwise

*c Counterclockwise

WINDSHIELD / WINDOWGLASS: POWER WINDOW REGULATO...

Last Modified: 9-16-2014

6.6 A

Doc ID: RM0000030HD00BX

Model Year: 2015

Model: Tundra

Prod Date Range: [08/2014 -           ]

Title: WINDSHIELD / WINDOWGLASS: POWER WINDOW REGULATOR MOTOR (for Front Door): INSTALLATION;

2015 MY Tundra [08/2014 -        ]

INSTALLATION

HINT:

Use the same procedure for the LH side and RH side.
The procedure listed below is for the LH side.
A bolt without a torque specification is shown in the standard bolt chart 


.

1. INSTALL FRONT POWER WINDOW REGULATOR MOTOR

ASSEMBLY LH

(b) Using a T25 ''TORX'' driver, install the motor with the 3 screws.

Torque:

5.4 N·m {55 kgf·cm, 48in·lbf}

HINT:

2. INSTALL FRONT DOOR WINDOW REGULATOR SUB-ASSEMBLY LH

(a) for Regular Cab:

Install the front door window regulator sub-assembly LH 


.

(b) for Double Cab:

Install the front door window regulator sub-assembly LH 


.

(c) for CrewMax:

Install the front door window regulator sub-assembly LH 


.

3. INSTALL FRONT DOOR GLASS SUB-ASSEMBLY LH

(a) for Regular Cab:

Install the front door glass sub-assembly LH 


.

(b) for Double Cab:

Install the front door glass sub-assembly LH 


.

(c) for CrewMax:

Install the front door glass sub-assembly LH 


.

4. INSTALL FRONT DOOR SERVICE HOLE COVER LH

(a) for Regular Cab:

Install the front door service hole cover LH 


.

(b) for Double Cab:

WINDSHIELD / WINDOWGLASS: POWER WINDOW REGULATO...

Install the front door service hole cover LH 


.

(c) for CrewMax:

Install the front door service hole cover LH 


.

5. INSTALL FRONT NO. 1 DOOR TRIM BRACKET

(a) for Regular Cab:

Install the front No. 1 door trim bracket 


.

(b) for Double Cab:

Install the front No. 1 door trim bracket 


.

(c) for CrewMax:

Install the front No. 1 door trim bracket 


.

6. INSTALL FRONT NO. 1 SPEAKER ASSEMBLY

(a) for Regular Cab:

Install the front No. 1 speaker assembly 


.

(b) for Double Cab:

Install the front No. 1 speaker assembly 


.

(c) for CrewMax:

Install the front No. 1 speaker assembly 


.

7. INSTALL FRONT DOOR TRIM BOARD SUB-ASSEMBLY LH

(a) for Regular Cab:

Install the front door trim board sub-assembly LH 


.

(b) for Double Cab:

Install the front door trim board sub-assembly LH 


.

(c) for CrewMax:

Install the front door trim board sub-assembly LH 


.

8. INSTALL FRONT LOWER DOOR FRAME BRACKET GARNISH LH

(a) for Regular Cab:

Install the front lower door frame bracket garnish LH 


.

(b) for Double Cab:

Install the front lower door frame bracket garnish LH 


.

(c) for CrewMax:

Install the front lower door frame bracket garnish LH 


.

9. INSTALL FRONT UPPER ARMREST BASE PANEL LH 

10. INSTALL FRONT DOOR INSIDE HANDLE BEZEL PLUG LH

(a) for Regular Cab:

Install the front door inside handle bezel plug LH 


.

(b) for Double Cab:

WINDSHIELD / WINDOWGLASS: POWER WINDOW REGULATO...


Content   ..  2203  2204  2205  2206   ..