Toyota Tundra (2015 year). Manual - part 1369


  Index      Toyota     Toyota Tundra (2015 year) - Service and Repair Manual


Search            copyright infringement  


Content   ..  1367  1368  1369  1370   ..


Toyota Tundra (2015 year). Manual - part 1369


Seal packing:

Toyota Genuine Seal Packing Black, Three Bond 1207B or equivalent

Seal diameter:

2.0 to 3.0 mm (0.0787 to 0.118 in.)

NOTICE:

Remove any oil from the contact surface.
Install the engine rear oil seal retainer within 3 minutes and tighten the bolts and nuts within 15 minutes
after applying seal packing.

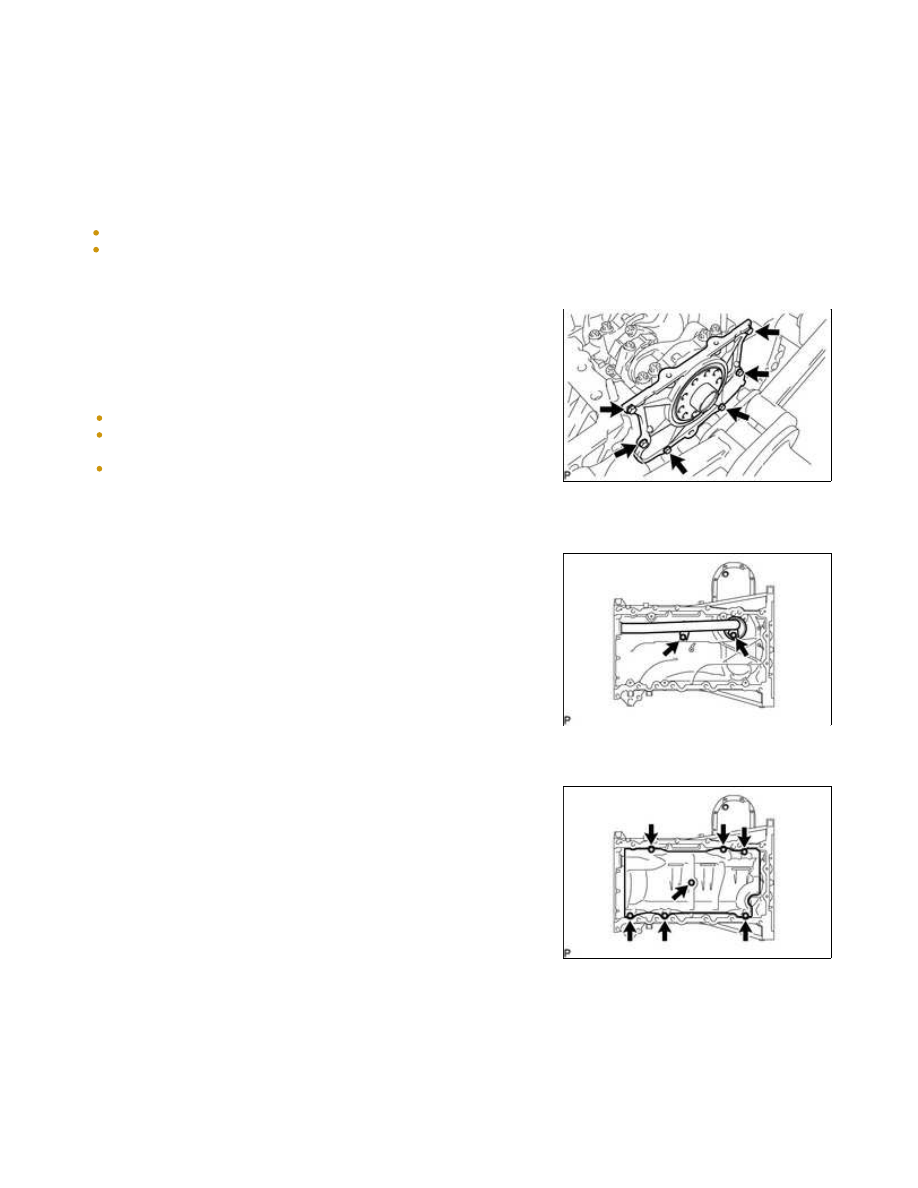
(b) Install the oil seal retainer with the 6 bolts.

Torque:

10 N·m {102 kgf·cm, 7ft·lbf}

NOTICE:

(c) Install the oil strainer with the 2 bolts.

Torque:

12 N·m {122 kgf·cm, 9ft·lbf}

NOTICE:

Make sure the O-ring is not twisted or damaged.

7. INSTALL NO. 1 OIL PAN BAFFLE PLATE

(a) Install the baffle plate with the 7 bolts.

Torque:

12 N·m {122 kgf·cm, 9ft·lbf}

8. INSTALL NO. 1 OIL PAN SUB-ASSEMBLY

1UR-FE ENGINE MECHANICAL: ENGINE UNIT: REASSEMBLY; 2...

(a) Apply seal packing in a continuous line as shown in the illustration.

Seal packing:

Toyota Genuine Seal Packing Black, Three Bond 1207B or equivalent

Standard seal diameter:

3.0 to 4.0 mm (0.118 to 0.157 in.)

NOTICE:

Remove any oil from the contact surface.
Install the oil pan within 3 minutes and tighten the bolts and nuts within 15 minutes after applying seal
packing.

(b) Install the oil pan with the 14 bolts and 2 nuts.

Torque:

for bolt A -

10 N·m {102 kgf·cm, 7ft·lbf}

for bolt B -

35 N·m {357 kgf·cm, 26ft·lbf}

for nut -

35 N·m {357 kgf·cm, 26ft·lbf}

NOTICE:

Do not start the engine for at least 2 hours after installing.

9. INSTALL NO. 2 OIL PAN SUB-ASSEMBLY

(a) Apply seal packing in a continuous line as shown in the illustration.

Seal packing:

Toyota Genuine Seal Packing Black, Three Bond 1207B or equivalent

Standard seal diameter:

3.0 to 4.0 mm (0.118 to 0.156 in.)

NOTICE:

1UR-FE ENGINE MECHANICAL: ENGINE UNIT: REASSEMBLY; 2...

Remove any oil from the contact surface.
Install the oil pan within 3 minutes and tighten the bolts and nuts within 15 minutes after applying seal
packing.

(b) Install the oil pan with the 14 bolts and 2 nuts.

Torque:

10 N·m {102 kgf·cm, 7ft·lbf}

NOTICE:

Do not start the engine for at least 2 hours after installing.

10. INSTALL NO. 1 HEAT EXCHANGER COVER

(a) Apply seal packing in a continuous line as shown in the illustration.

Seal packing:

Toyota Genuine Seal Packing 1282B, Three Bond 1282B or equivalent

Standard seal diameter:

3.0 to 4.0 mm (0.118 to 0.157 in.)

NOTICE:

Remove any oil from the contact surface.
Install the No. 1 heat exchanger cover within 3 minutes and tighten the bolts and nuts within 15 minutes
after applying seal packing.

(b) Install the heat exchanger cover with the 12 bolts and 2 nuts.

Torque:

for bolt C -

10 N·m {102 kgf·cm, 7ft·lbf}

except bolt C -

21 N·m {214 kgf·cm, 15ft·lbf}

Standard Bolt:

ITEM

LENGTH

THREAD DIAMETER

Bolt A

20 mm (0.787 in.)

8 mm (0.315 in.)

Bolt B

70 mm (2.76 in.)

8 mm (0.315 in.)

Bolt C

16 mm (0.630 in.)

6 mm (0.236 in.)

NOTICE:

1UR-FE ENGINE MECHANICAL: ENGINE UNIT: REASSEMBLY; 2...

Do not start the engine for at least 2 hours after installing.

11. INSTALL VENTILATION PIPE GASKET

(a) Using SST, evenly tap in a new ventilation pipe gasket until its

09951-00360

SST: 09950-70010

09951-07100

NOTICE:

Do not tap the gasket at an angle.
Do not tap the gasket excessively.

12. INSTALL OIL RETURN PIPE GASKET

(a) Install a new oil return pipe gasket.

13. INSTALL CYLINDER BLOCK WATER JACKET SPACER

(a) Install the 2 water jacket spacers as shown in the illustration.

NOTICE:

Face the cutouts indicated by the arrows in illustration away
from the engine.
Face the "up mark" as shown in the illustration.

14. INSTALL CYLINDER HEAD GASKET RH 

15. INSTALL CYLINDER HEAD GASKET LH 

16. INSTALL CYLINDER HEAD SUB-ASSEMBLY RH 

17. INSTALL CYLINDER HEAD SUB-ASSEMBLY LH 

18. INSTALL VALVE STEM CAP

19. INSTALL VALVE LASH ADJUSTER ASSEMBLY

(a) Inspect the valve lash adjuster 


.

(b) Install the 32 valve lash adjusters to the cylinder head.

1UR-FE ENGINE MECHANICAL: ENGINE UNIT: REASSEMBLY; 2...


Content   ..  1367  1368  1369  1370   ..