Toyota Tundra (2015 year). Manual - part 1368


  Index      Toyota     Toyota Tundra (2015 year) - Service and Repair Manual


Search            copyright infringement  


Content   ..  1366  1367  1368  1369   ..


Toyota Tundra (2015 year). Manual - part 1368


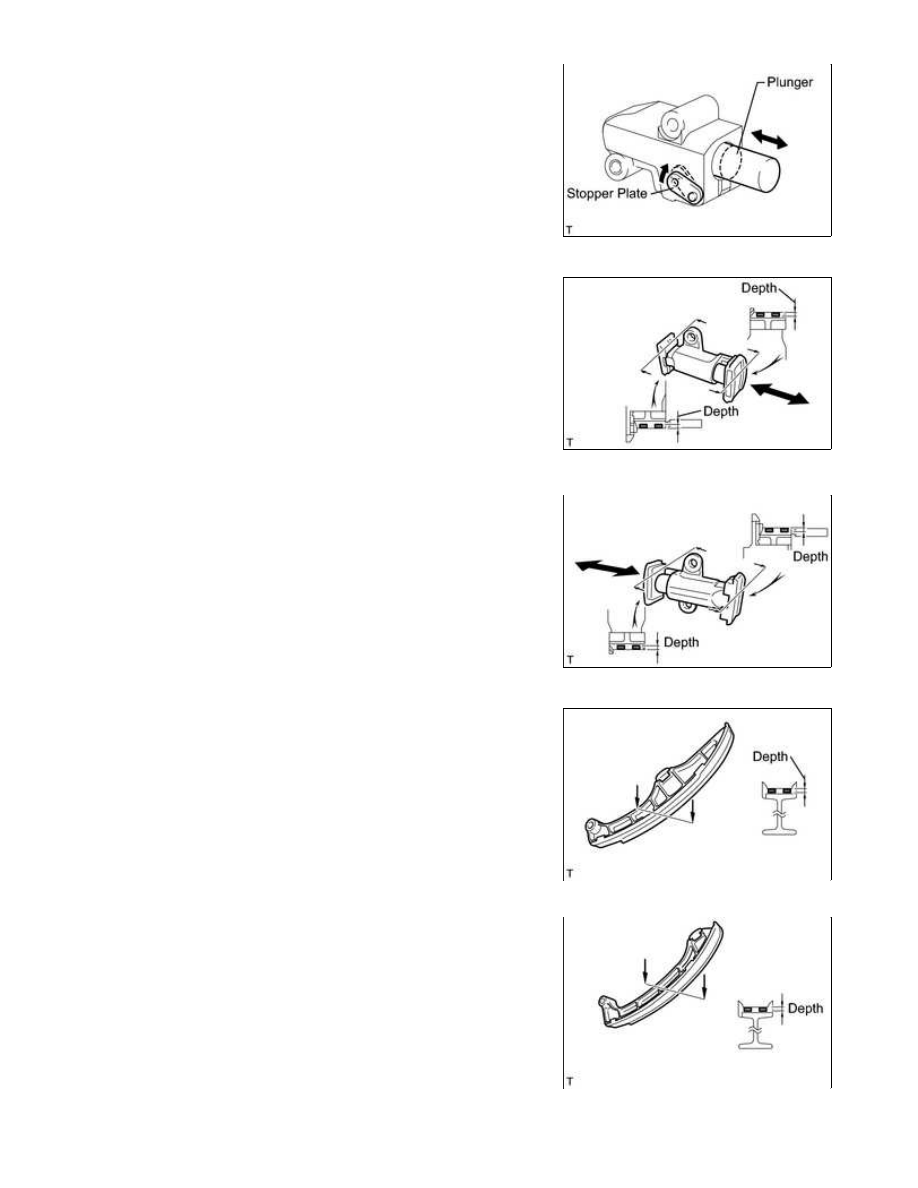
11. INSPECT NO. 1 CHAIN TENSIONER ASSEMBLY

(a) Move the stopper plate upward to release the lock. Push the

plunger and check that it moves smoothly.

If necessary, replace the chain tensioner.

12. INSPECT NO. 2 CHAIN TENSIONER ASSEMBLY

(a) Check that the plunger moves smoothly.

0.9 mm (0.0354 in.)

If the depth is more than the maximum, replace the chain

tensioner.

13. INSPECT NO. 3 CHAIN TENSIONER ASSEMBLY

(a) Check that the plunger moves smoothly.

0.9 mm (0.0354 in.)

If the depth is more than the maximum, replace the chain

tensioner.

14. INSPECT NO. 1 CHAIN TENSIONER SLIPPER LH

1.0 mm (0.0394 in.)

If the depth is more than the maximum, replace the chain

tensioner slipper.

15. INSPECT NO. 1 CHAIN TENSIONER SLIPPER RH

1.0 mm (0.0394 in.)

If the depth is more than the maximum, replace the chain

tensioner slipper.

1UR-FE ENGINE MECHANICAL: ENGINE UNIT: INSPECTION; 20...

16. INSPECT NO. 1 CHAIN VIBRATION DAMPER LH

1.0 mm (0.0394 in.)

If the depth is more than the maximum, replace the chain

vibration damper.

17. INSPECT NO. 1 CHAIN VIBRATION DAMPER RH

1.0 mm (0.0394 in.)

If the depth is more than the maximum, replace the chain

vibration damper.

18. INSPECT EXHAUST MANIFOLD SUB-ASSEMBLY LH

(a) Using a precision straightedge and feeler gauge, measure the

0.7 mm (0.0276 in.)

If the warpage is more than the maximum, replace the exhaust

manifold.

19. INSPECT EXHAUST MANIFOLD SUB-ASSEMBLY RH

(a) Using a precision straightedge and feeler gauge, measure the

0.7 mm (0.0276 in.)

If the warpage is more than the maximum, replace the exhaust

manifold.

1UR-FE ENGINE MECHANICAL: ENGINE UNIT: INSPECTION; 20...

Last Modified: 9-16-2014

6.6 A

Doc ID: RM0000030XP029X

Model Year: 2015

Model: Tundra

Prod Date Range: [08/2014 -           ]

Title: 1UR-FE ENGINE MECHANICAL: ENGINE UNIT: REASSEMBLY; 2015 MY Tundra [08/2014 -        ]

REASSEMBLY

1. INSTALL STUD BOLT

(a) Install the timing chain cover stud bolt.

(1) Using an E10 "TORX" socket wrench, install the 2 stud bolts as shown in the illustration.

Torque:

20 N·m {204 kgf·cm, 15ft·lbf}

(b) Install the oil pan stud bolt.

(1) Using an E6 and E7 "TORX" socket wrench, install the 3 stud

bolts as shown in the illustration.

Torque:

for stud bolt A -

5.0 N·m {51 kgf·cm, 44in·lbf}

for stud bolt B -

9.0 N·m {92 kgf·cm, 80in·lbf}

1UR-FE ENGINE MECHANICAL: ENGINE UNIT: REASSEMBLY; 2...

2. INSTALL RING PIN

(a) Using a plastic-faced hammer, tap in new ring pins to the timing

chain cover.

Standard Protrusion:

ITEM

RING PIN DIAMETER

SPECIFIED CONDITION

Ring pin A 13 mm (0.512 in.)

7.5 to 8.5 mm (0.295 to 0.335 in.)

Ring pin B 11 mm (0.433 in.)

3.6 to 4.6 mm (0.142 to 0.181 in.)

3. INSTALL REAR CRANKSHAFT OIL SEAL

(a) Using SST, tap in a new oil seal until its surface is flush with the

oil seal retainer edge.

SST: 09223-15030

SST: 09950-70010

09951-07100

Standard depth:

0 to 1.0 mm (0 to 0.0394 in.)

NOTICE:

Keep the lip free from foreign matter.
Do not tap on the oil seal at an angle.

4. INSTALL OIL DRAIN PIPE SUB-ASSEMBLY

(c) Install the oil drain pipe with the bolt.

Torque:

10 N·m {102 kgf·cm, 7ft·lbf}

5. INSTALL ENGINE REAR OIL SEAL RETAINER

(a) Apply seal packing in a continuous line as shown in the illustration.

1UR-FE ENGINE MECHANICAL: ENGINE UNIT: REASSEMBLY; 2...


Content   ..  1366  1367  1368  1369   ..