Peugeot Boxer Benne (2012 year). Instruction - part 4


  Index      Peugeot     Peugeot Boxer Benne - instruction 2012 year in english


Search            


Content   ..  2  3  4  5   ..


Peugeot Boxer Benne (2012 year). Instruction - part 4


47

3

E

ASE OF USE

and

 COMFOR

T

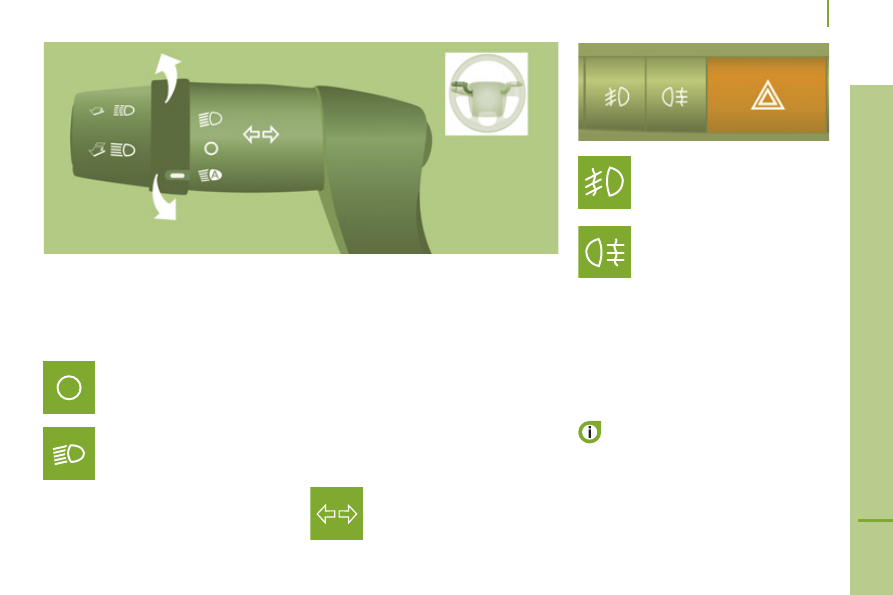
LIGHTING CONTROL STALK

 Selection is by rotation of the white mark on 
the ring.   

  Direction indicators (green

flashing) 

 Left: downwards. 
 Right: upwards.  

STEERING MOUNTED CONTROLS

  Sidelamps on  

  Dipped/main beam 

headlamps on  

  Switching between dipped and main 

beam

 Pull the control stalk fully towards you.  

  Headlamp flash 

 Pull the control stalk towards you, 
regardless of the position of the ring.  

  Front foglamps  

  Rear foglamps 

 If your vehicle is fitted with foglamps, these 
operate with the dipped or main beam 
headlamps. 
 Press one of these controls to switch on the 
lamps. 

  The foglamps should only be used in 
fog or when snow is falling. 

 In clear weather or in rain, both day and 
night, rear foglamps dazzle and their use is 
prohibited. 
 Do not forget to switch them off when they 
are no longer necessary.   

  "Motorway" function

 Pull the lever towards the steering wheel with 
a press, without passing the point of resistance 
of the lighting stalk; the corresponding direction 
indicators will fl ash fi ve times.  

   Steering mounted controls

48

 AUTOMATIC ILLUMINATION OF HEADLAMPS

  Activation

 Turn the ring to this position. 
The lamps are switched off 
automatically when the ignition is 
switched off.  

  Do not cover the sunshine sensor at 
the top centre of the windscreen.  

GUIDE-ME-HOME LIGHTING

  Ignition off or key in the STOP position. 
 Within 2 minutes after switching off the 
engine, position the ignition key in the STOP 
position or remove it. 
 Pull the lighting stalk towards the steering 
wheel.  

  The indicator lamp comes on in 

the instrument panel. 
 Each action on the lighting stalk, 
pulled towards the steering 

wheel, prolongs the guide me home 
lighting by 30 seconds up to approximately 
3 minutes. When this time has elapsed, the 
lamps are switched off automatically. 
 Deactivate this control by keeping the stalk 
pulled towards the steering wheel for more 
than 2 seconds.   

 If your vehicle is fitted with this function: 
when you leave your vehicle, the dipped 
beam headlamps remain on for the selected 
duration (when leaving a car park for 
example).  

  To set the sensitivity of the sensor, 
refer to "Mode" in chapter 4   

  If your vehicle is fitted with this function, the 
dipped beam headlamps are switched on 
automatically if the light is poor. 
 In fog or snow, the sunshine sensor may 
detect sufficient light. Therefore, the lamps 
will not be switched on automatically. If 
necessary, you must switch on the dipped 
beam headlamps manually. 
 They are switched off when the light returns 
to a sufficient level. 

   Steering mounted controls   

49

3

E

ASE OF USE

and

 COMFOR

T

 HEADLAMP BEAM 

 You are advised to adjust the height of the 
headlamp beams in accordance with the 
load in your vehicle. 
 This function works in the dipped and main 
beam headlamps position. 

 Press these controls, located 
on the dashboard, several times 
in succession to adjust the 
headlamps. 
 An indicator lamp on the screen 
indicates the adjustment position 
selected (0, 1, 2, 3). 

PARKING LAMPS 

 This system enables you to leave the lamps 
on when parked; with the ignition off, key in 
the STOP position or key removed. 
 Move the ring on the lighting stalk to position 
O then to dipped or main beam headlamps. 

  The warning lamp on the 
instrument panel comes on.
  
 The lamps will remain on while 
you are parked. 
 Leaving the lighting on for long 

periods may significantly reduce the state of 
charge of your vehicle's battery. 

   Travelling abroad 
 If using your vehicle in a country 

that drives on the other side of the road, 
the headlamps must be adjusted to avoid 
dazzling on-coming drivers. 
 Contact a PEUGEOT dealer or a qualified 
workshop.   

   Steering mounted controls

50

 WIPER STALK 

 Slow continuous wiping: 2 notches downwards. 

 Do not cover the rain sensor, located at 
the top centre of the windscreen. 

 When washing the vehicle, switch off 

the ignition or deactivate the automatic rain 
sensitive wipers.  

   Screenwash and headlamp wash  
 Pull the stalk towards you, the wash-wipe 
is accompanied by a timed operation the 
wipers. 
 The headlamp wash is linked with the 
screenwash, it is triggered if the dipped 
beam headlamps are on. 

  Windscreen wipers

 Wiping is only active when the ignition key is 
in the  RUNNING  position. 
 The stalk has five different positions: 

 Wipers off. 

 Intermittent wiping: 
 1 notch downwards. 
 In this position, four speeds can be selected 
by turning the ring: 

   -   very slow intermittent, 
  -  slow intermittent, 
  -  intermittent, 
  -  fast intermittent. 


Automatic rain sensitive windscreen

wipers 

 If your vehicle is fitted with this system, the 
wiping speed is adapted automatically to the 
intensity of the rainfall. 
 Automatic wiping: 1 notch downwards. This is 
confi rmed by one wipe. Must be reactivated 
each time the ignition is switched on. 
 In this position, the sensitivity of the rain 
sensor can be increased by turning the ring. 

  Good practice 

 Check that the windscreen wiper blades can 
operate freely when using the wipers in icy 
weather. 
 Use the step in the front bumper, to remove 
any accumulation of snow at the base of the 
windscreen and on the blades. 

 To change the blades, refer to the 
"Changing a wiper blade" section of 

chapter 8.  

 To top up the levels, refer to the 
"Levels" section of chapter 7.  

 Fast continuous wiping: 3 notches 
downwards. 

 Single wipe, pull the control towards the 
steering wheel.  

       With Stop & Start, when the wiper 
control stalk is in the fast wipe position, 

the STOP mode is not available.  

   Steering mounted controls   

51

3

E

ASE OF USE

and

 COMFOR

T

CRUISE CONTROL 

  "This is the speed at which the driver wishes to 
travel". 
 This aid to driving in free-fl owing traffi c conditions 
enables the vehicle to maintain a constant 
speed programmed by the driver, except when a 
considerable load is carried on a steep gradient. 
 In order to be programmed or activated, 
the vehicle speed must be greater than 
approximately 25 mph (40 km/h), with at least 
4th gear engaged. 

 Function selected. 

 Function deactivated.  

 If your vehicle is fitted with cruise control, 
this is displayed on the instrument panel by 
an indicator located in the rev counter. 

   Steering mounted controls

52

  Selecting the function - ON

 When the selection is set 
to  ON , this switches the 
function on. 
 If your vehicle is fi tted with 

this screen, a message confi rms the action.  

  Programming a speed 

 Accelerate to the required speed, with 4th or 
5th gear engaged. 
 Move the control upwards (+), for 
approximately one second, to store this 
speed. 
 Release the pressure on the accelerator 
pedal, the vehicle will maintain this speed.  

  Switching off / deactivating the 

function 

 Press the brake or clutch pedal or place 
the dial in the  OFF  position, the indicator is 
switched off. 
 If the ESP or ASR comes into operation, 
the cruise control function is deactivated 
temporarily.  

   -  

increase the speed in steps, by means 
of brief presses, or continuously by 
pressing and holding the control 
upwards ( + sign), 

Temporarily exceeding the

programmed speed 

 When the cruise control is active, it is 
still possible to exceed the programmed 
speed by pressing the accelerator pedal (to 
overtake another vehicle for example).  

  -  

decrease the speed continuously 
by pressing and holding the control 
downwards (- sign).   

  Restore - RES

 To restore the vehicle's 
programmed speed (for example 
after pressing the brake or clutch 

pedal), gradually return to the chosen speed 
and press  RES . 
 The indicator comes on, the cruise control 
function is restored.  

Changing the programmed speed while 

the cruise control is in operation

 You can: 

   Steering mounted controls   

53

3

E

ASE OF USE

and

 COMFOR

T

  Good practice 

 When changing the programmed reference 
speed by pressing and holding the control, 
take care as the speed may increase or 
decrease rapidly. 
 Do not use the cruise control on slippery 
roads or in heavy traffic. 
 On a steep gradient, the cruise control will 
not be able to prevent the vehicle from 
exceeding the programmed speed. 
 The cruise control cannot, in any 
circumstances, replace the need to comply 
with speed limits nor can it replace the need 
for vigilance and responsibility on the part 
of driver. 
 It is advisable to leave your feet near the 
pedals. 
 To prevent the mat from becoming caught 
under the pedals: 
   -  

ensure that the mat is positioned 
correctly, 

  -  

never fit one mat on top of another.   

Cancelling the programmed speed 

 When the vehicle stops, after the ignition is 
switched off, the system no longer stores 
any speed.  

Operating fault 

 In the event of a malfunction, the function is 
switched off and the indicator switches off. 
 Contact a PEUGEOT dealer to have the 
system checked.  

   Steering mounted controls

54

   Ventilation 

 VENTILATION 
  DEMISTING AND DEFROSTING

  Manual mode  

 Direct the control to this air 
distribution setting. 
  For faster and more effective 
demisting and defrosting of the 
windscreen: 

  Defrosting the rear screen and mirrors 
 Only operates when the engine is running. 

Pressing this button activates the 
rapid demisting-defrosting of the 
rear screen and door mirrors. 
 This function switches off 

automatically to prevent excessive energy 
consumption. It stops when the engine is 
switched off but resumes when the engine is 
started again. 
 Pressing this button switches the function 
off.   

   -  

increase the air flow setting, 

 Returning to the exterior air 
intake position permits renewal 
of the air in the passenger 
compartment.  

  Windscreen and side windows 
 The ventilation outlets located at the base 
of the windscreen and the side vents for the 
side windows increase the effectiveness 
of the demisting and defrosting. Do not 
obstruct these air outlets. 
 The pollen filter continuously and effectively 
filters dust. 
 Air recirculation (which can be activated by 
the driver or the passenger) isolates the 
passenger compartment from the exterior 
atmosphere. However, this position should 
only be used temporarily, normal use is to 
drive with the control positioned with the 
exterior air intake open. 

  -   move the exterior air intake 

control temporarily to air 
recirculation.  

       With Stop & Start, when the heated 
rear screen is switched on, the STOP 
mode is not available.  

55

3

E

ASE OF USE

and

 COMFOR

T

Ventilation

CORRECT USE OF THE AIR

CONDITIONING

 In order to be effective, the air conditioning should 
only be used with the windows closed. However, 
if the interior temperature remains high after a 
prolonged period parked in the sun, fi rst ventilate 
the passenger compartment for a few minutes. 

 For even air distribution, ensure that the 
exterior air intake grille located at the base 
of the windscreen is not obstructed and that 
the side and central vents, the air outlets on 
the floor and the air extractor at the rear are 
open. 
 The air conditioning is useful in all seasons 
as it eliminates condensation and air 
humidity. 

 Operate the air conditioning system for 
5 to 10 minutes, once or twice a month, 

to keep it in good working order. 
 Have the filter elements (air filter and 
passenger compartment filter) replaced 
regularly. If you drive in a dusty environment, 
have them replaced twice as often. 
 It is normal that the condensation created by 
the air conditioning system results in a flow 
of water which may form a puddle under the 
vehicle when parked. 
 If the system does not produce cold air, do 
not use it and contact a PEUGEOT dealer. 

  "Leave them open" 
 For optimum distribution and diffusion of hot 
or cool air in the passenger compartment, 
there are: 4 adjustable central vents, of 
which 2 can be directed sideways (right 
or left) towards the top of the body and 
4 side vents which can be directed towards 
the passengers. The air vents directed 
towards the floor of the vehicle complete the 
equipment.   

VENTS  

56

   Ventilation 

 WITH MANUAL ADJUSTMENT 

 If your vehicle is fitted with these controls, 
they are located on the dashboard on the 
centre console control panel. 

Temperature adjustment 

 Control positioned: 
   -   in the blue zone provides cool 

air, 

  Air flow 

 The force of the blown air, from 
the vents, varies from 1 to the 
strongest 4. Remember to adjust 
this control in order to reach the 

ambient air comfort level. To switch off the 
blower, place the control in position 0.  

  Air conditioning 

 The air conditioning mode can only operate 
with the engine running. 

 The air blower must be set to at 
least 1. 
 Pressing the button triggers the 
operation of the air conditioning, 

the LED is on. Pressing the button again 
switches the function off and the LED is 
switched off.  

  Air distribution

 The air supply distribution is directed by the 
control turned towards: 

 the side vents and the central 
vents, 

 the side vents, the central vents 
and the footwells, 

 the footwells, 

 the windscreen, the footwells and 
the side windows, 

 the windscreen and the side 
windows.  

  -   in the red zone provides 

heating of the interior ambient 
air.   

57

3

E

ASE OF USE

and

 COMFOR

T

Ventilation

Intake of exterior air 

  recommended settings for the air conditioning 

 For optimum operation of the system, the settings below are recommended: 

Recirculation of interior air 

 This position should only be 
temporary. 
 Used with the air conditioning 
switched on and setting of the 

force of blown air (from 1 to 4), recirculation 
enables you to obtain the required ambient 
air comfort level with both hot or cold 
settings. 
 Recirculation temporarily prevents exterior 
odours and smoke from entering the 
passenger compartment. 

  If I require...  

  Air 

distribution  

  Temperature  

  Air flow  

  Air 

recirculation    

  AC  

  Heating  


  -  

  Cooling  


  Demisting  

Defrosting  


 When your ambient air comfort level has 
been reached, return to the intake of exterior 
air position to permit renewal of the air in the 
passenger compartment and demisting. This 
operating mode is preferable.  

 This is the preferred operating position.  

58

   Ventilation 

 MONO-ZONE DIGITAL AIR

CONDITIONING

 If your vehicle is fitted with this system, the 
controls are located in the middle of the 
dashboard. The system can be identified by 
its control screen. 

AUTO mode

 Switching on  FULL AUTO  
mode: pressing the  AUTO  
control switches on the system's 
functions, confi rmed by the display 

of  FULL AUTO . This is the normal operating 
mode for the digital air conditioning system. 
 Using the moving ring surrounding the AUTO 
control, set the comfort temperature to be 
reached according to a setting between: 
   -  

HI (High to ≈ 32) and, 

  -  

LO (Low to ≈ 16).  

 The system controls the distribution, 
fl ow and intake of air to ensure comfort 
equivalent to the setting displayed and 

suffi cient recirculation of air in the passenger 
compartment. 
 No further adjustments are required.  

 Control screen for your digital air 
conditioning system. 

  AUTO mode with personalisation

 Switch on in  AUTO  mode, certain 
settings can be modified: the 
distribution, the air flow, the air 
conditioning and the air intake/
recirculation. 

 The display changes from  FULL AUTO  to 
 AUTO . 
 To return to fully automatic operation, press 
this button again. The display on the control 
panel changes from  AUTO  to  FULL AUTO . 
 If the system is not able to maintain 
the setting selected following manual 
adjustments, the setting flashes then  AUTO  
is cleared. Press the  AUTO  control to return 
to the automatic settings.  

  Switching off the air conditioning 

 Pressing this control switches 
off the air conditioning functions. 
The snowflake is cleared from the 
screen.  

  Complete switch-off 

 Pressing this control switches 
the system off. The LED and the 
screen switch off.  

 When the engine is running and the air 
conditioning is on, this symbol and the 
message  FULL AUTO  are displayed. 

 The other components are displayed according 
to the settings selected by the user. 

59

3

E

ASE OF USE

and

 COMFOR

T

Ventilation

Comfort value adjustment ring

 The settings range between: 
   -  

increasing the interior ambient air 
temperature HI (High) which goes up to 
to a maximum setting of 32, 

  -  

cooling the interior ambient air 
temperature LO (Low) which goes down 
to a setting of 16.   

Air distribution

 A press illuminates the LED on the buttons 
which distribute the air flow towards: 

 the windscreen and front side 
window vents (demisting/
defrosting the windows), 

 the central and side vents (chest 
and face), 

 the vents in the front and rear 
areas (feet). 

 The combination of buttons permits 
improvement of air distribution.  

Air flow 

 Successive presses of this button 
increase (+) or reduce (-) the 
force of the air flow to the interior.  

  Intake of exterior air/

recirculation of interior air 

 When the LED is on, the air 
recirculates inside the passenger 

compartment to prevent the entry of exterior 
odours and smoke. This position should be 
temporary. 
 When the ambient air comfort level has been 
reached, pressing the button switches the 
LED off and reopens the exterior air intake. 
 Pressing the  AUTO  button also restores 
the intake of exterior air. Returning to this 
position permits renewal of the air in the 
passenger compartment and demisting. 
Pressing the  AUTO  button again restores 
the  FULL AUTO  function.  

  Rapid demisting/defrosting 

 Pressing this control permits 
rapid clearing of the windows. 
The LED is on. 

 The system manages the air conditioning, 
the flow and intake of air, the defrosting 
of the rear screen and provides optimum 
distribution of the air to the windscreen and 
front side windows. 
 If your vehicle is fitted with additional 
heating, switch it off to ensure rapid and 
effective demisting/defrosting.  

ADDITIONAL REAR VENTILATION 

  The controls for this system, 
additional to the standard cabin 
ventilation system, are on the 
lower dashboard, to the left of the 
steering wheel. 

  Air outlet 
 A press on this control activates 
the extraction of air to the 
outside; the LED comes on. 
Press again to switch off.  

  Air inlet 
 A press on this control activates 
the entry of air into the cabin; the 
LED comes on. Press again to 
switch off.   

   Ventilation 

 ADDITIONAL HEATING SYSTEMS 

Supplementary heating

 On the 2-3 seats version, this is located 
under the seat on the driver's side with air 
diffusion directed forwards. 

 REAR HEATING AND / OR AIR

CONDITIONING

 If your vehicle is fitted with an 
additional air conditioning unit, 
located in the rear of the vehicle: 
the distribution rail located in 

the roof and the individual diffusion vents 
provide a perfect diffusion of cold air. 
 The warm air diffused at the floor, from the 
front air conditioning unit, is distributed at 
the feet of the rear passengers of rows 2 
and 3. 
 A warm air diffusion vent, located on the rear 
left wheelarch, may complete the assembly 
for the feet of the rear passengers of row 3. 

  Additional heating 

 This is passenger compartment heating, 
additional to the standard equipment. 
 It can operate independently of the engine.  

  Additional heater or programmable

additional heating 

 This is an additional, programmable and 
separate system which heats the Diesel 
engine hot coolant loop to make starting 
easier. 
 It improves the demisting and defrosting 
performance and that of the heated seats, if 
fitted to the vehicle. 
 The passenger compartment heating is 
brought up to temperature more rapidly. 
 This system must be programmed to start up 
before you enter the vehicle.  

 On the 5-9 seats version, it is 
located at the rear. Depending 
on the model version, the air 
diffusion is either direct from the 

rear or comes from the rail located under 
each of the two rows of seats. 

 Press this control to activate/
deactivate the heating. The LED 
is on if the heating is activated. 
When rapid demisting and 

defrosting is required, switch off the control.  

61

3

E

ASE OF USE

and

 COMFOR

T

Ventilation

Activation/Deactivation 

 This control, located on the 
control panel at the left-hand end 
of the dashboard, enables you to 
activate/deactivate the operation 

of the rear controls from the driver's seat. 
 The first press activates (LED on). 
 A second press deactivates (LED off).  

 To deactivate the fan, place the control in 
position 0.  

 However, a safety device will ventilate the 
rear circuit automatically, even if the control 
is in position 0, to prevent the formation of 
condensation.  

Air flow 

 The force of the fan blown air, 
via the vents, varies from 1 to the 
strongest 4. 
 To obtain a comfortable level of 

ambient air, remember to adjust this control. 

  Comfort value adjustment 

   -   on the blue, delivers cool air, 

  -   on the red, delivers heating of 

the ambient air.  

 The OFF control on the "Mono-zone" central 
control panel switches the function off. 

 Control positioned: 

62

   Ventilation 

 PROGRAMMABLE ADDITIONAL

HEATING

 If your vehicle is fitted with separate 
programmable heating: it gradually brings 
the engine up to a good temperature to 
facilitate starting. 

 An integrated clock permits programming of 
its start time. The passenger compartment 
will be heated more quickly. 

 Heating cycle indicator 

Digital programming control

 The programmable heating system control 
panel is located at the bottom left of the 
dashboard. 

 Display on 

 Display of the programme 
number selected 

 Time display button 

 Time setting buttons 

 Selection of the stored 
programme 

 Button for immediate switching 
on of the heating 

 Time setting and reading 
indicator  


Content   ..  2  3  4  5   ..