Peugeot 308 (2017 year). Instruction - part 6


  Index      Peugeot     Peugeot 308 - instruction 2017 year in english


Search            


Content   ..  4  5  6  7   ..


Peugeot 308 (2017 year). Instruction - part 6


79

3

Ease of use and comfort

308_en_Chap03_ergonomie-et-confort_ed01-2016

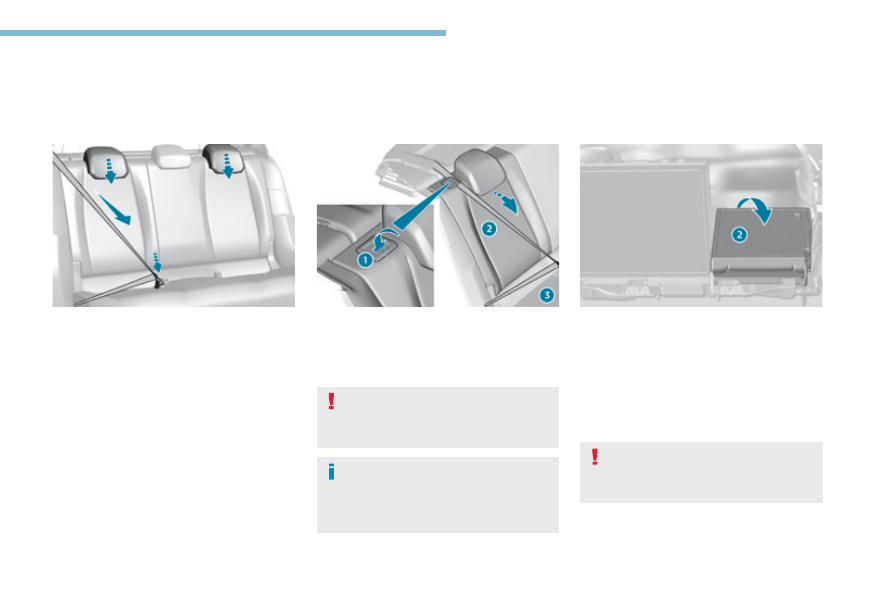
Rear seats (hatchback)

F  Move the corresponding front seat forward 

if necessary.

F  Check that the corresponding outer seat 

belt is positioned correctly against the 
backrest and buckle it.

F  Place the head restraints in the low 

position.

F  Straighten the seat backrest 2 and secure it.
F  Check that the red indicator, located next to 

the control 1, is no longer visible.

F  unbuckle and reposition the outer seat belt 

on the side of the backrest.

When folding the seat, the centre seat 
belt should not be fastened, but laid out 
flat on the seat

F  Press control 1 to release the seat 

backrest 2.

F  Fold the seat backrest 2 on to the 

cushion 3.

Folding the backrest

Repositioning the seat backrest

Rear seats with fixed one-piece cushion and 1/3 - 2/3 split backrests which can be folded individually to adapt the load space in the boot.

the rear seat cushion does not fold, 
just the seat backrest can be folded to 
increase the boot loading space.

When repositioning the seat backrest, 
take care not to trap the seat belts.

80

Ease of use and comfort

308_en_Chap03_ergonomie-et-confort_ed01-2016

Rear seats (SW)

1/3 - 2/3 split rear seats which can be folded to vary the boot load space.

each section of the seat (1/3 or 2/3) has its own control to release the seat backrest from inside the 
boot.

Folding the seat from the boot

F  Check that nothing is preventing the seat 

backrest from folding (seat belts, ...) and 
that no object might interfere with the seat 
manoeuvre (above as well as below).

F  Place the head restraints in the low 

position.

F  Pull the control from inside the boot, the 

seat backrest folds onto the cushion.

Folding the seat from  
the rear

F  Check that nothing is preventing the seat 

backrest folding and that no object might 
interfere with the seat manoeuvre  
(above as well as below).

F  Move the corresponding front seat 

forwards if necessary.

F  Check that the seat belt is positioned 

correctly on the side of the seat backrest.

F  Place the head restraints in the low 

position.

81

3

Ease of use and comfort

308_en_Chap03_ergonomie-et-confort_ed01-2016

these have one position for use (up) and 
a stowed position (down).
they can be removed and are interchangeable.

Outer rear seat head restraints

Never drive with the head restraints 
removed; they must be in place and 
correctly adjusted.

to remove a head restraint:
F  pull the head restraint upwards to the stop,
F  then, press the lug A.

the centre head restraint is not 
adjustable.

F  Pull the control 1 forwards, the seat 

backrest folds onto the cushion.

Returning the seat back to its original position

F  Put the seat backrest in the upright position 

and secure it.

F  Check that the red indicator, located at the 

control 1, is no longer visible.

F  Refit the head restraints or put them back 

in place.

When returning the rear seat back to 
its original position, take care not to 
trap the seat belts and ensure that their 
buckles are positioned correctly.

82

Ease of use and comfort

308_en_Chap03_ergonomie-et-confort_ed01-2016

Interior fittings

1.  Cooled glove box fitted with a ventilation 

nozzle

2.  12 V accessory socket (120 W)
  

Observe the maximum power rating to 
avoid damaging your accessory.

3.  uSB port
4.  Jack auxiliary socket
5.  Cup holder (depending on version)
6.  Storage (depending on version)
7.  Storage - Retractable cup holder
 

turn the carrier for access to the cup 
holder.

8.  Front armrest
9.  230 V (120 W) accessory socket
 

Observe the power rating to avoid 
damaging your accessory.

83

3

Ease of use and comfort

308_en_Chap03_ergonomie-et-confort_ed01-2016

Mats

When fitting the mat for the first time, on the 
driver's side use only the fixings provided in the 
wallet attached.
the other mats are simply placed on the 
carpet.

Fitting

Removal

Refitting

to avoid any risk of jamming of the 
pedals:

only use mats which are suited to 
the fixings already present in the 
vehicle; these fixings must be used,

never fit one mat on top of another.

the use of mats not approved by 
PeugeOt may interfere with access to 
the pedals and hinder the operation of 
the cruise control / speed limiter.
the mats approved by PeugeOt have 
two fixings located below the seat.

to remove the mat on the driver's side:
F  move the seat as far back as possible,
F  unclip the fixings,
F  remove the mat.

to refit the mat on the driver's side:
F  position the mat correctly,
F  refit the fixings by pressing,
F  check that the mat is secured correctly.

84

Ease of use and comfort

308_en_Chap03_ergonomie-et-confort_ed01-2016

F  to connect a 12 V accessory (maximum 

power: 120 Watts), lift the cover and 
connect a suitable adaptor.

12 V accessory 
socket

Front armrest

the height and longitudinal position of the armrest cover can be adjusted for greater comfort.

F  Raise the cover to the required position 

(low, intermediate or high).

F  If you raise the cover slightly beyond the 

high position, guide it when lowering it to 
the low position.

F  Raise the lever.
F  Raise the cover fully.

F  Slide the cover fully forwards or rearwards.

Storage

Longitudinal adjustment

Height adjustment

Observe the maximum power rating to 
avoid damaging your accessory.

the connection of an electrical device 
not approved by PeugeOt, such as a 
uSB charger, may adversely affect the 
operation of vehicle electrical systems, 
causing faults such as poor telephone 
reception or interference with displays 
in the screens.

85

3

Ease of use and comfort

308_en_Chap03_ergonomie-et-confort_ed01-2016

It permits the connection of a portable device 
so that you can listen to your music files via the 
vehicle's speakers.
the management of the files is done using your 
portable device.

It allows the connection of a portable device, 
such as a digital audio player of the iPod

®

 type 

or a uSB memory stick.
It reads the audio files which are transmitted to 
your audio system and played via the vehicle's 
speakers.
You can manage these files using the steering 
mounted controls or the audio system.

Jack auxiliary socket

uSB port

For more information on the use of 
this equipment, refer to the Audio and 
telematics
 section.

When a uSB port is used, the portable 
device charges automatically.
While charging, a message is displayed 
if the current consumption of the 
portable device exceeds the power 
rating of the port.
For more information on using this 
equipment, refer to the Audio and 
telematics
 section.

230 V / 50 Hz power socket

F  Open the central storage box,
F  Check that the warning lamp is on green,
F  Connect your multimedia or other electrical 

device (telephone charger, laptop 
computer, CD-DVD player, baby food 
warmer...).

In the event of a fault with the socket, the green 
warning lamp flashes.
Have it checked by a PeugeOt dealer or a 
qualified workshop.

A 230 V / 50 Hz socket (maximum power: 
120 W) is fitted in the rear storage box.
this socket works with the engine running, as 
well as in StOP mode with Stop & Start.

86

Ease of use and comfort

308_en_Chap03_ergonomie-et-confort_ed01-2016

Ski flap

F  Lower the armrest.
F  Press the flap opening control.
F  Lower the flap.
F  Load the objects from inside the boot.

F  Lower the rear armrest for a more 

comfortable position.

It may be fitted with cup holders and also gives 
access to the ski flap.

Rear armrest

Connect only one device at a time to 
the socket (no extension or multi-way 
connector).
Connect only devices with class II 
insulation (shown on the device).
Do not use a device with a metal case.
As a safety measure, when electrical 
consumption is high and when required 
by the vehicle's electrical system 
(particular weather conditions, electrical 
overload...), the current supply to the 
socket will be cut off; the green warning 
lamp goes off.

the different "ports and sockets" can 
be either not available, an option or 
standard, depending on the trim level of 
the vehicle.

Do not leave the flap open when not 
carrying long objects in the vehicle.

It allows long objects to be carried in the 
vehicle.

87

3

Ease of use and comfort

308_en_Chap03_ergonomie-et-confort_ed01-2016

Boot fittings (hatchback)

1.  Rear parcel shelf
2.  Boot floor
 

Raise the floor for access to the storage.

3.  Storage wells
 

in which are stowed:
-  the towing eye,
-  the temporary puncture repair kit,
-  the spare wheel, depending on trim 

level, an option or standard.

4.  Stowing rings
5.  Strap (depending on version)

88

Ease of use and comfort

308_en_Chap03_ergonomie-et-confort_ed01-2016

Boot fittings (SW)

1.  Boot lamp
2.  Rear seat folding controls
3.  12 V accessory socket (120 W max)
4.  Removable storage boxes
 

Pull up to unclip them.

5.  Storage wells, in which are stowed:

-  the towing eye,
-  the temporary puncture repair kit,
-  the spare wheel, depending on trim 

level, an option or standard.

6.  Luggage cover
 

(see corresponding section)

7.  eyes for fixing a net (to restrain luggage) 

(depending on version)

F  extract the eyes one at a time then slide 

them into the oblong housing.

F  While pressing the button, move the eye to 

the desired position.

F  Observe the direction of fitting (eyes in the 

vertical position towards the outside of the 
vehicle).

89

3

Ease of use and comfort

308_en_Chap03_ergonomie-et-confort_ed01-2016

Luggage cover, roller blind (SW)

To reel in

To remove

Storage

F  Remove the roller guide from the rails in 

the boot pillars.

F  Release the roller blind, it reels in 

automatically.

F  Place a hand on the left under the luggage 

cover.

F  turn the end of the reel towards the front 

(clockwise) to release it.

F  Repeat the operation on the right (anti-

clockwise).

A recess in the floor well, under the boot 
carpet, allows the luggage cover to be stowed 
diagonally.

this recess is not available with the 
bass woofer unit.

90

Ease of use and comfort

308_en_Chap03_ergonomie-et-confort_ed01-2016

To install

F  Position the left and then right-hand ends 

of the luggage cover in their respective 
housings.

F  Place your hands on the roller then turn the 

assembly to the rear to secure it.

F  unreel the roller blind until it locks on the 

rear pillar.

High load (SW)

Luggage retaining net

Row 1

F  Fold the rear seats.
F  Remove the cover on each side of the roof.
F  Position the net's upper hooks in the roof.
F  Attach the bottom of the net to the fixings 

located at the seat belt mountings.

F  Pull on the straps to stretch the net.
Once fitted, the net does not prevent folding of 
the rear seat backrests.

Row 2

F  Remove the cover on each side of the roof.
F  Position the net's upper hooks in the roof.
F  Attach the bottom of the net to the rings 

located either side of the boot carpet or on 
the boot rails (depending on trim level).

F  Pull on the straps to stretch the net.

this allows the use of the entire loading volume up to the roof:

behind the front seats (row 1) when the rear seats are folded.

behind the rear seats (row 2).

91

3

Ease of use and comfort

308_en_Chap03_ergonomie-et-confort_ed01-2016

Heating and Ventilation

Air intake

the air circulating in the passenger compartment 
is filtered and originates either from the outside via 
the grille located at the base of the windscreen or 
from the inside in air recirculation mode.

Controls

the incoming air follows various routes 
depending on the controls selected by 
the driver, the front passenger and rear 
passengers, according to the level of 
equipment.
the temperature control enables you to obtain 
the level of comfort required by mixing the air of 
the various circuits.
the air distribution control enables you to 
select the air vents used in the passenger 
compartment by the combined use of the 
associated buttons.
the air flow control enables you to increase or 
reduce the speed of the ventilation fan.
Depending on your vehicle, the controls are 
accessible in the "Air conditioning" menu of 
the touch screen or are grouped together on 
control panel on the centre console.

1.  Windscreen demisting/defrosting vents.
2.  Front side window demisting/defrosting 

vents.

3.  Side adjustable air vents.

4.  Central adjustable air vents.
5.  Air outlets to the front footwells.
6.  Air outlets to the rear footwells.

Air distribution

92

Ease of use and comfort

308_en_Chap03_ergonomie-et-confort_ed01-2016

In order for these systems to be fully effective, follow the operation and maintenance 
guidelines below:
F  to obtain an even air distribution, take care not to obstruct the exterior air intake grilles 

located at the base of the windscreen, the nozzles, the vents and the air outlets, as well 
as the air extractor located in the boot.

F  Do not cover the sunshine sensor, located on the dashboard; this is used for regulation 

of the air conditioning system.

F  Operate the air conditioning system for at least 5 to 10 minutes, once or twice a month 

to keep it in perfect working order.

F  ensure that the passenger compartment filter is in good condition and have the filter 

elements replaced regularly.


We recommend the use of a combined passenger compartment filter. thanks to its 
special active additive, it contributes to the purification of the air breathed by the 
occupants and the cleanliness of the passenger compartment (reduction of allergic 
symptoms, bad odours and greasy deposits).

F  to ensure correct operation of the air conditioning system, you are also advised to have 

it checked regularly as recommended in the warranty and maintenance record.

F  If the system does not produce cold air, switch it off and contact a PeugeOt dealer or 

a qualified workshop.

Recommendations for ventilation and air conditioning

If after an extended stop in sunshine, 
the interior temperature is very high, first 
ventilate the passenger compartment for 
a few moments.
Put the air flow control at a setting high 
enough to quickly change the air in the 
passenger compartment.
the air conditioning system does not 
contain chlorine and does not present 
any danger to the ozone layer.

the condensation created by the air 
conditioning results in a discharge 
of water under the vehicle which is 
perfectly normal.

When towing the maximum load on a steep gradient in high temperatures, switching off the 
air conditioning increases the available engine power and so improves the towing ability.

Stop & Start

the heating and air conditioning 
systems only work when the engine is 
running.
to maintain a comfortable temperature 
in the passenger compartment, you can 
temporarily deactivate the Stop & Start 
system.
For more information on Stop & Start
refer to the corresponding section.

93

3

Ease of use and comfort

308_en_Chap03_ergonomie-et-confort_ed01-2016

Temperature adjustment

F  turn the dial from blue (cold) to 

red (hot) to adjust the temperature 
to your requirements.

the air conditioning system only operates with the engine running.

Air flow adjustment

F  turn the dial to obtain a 

comfortable air flow.

If you put the air flow control in the 
minimum position (system off), the 
temperature is no longer controlled. 
However, a slight flow of air can still be 
felt, resulting from the movement of the 
vehicle.

Manual air conditioning

Air distribution adjustment

Windscreen and side windows.

Footwells.

Central and side vents.

the air distribution can be adapted by adding 
the corresponding buttons.

Air conditioning On / Off

It enables you to:

lower the temperature, in summer,

increase the effectiveness of the demisting 
in winter, above 3°C.

Switching on

F  Press this button; its indicator lamp comes 

on.

Switching off

F  Press this button again; its indicator lamp 

goes off.

the air conditioning is designed to 
operate effectively in all seasons, 
with the windows closed.

the air conditioning does not operate 
when the air flow adjustment is set to 
off.

to obtain cool air more quickly, you can use 
interior air recirculation for a few moments. 
then return to the intake of exterior air.

Switching off the air conditioning may result in 
some discomfort (humidity, misting).

94

Ease of use and comfort

308_en_Chap03_ergonomie-et-confort_ed01-2016

Manual air conditioning (touch screen)

Temperature adjustment

F  Press one of these buttons to reduce or 

increase the value.

the air conditioning system operates with the engine running.

Air flow adjustment

Press one of these buttons to 
increase or decrease the speed of 
the air booster fan.

the air flow symbol (a fan) fills progressively 
according to the quantity of air wanted.
By reducing the air flow to minimum, you are 
stopping ventilation.

Avoid driving too long without ventilation 
(risk of misting and deterioration of air 
quality).

Press the button for the "Air 
conditioning
" menu to display the 
system controls page.

Air distribution adjustment

these buttons are used to arrange 
the distribution of air in the passenger 
compartment by combining several air outlets.

Windscreen.

the air distribution can be adapted by using 
several buttons: illumination of the indicator 
lamp confirms the presence of fan boosted air 
in the direction indicated, the indicator lamp off 
indicates the absence of fan boosted air in the 
direction indicated.
For a uniform distribution of air in the 
passenger compartment, the three buttons can 
be activated simultaneously.

Footwells.

Central and side vents.


Content   ..  4  5  6  7   ..