Opel Crossland X (2018 year). Manual - part 7


  Index      Opel     Opel Crossland X (2018 year) - manual in english


Search            copyright infringement  


Content      ..     5      6      7      8     ..


Opel Crossland X (2018 year). Manual - part 7


102

Instruments and controls

Vehicle messages

Messages are indicated in the Driver

Information Centre, in some cases

together with a warning and signal

chime.

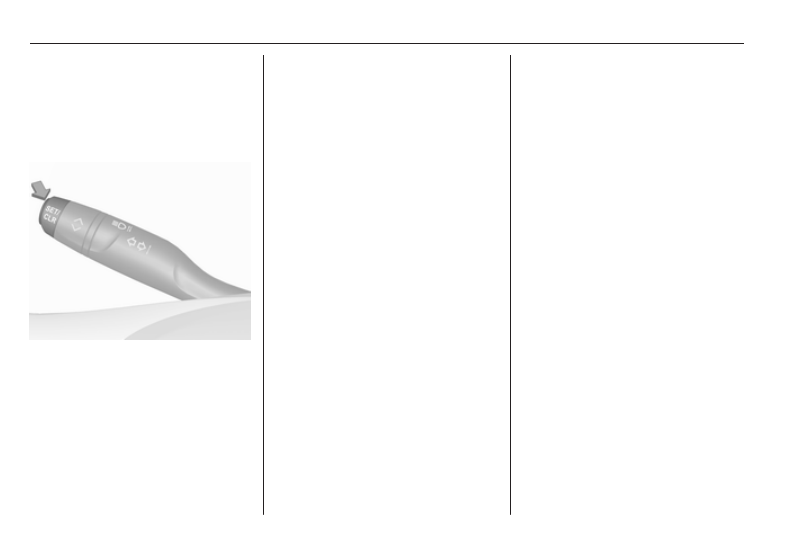
Press SET/CLR on the turn signal

lever to confirm a message.

Vehicle and service messages

The vehicle messages are displayed

as text. Follow the instructions given

in the messages.

Messages in the

Colour-Info-Display

Some important messages may

appear additionally in the

Info-Display. Some messages only

pop-up for a few seconds.

Warning chimes

When starting the engine or whilst

driving

Only one warning chime will sound at

a time.
The warning chime regarding not

fastened seat belts has priority over

any other warning chime.

● If a seat belt is not fastened.
● If a door or the tailgate is not fully

closed when starting off.

● If a certain speed is exceeded

with parking brake applied.

● If cruise control deactivates

automatically.

● If a programmed speed or speed

limit is exceeded.

● If a warning message appears in

the Driver Information Centre.

● If the electronic key is not in the

passenger compartment.

● If the parking assist detects an

object.

● If an unintended lane change

occurs.

● If the diesel particle filter has

reached the maximum filling

level.

When the vehicle is parked and/or

the driver's door is opened

● With exterior lights on.

During an Autostop

● If the driver's door is opened.
● If any condition for an autostart is

not fulfilled.

Battery voltage

When the vehicle battery voltage is

running low, a warning message will

appear in the Driver Information

Centre.

-------------------------------------------------------------------------------------------------------------------------------------------------------------

Instruments and controls

103

When the vehicle is being driven, the

load reduction function temporarily

deactivates certain functions, such as

the air conditioning, the heated rear

screen, heated steering wheel, etc.
The deactivated functions are

reactivated automatically as soon as

conditions permit.

Vehicle personalisation

The vehicle's behaviour can be

personalised by changing the settings

in the Info-Display.
Depending on vehicle equipment and

country-specific regulations some of

the functions described below may

not be available.
Some functions are only displayed or

active when the engine is running.

Graphic-Info-Display

Press MENU to open the menu page.
Use four-way button to operate the

display:

Select ˆ Personalisation-

configuration, I OK.

Unit settings

Select Display configuration, I OK.
Select Choise of units, I OK.
Select desired settings, I OK.

Language settings

Select Display configuration, I OK.
Select Choise of language, I OK.
Select desired language, I OK.

Vehicle settings

Select Define vehicle parameters, I

OK.
In the corresponding submenus the

following settings can be changed:

● Lighting.

Follow me home headlamps:

Activation and setting duration

time.
Welcome lighting: Activation and

setting duration time.

● Comfort

Ambient lighting: Activation/

Deactivation.

-------------------------------------------------------------------------------------------------------------------------------------------------------------

104

Instruments and controls

Rear wiper in reverse gear:

Activation/Deactivation.

● Vehicle

Unlocking boot only: Activation/

Deactivation.
Plip action: Driver/all doors.

● Driving assistance

Fatigue Detection system:

Activation/Deactivation.
Speed recommendation:

Activation/Deactivation.

7" Colour-Info-Display

Press ; to open homepage.

Use touch buttons to operate the

display:
Select Settings.

Unit settings

Select Units
Change units for Consumption and

Distance and Temperature.
Touch 9 repeatedly to return to the

homepage.

Language settings

Select Language.
Change language by touching the

respective entry.
Touch 9 repeatedly to return to the

homepage.

Vehicle settings

Select Vehicle.
In the corresponding submenus the

following settings can be changed:

● Collision / Detection Systems

Side Blind Spot Alert: Activates

or deactivates side blind spot

alert.

Drowsy Driver Alert : Activates or

deactivates the driver

drowsiness system.
Speed Limit Information:

Activates or deactivates the

speed limit information by traffic

sign recognition.
Rear View Camera Guidelines:

Activates or deactivates the rear

view camera guidelines on the

Info display.

● Comfort and Convenience

Auto Wipe in Reverse Gear:

Activates or deactivates

automatic switching on of the

rear window wiper when reverse

gear is engaged.

● Lighting

Ambient Lighting: Activates or

deactivates the ambient lighting

and adjusts its brightness.
Welcome Lighting: Activates or

deactivates and changes the

duration of welcome lighting.

-------------------------------------------------------------------------------------------------------------------------------------------------------------

Instruments and controls

105

Exit Lighting: Activates or

deactivates and changes the

duration of exit lighting.

● Remote Lock, Unlock, Start

Remote Door Unlock: Changes

the configuration to unlock the

driver's door only or all doors

when pressing O on the remote

control.
Unlock boot only: Activates or

deactivates unlocking the tailgate

only when pressing T on the

remote control.

Touch 9 repeatedly to return to the

homepage.

8" Colour-Info-Display

Press SET to open settings menu.
Use touch buttons to operate the

display.

Unit settings

Select System settings.
Change units for Consumption and

Distance and Temperature.
Confirm with G
Touch r repeatedly to exit the menu.

Language settings

Select Languages.

Change language by touching the

respective entry.
Confirm with G
Touch r repeatedly to exit the menu.

Vehicle settings

Press Í.
Select Vehicle settings.
In the corresponding submenus the

following settings can be changed:

● Headlights

Welcome lighting: Activates or

deactivates the function and

adjusts its duration.

-------------------------------------------------------------------------------------------------------------------------------------------------------------

106

Instruments and controls

Guide-me-home lighting:

Activates or deactivates the

function and adjusts its duration.

● Comfort

Mood lighting: Adjusts the

brightness of the ambient

lighting.
Rear wiper in reverse: Activates

or deactivates automatic

switching on of the rear window

wiper when reverse gear is

engaged.

● Vehicle access

Door unlock: boot only: Activates

or deactivates unlocking the

tailgate only when pressing T

on the remote control.
Door unlock: driver only:

Changes the configuration to

unlock the driver's door only or all

doors when pressing O on the

remote control.

● Safety

Driver attention warning:

Activates or deactivates the

driver drowsiness system.

Driving functions

Press Í.
Select Driving functions.
In the corresponding submenus the

following settings can be changed:

● Park Assist: Activates advanced

park assist, a parking maneuver

can be selected.

● Blind Spot Sensors: Activates or

deactivates side blind spot alert.

● Panoramic view system:

Activation/deactivation of the

function.

Telematics service

OnStar

OnStar is a personal connectivity and

service assistant with integrated

Wi-Fi hotspot. The OnStar service is

available 24 hours a day, seven days

a week.

Note

OnStar is not available for all

markets. For further information,

contact your workshop.
Note

In order to be available and

operational, OnStar needs a valid

OnStar subscription, functioning

vehicle electrics, ignition on, mobile

service and GPS satellite link.

To activate the OnStar services and

set up an account, press Z and speak

with an advisor.

-------------------------------------------------------------------------------------------------------------------------------------------------------------

Instruments and controls

107

Depending on the equipment of the

vehicle, the following services are

available:

● Emergency services and support

in the case of a vehicle

breakdown

● Wi-Fi hotspot
● Smartphone application
● Remote control, e.g. location of

the vehicle, activation of horn and

lights, control of central locking

system

● Stolen vehicle assistance
● Vehicle diagnostics

Note

The OnStar module of the vehicle is

deactivated after ten days without an

ignition cycle. Functions requiring a

data connection will be available

again after switching on the ignition.

OnStar buttons

Privacy button

Press and hold j until a message is

heard to activate or deactivate the

transmission of the vehicle location.
Press j to answer a call or to end a

call to an advisor.
Press j to access the Wi-Fi settings.

Service button

Press Z to establish a connection to

an advisor.

SOS button

Press [ to establish a priority

emergency connection to a specially

trained emergency advisor.

Status LED

Green: The system is ready with

activated transmission of the vehicle

location.
Green flashing: The system is on a

call.
Red: A problem arose.
Off: The system is ready with

deactivated transmission of the

vehicle location or the system is in

standby mode.
Red / green flashing for a short period

of time: The transmission of the

vehicle location has been

deactivated.

OnStar services

General services

If you need any information e.g.

opening hours, points of interest and

destinations or if you need any

support e.g. in the case of a vehicle

-------------------------------------------------------------------------------------------------------------------------------------------------------------

108

Instruments and controls

breakdown, a flat tyre and empty fuel

tank, press Z to establish a

connection to an advisor.

Emergency services

In the case of an emergency situation,

press [ and talk to an advisor. The

advisor then contacts emergency or

assistance service providers and

directs them to your vehicle.
In the case of an accident with

activation of airbags or belt

tensioners, an automatic emergency

call is established. The advisor is

immediately connected to your

vehicle to see whether help is

needed.

Note

Establishing an emergency call may

not be possible in areas without

sufficient network availability or due

to hardware damage during an

accident.

Wi-Fi hotspot

The Wi-Fi hotspot of the vehicle

provides internet connectivity with a

maximum speed of 4G/LTE.

Note

The Wi-Fi hotspot functionality is not

available for all markets.

Up to seven devices may be

connected.
To connect a mobile device with the

Wi-Fi hotspot:

1. Press j and then select Wi-Fi

settings on the Info-Display. The

settings displayed include the Wi-

Fi hotspot name (SSID),

password and connection type.

2. Start a Wi-Fi network search on

your mobile device.

3. Select your vehicle hotspot

(SSID) when listed.

4. When prompted, enter the

password on your mobile device.

Note

To change the SSID or password,

press Z and talk to an advisor or log

in to your account.

To switch off the Wi-Fi hotspot

functionality, press Z to call an

advisor.

Smartphone app

With the myOpel smartphone app,

some vehicle functions can be

operated remotely.
The following functions are available:

● Lock or unlock vehicle.
● Honk horn or flash lights.
● Check fuel level.
● Locate vehicle on a map.
● Manage Wi-Fi settings.

To operate these functions, download

the app from App Store

®

 or

Google Play™ Store.

Remote control

If desired, use any phone to call an

advisor, who can remotely operate

specific vehicle functions. Find the

respective OnStar phone number on

our country-specific website.
The following functions are available:

● Lock or unlock vehicle.
● Provide information on the

vehicle location.

● Honk horn or flash lights.

-------------------------------------------------------------------------------------------------------------------------------------------------------------

Instruments and controls

109

Stolen vehicle assistance

If the vehicle is stolen, report the theft

to the authorities and request OnStar

stolen vehicle assistance. Use any

phone to call an advisor. Find the

respective OnStar phone number on

our country-specific website.
OnStar can provide support in

locating and recovering the vehicle.
Theft alert

When the anti-theft alarm system is

triggered, a notification is sent to

OnStar. You are then informed about

this event by text message or email.
Restart prevention

By sending remote signals, OnStar

can prevent the vehicle from

restarting once it has been turned off.

On-demand diagnostics

At any time e.g. if the vehicle displays

a vehicle message, press Z to

contact an advisor and ask to

complete a real-time diagnostic check

to directly determine the issue.

Depending on the results, the advisor

will provide further support.

Diagnostic report

The vehicle automatically transmits

diagnostic data to OnStar which

sends a monthly email report to you

and your preferred workshop.

Note

The workshop notification function

can be disabled in your account.

The report contains the status of key

operating systems of the vehicle like

engine, transmission, airbags, ABS,

and other major systems. It also

provides information on possible

maintenance items and tyre pressure

(only with tyre pressure monitoring

system).
To look at the information in greater

detail, select the link within the email

and log in to your account.

OnStar settings

OnStar PIN

To have full access to all OnStar

services, a four-digit PIN is required.

The PIN has to be personalised when

first talking to an advisor.
To change the PIN, press Z to call an

advisor.

Account data

An OnStar subscriber has an account

where all the data is stored. To

request a change of the account

information, press Z and talk to an

advisor or log in to your account.
If the OnStar service is used on

another vehicle, press Z and request

that the account be transferred to the

new vehicle.

Note

In any case, if the vehicle is disposed

of, sold or otherwise transferred,

immediately inform OnStar about

the changes and terminate the

OnStar service on this vehicle.

Vehicle location

The vehicle location is transmitted to

OnStar when service is requested or

triggered. A message on the Info-

Display informs about this

transmission.
To activate or deactivate the

transmission of the vehicle location,

press and hold j until an audio

message is heard.

-------------------------------------------------------------------------------------------------------------------------------------------------------------

110

Instruments and controls

The deactivation is indicated by the

status light flashing red and green for

a short period of time and each time

the vehicle is started.

Note

If the transmission of the vehicle

location is deactivated, some

services are no longer available.
Note

The vehicle location always remains

accessible to OnStar in the case of

an emergency.

Find the privacy policy in your

account.

Software updates

OnStar may remotely carry out

software updates without further

notice or consent. These updates are

to enhance or maintain safety and

security or the operation of the

vehicle.
These updates may concern privacy

issues. Find the privacy policy in your

account.

-------------------------------------------------------------------------------------------------------------------------------------------------------------

Lighting

111

Lighting

Exterior lighting .......................... 111

Light switch .............................. 111

Automatic light control ............. 112

High beam ............................... 112

Headlight flash ......................... 112

Headlight range adjustment .... 113

Daytime running lights ............. 113

Adaptive forward lighting ......... 113

Hazard warning flashers .......... 114

Turn and lane-change signals . 115

Front fog lights ......................... 115

Rear fog light ........................... 116

Parking lights ........................... 116

Reversing lights ....................... 116

Misted light covers ................... 116

Interior lighting ........................... 117

Instrument panel illumination

control ..................................... 117

Interior lights ............................ 117

Reading lights .......................... 117

Sunvisor lights ......................... 118

Lighting features ........................ 118

Centre console lighting ............ 118

Entry lighting ............................ 118

Exit lighting .............................. 118

Battery discharge protection .... 119

Exterior lighting

Light switch

Turn light switch:
AUTO : automatic light control

switches automatically

between daytime running

light and headlight

8

: sidelights

9

: headlights

Control indicator 8 3 95.

Tail lights

Tail lights are illuminated together

with low/high beam and sidelights.

-------------------------------------------------------------------------------------------------------------------------------------------------------------

112

Lighting

Automatic light control

When the automatic light control

function is switched on and the

engine is running, the system

switches between daytime running

lights and headlights automatically

depending on the external lighting

conditions and information given by

the rain sensor system.
Daytime running light 3 113.

Automatic headlight activation

During poor lighting conditions

headlights are switched on.

Additionally, headlights are switched

on if the windscreen wipers have

been activated for several wipes.
Adaptive forward lighting 3 113

Tunnel detection

When a tunnel is entered headlights

are switched on immediately.

High beam

Push lever to switch from low to high

beam.
Pull lever to deactivate high beam.
High beam assist 3 113.

Headlight flash

To activate the headlight flash, pull

lever.
Pulling lever deactivates high beam.

-------------------------------------------------------------------------------------------------------------------------------------------------------------

Lighting

113

Headlight range adjustment

Manual headlight range

adjustment 

To adapt headlight range to the

vehicle load to prevent dazzling: turn

thumb wheel ? to required position.
0 : front seats occupied

1 : all seats occupied

2 : all seats occupied and load

compartment laden

3 : driver's seat occupied and load

compartment laden

Daytime running lights

Daytime running lights increases

visibility of the vehicle during daylight.
They are switched on automatically

during daytime when engine is

running.
The system switches between

daytime running lights and low beam

automatically, depending on the

lighting conditions.

Adaptive forward lighting

The Adaptive forward lighting

functions are only available with LED

headlights.
LED headlights for low and high beam

ensure better visibility under all

conditions.
Operation is the same as for halogen

headlights.
Adaptive forward lighting functions

are active automatically with light

switch in position AUTO. Adaptive

forward lighting includes following

functions:

● cornering lights
● high beam assist
● automatic headlight levelling

Cornering light

When turning off, depending on the

steering angle and the turn signal

light, particular LEDs are triggered

which illuminate the direction of

travel. It is activated up to a speed of

40 km/h.

High beam assist

This feature allows high beam to

function as the main driving light at

night and when vehicle speed

exceeds 25 km/h.

-------------------------------------------------------------------------------------------------------------------------------------------------------------

114

Lighting

It switches automatically to low beam

when:

● The camera or a sensor in the

windscreen detects the lights of

oncoming or preceding vehicles.

● The vehicle speed drops below

15 km/h.

● It is foggy or snowy.
● Driving in urban areas.

If there are no restrictions detected,

the system switches back to high

beam.

Activation

Activate this function pressing a

button on the turn and lane change

lever. The LED of the button

illuminates if the high beam assist is

activated. The high beam is switched

on automatically at a speed above

25 km/h.
The green control indicator f

illuminates continuously when the

assist is activated, the blue one 7

illuminates when high beam is on.
Control indicator f 3 95.

Deactivation

Deactivate this function pressing a

button on the turn and lane change

lever.
If a headlight flash is activated when

the high beam assist is activated and

low beam is on, the high beam assist

will be deactivated. The system

changes to high beam.
If a headlight flash is activated when

the high beam assist is activated and

high beam is on, the high beam assist

will be deactivated. The system

changes to low beam.
To reactivate the high beam assist,

flash the headlights again.

Automatic headlight levelling

To prevent oncoming traffic from

being dazzled, headlight levelling is

automatically adjusted based on the

load in the vehicle.

Fault in Adaptive forward lighting-

LED system

When the system detects a failure in

the Adaptive forward lighting-LED

headlight system, a warning is

displayed in the Driver Information

Centre.

Hazard warning flashers

Operated by pressing ¨.

-------------------------------------------------------------------------------------------------------------------------------------------------------------

Lighting

115

When braking in an emergency, the

hazard warning flashers are switched

on automatically depending on the

force of deceleration. They are

switched off automatically the first

time you accelerate if you press ¨.

Turn and lane-change

signals

lever up

: right turn signal

lever down : left turn signal
A resistance point can be felt by

moving the lever.

Move the lever past the resistance

point to switch on constantly. When

the steering wheel moves opposite,

the turn signal is automatically

deactivated. Switch off manually by

moving the lever to its original

position.
Tap shortly to switch on for three

flashes, e.g., when changing lanes.
Move the lever to the resistance point

and hold for flashing until lever is

released.
If you forget to cancel the turn and

lane-change signals for more than

twenty seconds, the volume of the

audible signal will increase if the

speed is above 60 km/h.

Front fog lights

Operated by pressing >.
Light switch in position AUTO:

switching on front fog lights will switch

headlights on automatically.

-------------------------------------------------------------------------------------------------------------------------------------------------------------

116

Lighting

Rear fog light

Operated by pressing ø.
Light switch in position AUTO:

switching on rear fog light will switch

headlights on automatically.
Light switch in position 8: rear fog

light can only be switched on with

front fog lights.
The vehicle rear fog light is

deactivated when towing a trailer or a

plug is connected with the socket, e.

g. when a bicycle carrier is used.

Parking lights

When the vehicle is parked, the

parking lights on one side can be

activated:

1. Switch off ignition.
2. Move turn signal lever all the way

up (right parking lights) or down

(left parking lights).

Confirmed by a signal and the

corresponding turn signal control

indicator.

Reversing lights

The reversing light comes on when

the ignition is on and reverse gear is

selected.

Misted light covers

The inside of the light housing may

mist up briefly in poor, wet and cold

weather conditions, in heavy rain or

after washing. The mist disappears

quickly by itself; to help switch on the

headlights.

-------------------------------------------------------------------------------------------------------------------------------------------------------------

Lighting

117

Interior lighting

Instrument panel

illumination control

Brightness of the following lights can

be adjusted in position AUTO when

the light sensor detects night

conditions, or in position 8 or 9:

● instrument panel illumination
● Info-Display
● illuminated switches and

operation elements

Turn thumb wheel A and hold until

the desired brightness is obtained.

Interior lights

During entry and exit of the vehicle,

the front and rear courtesy lights

automatically switch on and then off

after a delay.

Note

In the event of an accident with

airbag deployment the courtesy

lights are turned on automatically.

Front courtesy light

Operate rocker switch:
w

: automatic switching on

and off

press u : on

press v : off

Rear courtesy lights

Illuminate in conjunction with the front

courtesy light depending on rocker

switch position.

Reading lights

Operated by pressing s and t in the

courtesy lights.

-------------------------------------------------------------------------------------------------------------------------------------------------------------


Content      ..     5      6      7      8     ..