Nissan Quest E52. Manual - part 809


  Index      Nissan     Nissan Quest E52 (2011-2014 year) - Service and Repair Manual


Search            


Content   ..  807  808  809  810   ..


Nissan Quest E52. Manual - part 809


HEADLINING

INT-35

< REMOVAL AND INSTALLATION >

C

D

E

F

G

H

I

K

L

M

A

B

INT

N

O

P

Removal and Installation

INFOID:0000000009650295

CAUTION:

• When removing, always use a remover tool that is made of plastic to prevent damage to the parts.
• Never damage the body.

REMOVAL

1.

Remove front pillar garnish. Refer to 

INT-21, "FRONT PILLAR GARNISH : Removal and Installation"
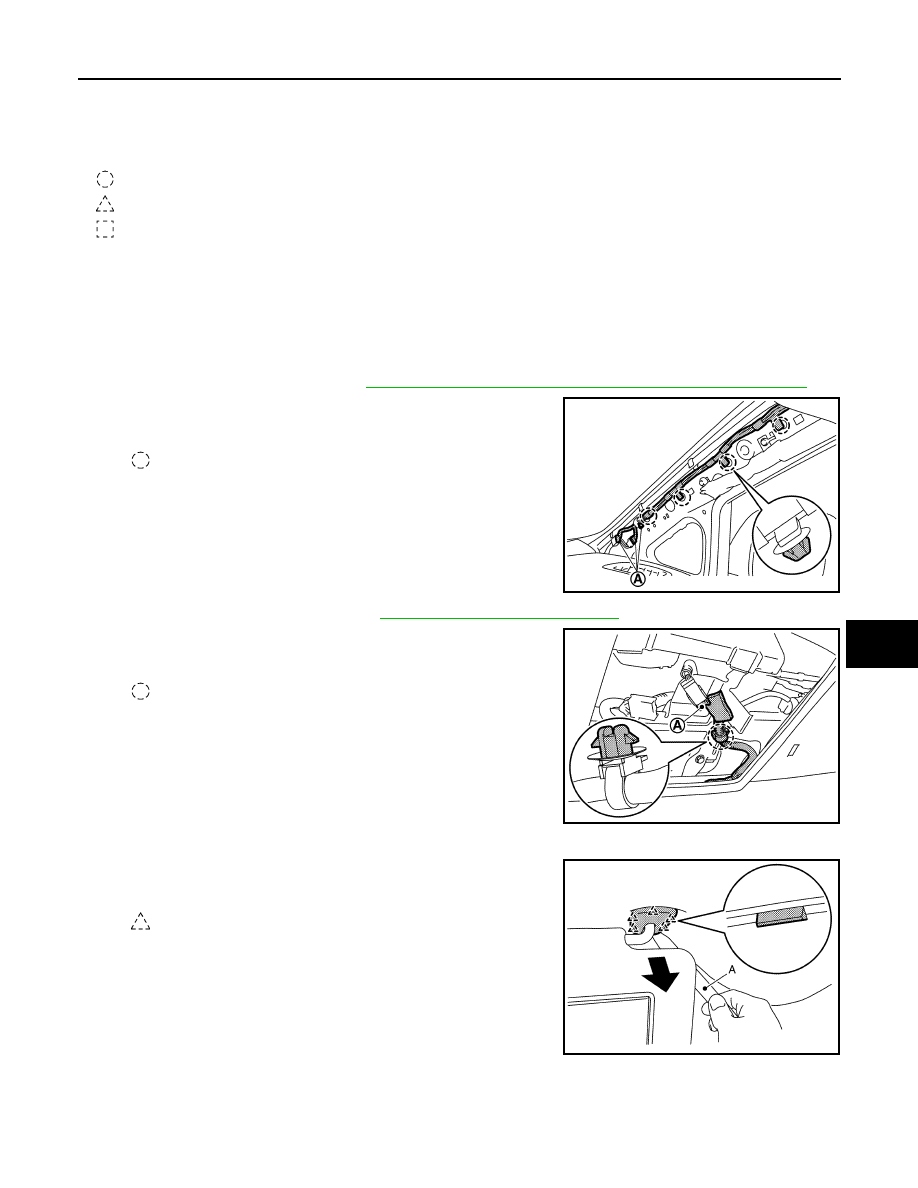
.

2.

Disconnect harness connector (A) from headlining and harness
fixing clips.

3.

Remove map lamp assembly. Refer to 

INL-67, "Removal and Installation"

.

4.

Disconnect harness connector (A), and then disengage harness
fixing clip.

5.

Remove sun visor assembly.

a.

Disengage sun visor cover fixing pawls using a remover tool (A),
and then remove sun visor cover.

b.

Remove sun visor fixing screws.

c.

Disconnect harness connector, and then remove sun visor assembly.

6.

Remove sun visor holder.

13. Sun visor cover LH

14. Front assist grip

15.

Roof console

16. Rear ventilator grille A LH

17. Second assist grip LH

18.

Rear ventilator grille B LH

19. Third assist grip LH

20. Seat belt finisher

21.

Dual lock fastener

22. Metal clip

23. Map lamp bracket

: Clip

: Pawl

: Metal clip

: Clip

JMJIA4908ZZ

: Clip

JMJIA4909ZZ

: Pawl

JMJIA4910ZZ

INT-36

< REMOVAL AND INSTALLATION >

HEADLINING

Rotate 90

°

. Remove toward vehicle dower.

7.

Remove all assist grips.

a.

Disengage pawl of assist grip clip (1) using a remover tool (A).
Slide assist grip clip forward and remove it.

b.

Slide assist grip (2) forward and remove it.

8.

Remove roof console. (with rear display)

a.

Disengage roof console fixing clips using a remover tool (A).

b.

Disconnect harness connector, and then remove roof console.

9.

Remove center pillar upper garnish. Refer to 

INT-26, "CENTER PILLAR UPPER GARNISH : Removal

and Installation"

.

10. Remove roof side garnish. Refer to 

INT-28, "ROOF SIDE GARNISH : Removal and Installation"

.

11. Disengage antenna feeder connector (A), (B), (C), and fixing bolt (D).

JMJIA4911ZZ

: Pawl

JMJIA4398ZZ

: Clip

JMJIA4912ZZ

Left side

Right side

: Pawl

: Vehicle front

JMJIA6212ZZ

HEADLINING

INT-37

< REMOVAL AND INSTALLATION >

C

D

E

F

G

H

I

K

L

M

A

B

INT

N

O

P

12. Remove seat belt finisher.

Disengage seat belt finisher fixing clips using a remover tool (A),
and then remove seat belt finisher.

13. Disengage clips on the rear end of headlining.

14. Peel dual lock fastener (A).

15. Remove headlining assembly though the back door.

CAUTION:

• Two workers are required for removal in order to prevent

damage.

• Apply protective tape to the portion where contact may

occur during work.

• ever bend headlining when removing.

16. Remove the following parts after removing headlining assembly.

• Personal lamp assembly: Refer to 

INL-77, "Removal and Installation"

.

• Rear A/C control (without rear display)

Automatic air conditioning: Refer to 

HAC-144, "Removal and Installation"

.

: Clip

JMJIA4914ZZ

1.

Normal roof

2.

Normal roof with rear display

3.

Sunroof with rear display

A.

Dual lock fastener

JMJIA6213ZZ

JMJIA4916ZZ

INT-38

< REMOVAL AND INSTALLATION >

HEADLINING

Manual air conditioning: Refer to 

HAC-239, "Removal and Installation"

.

INSTALLATION

Note the following items, and install in the reverse order of removal.

CAUTION:

• When installing headlining, start by installing both sun visor holders and headlining clips in order to

keep the headlining in position.

• Never bend headlining when installing.
• When installing assist grip, install metal clip (1) to assist grip

clip (2), and then install to the vehicle body.

NOTE:
When removing assist grip clip, metal clip remains on body side.

JMJIA3623ZZ


Content   ..  807  808  809  810   ..