Nissan Rogue. Manual - part 144


  Index      Nissan     Nissan Rogue (2015 year) - Service and Repair Manual


Search            


Content   ..  142  143  144  145   ..


Nissan Rogue. Manual - part 144


BR-46

< REMOVAL AND INSTALLATION >

REAR DISC BRAKE

CAUTION:

• Do not reuse the pad retainers and anti-rattle clips.

• Do not damage the piston boot.

• Do not drop the brake pads, shims, or the shim covers.

• Note the position of components during removal to aid with installation.

6. Compress the rear caliper piston.

INSTALLATION

1. Install the new pad retainers anti-rattle clips to the torque member.

CAUTION:

• Do not reuse the pad retainers and anti-rattle clips.

• Do not deform the pad retainers.

• Verify that the pad retainers are secured properly to the torque member.

2. Apply Molykote® AS-880N grease to the mating faces between the brake pads and Molykote® 7439 to

the pad retainers. Refer to 

BR-45, "BRAKE PAD : Exploded View"

.

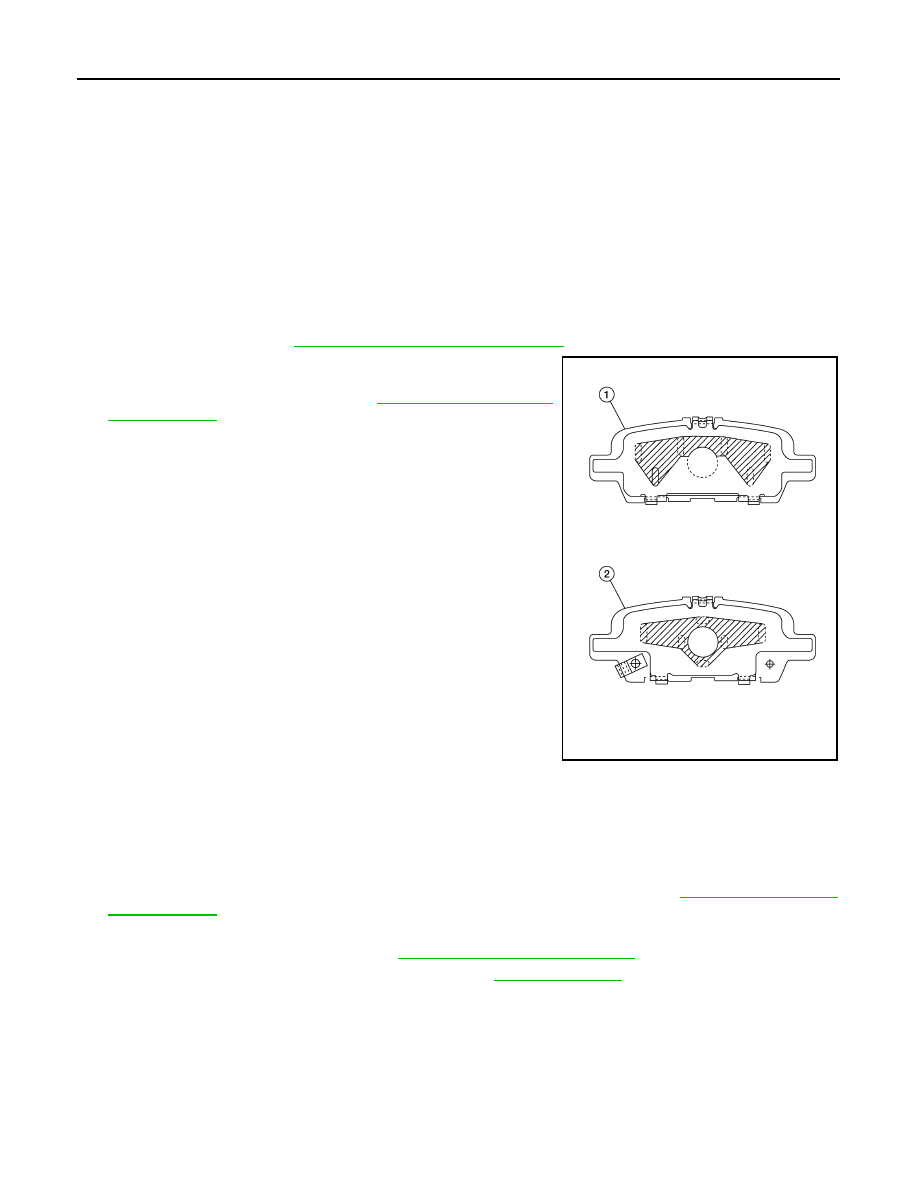
3. Apply Molykote® AS-880N grease to the mating faces between

the brake pads, inner shim (1) and outer shim (2). Install compo-

nents to the brake pad. Refer to 

BR-45, "BRAKE PAD :

Exploded View"

.

CAUTION:

When installing new brake pads, replace the shims and

shim covers.

4. Install the brake pads to the torque member.
5. Using a suitable tool, press the pistons into the brake caliper.

CAUTION:

Do not damage the piston boot.

6. Using the upper slide pin bolt as a pivot, swing the brake caliper up to the torque member.
7. Install the lower slide pin bolts. Tighten all slide pin bolts to specification. Refer to 

BR-45, "BRAKE PAD :

Exploded View"

.

8. Depress the brake pedal several times and verify that drag does not exist.
9. Install the front wheels and tires. Refer to 

WT-67, "Removal and Installation"

.

10. Check brake fluid level and refill as necessary. Refer to 

BR-8, "Inspection"

.

INSPECTION AFTER INSTALLATION

1. Check the drag of rear disc brake. If any drag is found, follow the procedure described below.
2. Remove brake pads.
3. Using a suitable tool, press the pistons into the brake caliper body.

CAUTION:

Do not damage the piston boots.

4. Install brake pads.

ALFIA0514ZZ

REAR DISC BRAKE

BR-47

< REMOVAL AND INSTALLATION >

C

D

E

G

H

I

J

K

L

M

A

B

BR

N

O

P

5. Depress the brake pedal several times.
6. Check the drag of rear disc brake again. If any drag is found, disassemble the brake caliper body.
7. Burnish contact surfaces after refinishing or replacing disc brake rotors or if a soft pedal occurs at very low

mileage. Refer to 

BR-19, "Brake Burnishing"

.

BRAKE CALIPER ASSEMBLY
BRAKE CALIPER ASSEMBLY : Exploded View

INFOID:0000000011279897

BRAKE CALIPER ASSEMBLY : Removal and Installation

INFOID:0000000011279898

WARNING:

Clean dust on brake caliper and brake pad with a vacuum dust collector to minimize the hazard of air-

borne particles or other materials.

CAUTION:

• Do not depress the brake pedal.

• Do not spill or splash brake fluid on painted areas; it may cause paint damage. If brake fluid is

splashed on painted areas, wash it away with water immediately.

• Do not bend, twist or pull the brake hoses and piping.

• Do not reuse drained brake fluid.

NOTE:

When removing components such as hoses, tubes/lines, etc., cap or plug openings to prevent fluid from spill-

ing.

REMOVAL

1. Remove reservoir cap from the reservoir tank. 
2. Remove rear wheels and tires using power tool.

1.

Torque member

2.

Brake caliper body

3.

Slide pin bushing

4.

Copper sealing washers

5.

Brake hose

A.

Niglube Rx-2

AWFIA1115ZZ

BR-48

< REMOVAL AND INSTALLATION >

REAR DISC BRAKE

3. Remove union bolt, copper sealing washers, and disconnect brake hose from brake caliper. Discard the

copper sealing washers.

CAUTION:

Do not reuse copper sealing washers.

4. Loosen the upper slide pin bolt and remove the lower slide pin bolt.
5. Remove the upper slide pin bolt and caliper from the vehicle as an assembly.
6. Remove the brake pads from the torque member.

CAUTION:

• Do not damage the piston boot.

• Do not drop the brake pads, shims, or the shim covers.

• Note the position of components during removal to aid with installation.

INSTALLATION

1. Install the brake pads in the torque member.

CAUTION:

• Do not damage the piston boot.

• Do not drop the brake pads, shims, or the shim covers.

• Note the position of components during removal to aid with installation.

2. Install the brake caliper to torque member and install the slide pin bolts. Tighten to specification.
3. Install the brake caliper and torque member to the vehicle as an assembly. Install the torque member

bolts. 

4. Assemble the union bolt (A) and the copper sealing washers (1)

to the brake hose and install it as an assembly to the brake cali-

per. Align the brake hose L-pin by aligning it with the brake cali-

per hole, and tighten the union bolt (A) to the specified torque.

CAUTION:

Do not reuse copper sealing washers.

5. Refill with new brake fluid and perform the air bleeding. Refer to 

BR-16, "Bleeding Brake System"

.

CAUTION:

• Do not reuse drained brake fluid.

• Do not spill or splash brake fluid on the disc brake rotor.

6. Install the rear wheels and tires. Refer to 

WT-67, "Removal and Installation"

.

INSPECTION AFTER INSTALLATION

1. Check the drag of rear disc brake. If any drag is found, follow the procedure described below.
2. Remove brake pads.
3. Using a suitable tool, press the pistons into the brake caliper body.

CAUTION:

Do not damage the piston boots.

4. Install brake pads.
5. Depress the brake pedal several times.
6. Check the drag of rear disc brake again. If any drag is found, disassemble the brake caliper body.
7. Burnish contact surfaces after refinishing or replacing disc brake rotors or if a soft pedal occurs at very low

mileage. Refer to 

BR-19, "Brake Burnishing"

.

AWFIA0795ZZ

FRONT DISC BRAKE

BR-49

< UNIT DISASSEMBLY AND ASSEMBLY >

C

D

E

G

H

I

J

K

L

M

A

B

BR

N

O

P

UNIT DISASSEMBLY AND ASSEMBLY

FRONT DISC BRAKE

BRAKE CALIPER ASSEMBLY (1 PISTON TYPE)
BRAKE CALIPER ASSEMBLY (1 PISTON TYPE) : Exploded View

INFOID:0000000011279899

BRAKE CALIPER ASSEMBLY (1 PISTON TYPE) : Disassembly and Assembly

INFOID:0000000011279900

DISASSEMBLY

1. Remove the brake caliper from the vehicle. Refer to 

BR-38, "BRAKE CALIPER ASSEMBLY (1 PISTON

TYPE) : Removal and Installation"

.

1.

Torque member

2.

Bushing

3.

Piston boot

4.

Slide pin boot

5.

Slide pin

6.

Piston

7.

Piston seal

8.

Brake caliper body

9.

Bleeder cap

10. Brake hose

11. Copper sealing washers

12. Inner shim cover

13. Inner shim

14. Inner pad

15. Pad retainer

16. Anti-rattle clip

17. Outer pad

18. Outer shim

19. Outer shim cover

A.

Niglube Rx-2

B.

Rubber grease

C.

Molykote® AS-880N

D.

Molykote® 7439

: Apply brake fluid.

AWFIA1112ZZ


Content   ..  142  143  144  145   ..