Nissan Altima HL32 Hybrid. Manual - part 440


  Index      Nissan     Nissan Altima HL32 Hybrid (2009 year) - Service and Repair Manual


Search            


Content   ..  438  439  440  441   ..


Nissan Altima HL32 Hybrid. Manual - part 440


EXL-160

< ON-VEHICLE REPAIR >

HEADLAMP

ON-VEHICLE REPAIR

HEADLAMP

Bulb Replacement

INFOID:0000000004216442

HEADLAMP

CAUTION:

Do not touch the glass of bulb directly by hand. Keep grease and other oily substances away from

bulb. Do not touch bulb by hand while it is lit or right after being turned off, burning may result.

Removal

1. Disconnect 12-volt battery negative terminal. Refer to 

PG-69, "Removal and Installation"

.

2. Position the fender protector aside. Refer to 

EXT-18, "Removal and Installation"

.

3. Turn the headlamp bulb sockets counterclockwise to unlock and remove them.
4. Turn the high beam lamp bulb socket counterclockwise to unlock and remove it. 

Installation

Installation is in the reverse order of removal.

CAUTION:

After installing a headlamp bulb, be sure to install the bulb socket securely to ensure watertightness.

FRONT TURN SIGNAL LAMP

Removal

1. Turn the bulb socket counterclockwise to unlock it.
2. Pull the bulb to remove it.

Installation

Installation is in the reverse order of removal.

CAUTION:

After installing a headlamp bulb, be sure to install the bulb socket securely to ensure watertightness.

Removal and Installation

INFOID:0000000004216443

COMBINATION LAMP

Removal

1. Disconnect 12-volt battery negative terminal. Refer to  

PG-69, "Removal and Installation"

.

2. Remove the front bumper fascia. Refer to 

EXT-12, "Removal and Installation"

.

3. Ensure lighting switch is OFF.
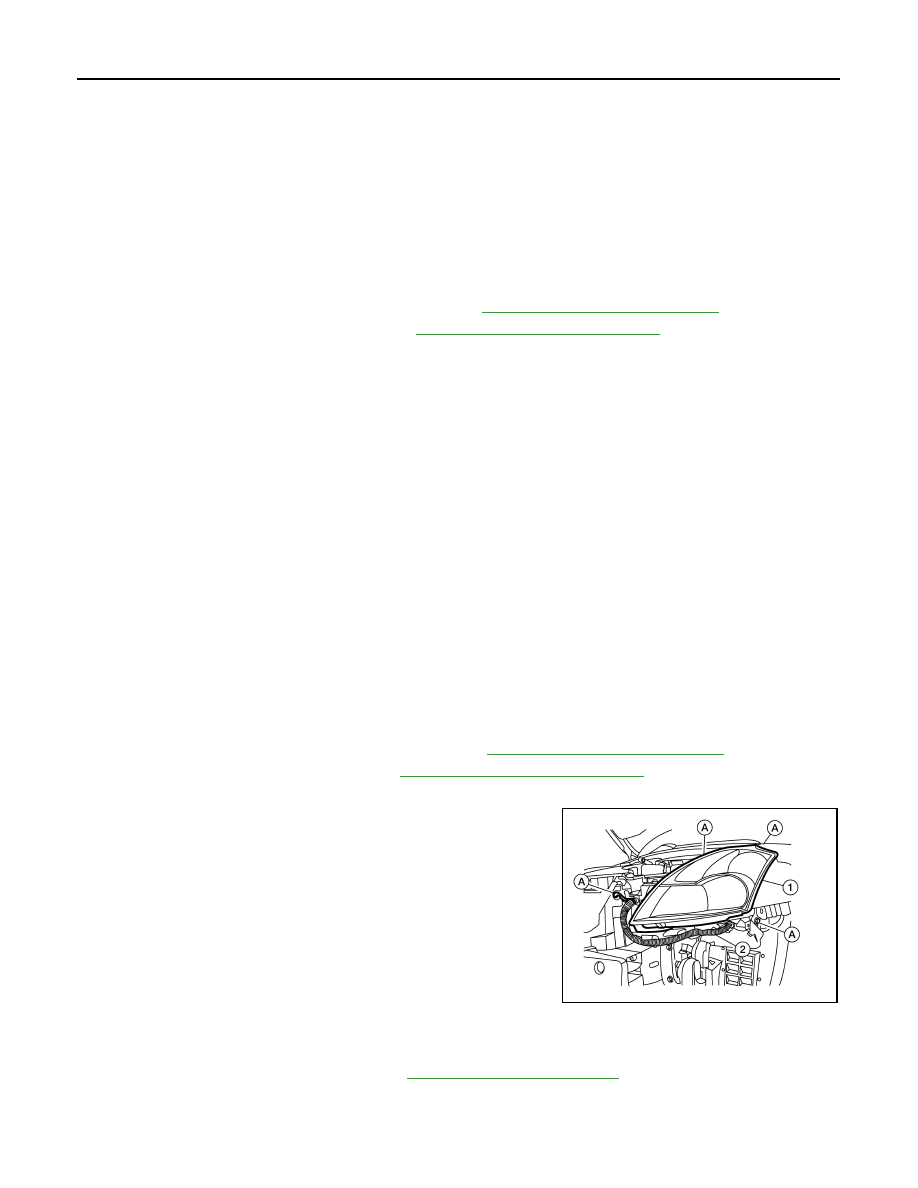
4. Remove the headlamp bolts (A).
5. Pull the headlamp assembly (1) toward the front of the vehicle,

detach the headlamp harness (2) from the headlamp assembly

(1), disconnect the bulb connectors and remove.

Installation

Installation is in the reverse order of removal.

NOTE:

Confirm headlamp aiming adjustment. Refer to 

EXL-157, "Aiming Adjustment"

.

AWLIA1713ZZ

HEADLAMP

EXL-161

< ON-VEHICLE REPAIR >

C

D

E

F

G

H

I

J

K

M

A

B

EXL

N

O

P

Disassembly and Assembly

INFOID:0000000004216444

Combination Lamp

Disassembly

CAUTION:

• Do not touch the glass of the bulb directly by hand. Keep grease and other oily substances away

from bulb. Do not touch bulb while it is lit or right after being turned off, burning may result.

1. Turn the halogen lamp bulb (low beam) counterclockwise to unlock and remove it.
2. Turn the halogen lamp bulb (high beam) socket counterclockwise to unlock and remove it.
3. Turn the front turn signal lamp bulb socket counterclockwise to unlock and remove it.
4. Pull the front turn signal lamp bulb from its socket.
5. Turn the park/side marker lamp bulb socket counterclockwise to unlock and remove it.
6. Pull the park/side marker lamp bulb from its socket.

Assembly

Assembly is in the reverse order of disassembly.

1.

Headlamp assembly

2. Halogen lamp bulb (high beam) 3. Halogen lamp bulb (low beam)

4.

Front turn signal lamp bulb socket 5. Front turn signal lamp bulb 

6. Park/side marker lamp bulb socket

7.

Park/side marker lamp bulb

AWLIA1714ZZ

EXL-162

< ON-VEHICLE REPAIR >

FRONT FOG LAMP

FRONT FOG LAMP

Bulb Replacement

INFOID:0000000004216445

REMOVAL

CAUTION:

• Do not touch the glass of bulb directly by hand. Keep grease and other oily substances away from it.

Do not touch bulb by hand while it is lit or right after being turned off. Burning may result.

• Do not leave bulb out of fog lamp reflector for a long time because dust, moisture smoke, etc. may

affect the performance of fog lamp. When replacing bulb, be sure to replace it with new one.

NOTE:

The fog lamp is a semi-sealed beam type which uses a replaceable halogen bulb.
1. Position the front fender protector aside. Refer to 

EXT-18, "Removal and Installation"

.

2. Disconnect the fog lamp electrical connector.
3. Turn the fog lamp bulb (B) counterclockwise to remove it.

• Fog lamp assembly (1)

• Fog lamp bolt (A)

INSTALLATION

Installation is in the reverse order of removal.

Removal and Installation

INFOID:0000000004216446

REMOVAL

The fog lamp is a semi-sealed beam type which uses a replaceable halogen bulb.

CAUTION:

• Do not leave fog lamp assembly without bulb for a long period of time. Dust, moisture, smoke, etc.

entering the fog lamp body may affect the performance. Remove the bulb from the headlamp assem-

bly just before replacement bulb is installed.

• Grasp only the plastic base when handling the bulb. Never touch the glass envelope. Touching the

glass could significantly affect the bulb life and/or fog lamp performance.

1. Remove inner splash shield.
2. Position the fender protector aside. Refer to 

EXT-18, "Removal and Installation"

.

3. Disconnect the fog lamp electrical connector.
4. Remove bolt (A) from top of the fog lamp (1).
5. Remove the fog lamp (1).

• Fog lamp bulb (B)

INSTALLATION

Installation is in the reverse order of removal.

• Check fog lamp aiming adjustment. Refer to 

EXL-159, "Aiming Adjustment"

.

ALLIA0225GB

ALLIA0225GB

DAYTIME RUNNING LIGHT SYSTEM

EXL-163

< ON-VEHICLE REPAIR >

C

D

E

F

G

H

I

J

K

M

A

B

EXL

N

O

P

DAYTIME RUNNING LIGHT SYSTEM

Removal and Installation

INFOID:0000000004216447

REMOVAL

1. Disconnect the IPDM E/R. Refer to 

PCS-39, "Removal and Installation"

.

2. Disconnect the harness junction block to position it aside.
3. Remove the DTRL relay (1).

: Front

INSTALLATION

Installation is in the reverse order of removal.

ALLIA0835ZZ


Content   ..  438  439  440  441   ..