Nissan Frontier. Manual - part 62
 

  Index      Nissan     Nissan Frontier (2014 year) - Service and Repair Manual


Search            


Content   ..  60  61  62  63   ..


Nissan Frontier. Manual - part 62


AV-240

< REMOVAL AND INSTALLATION >

[DISPLAY AUDIO WITH AMPLIFIER]

STEERING SWITCH

STEERING SWITCH

Removal and Installation

INFOID:0000000009482179

Removal and Installation

REMOVAL

1. Remove the driver air bag module. Refer to 

SR-11, "Removal and Installation"

.

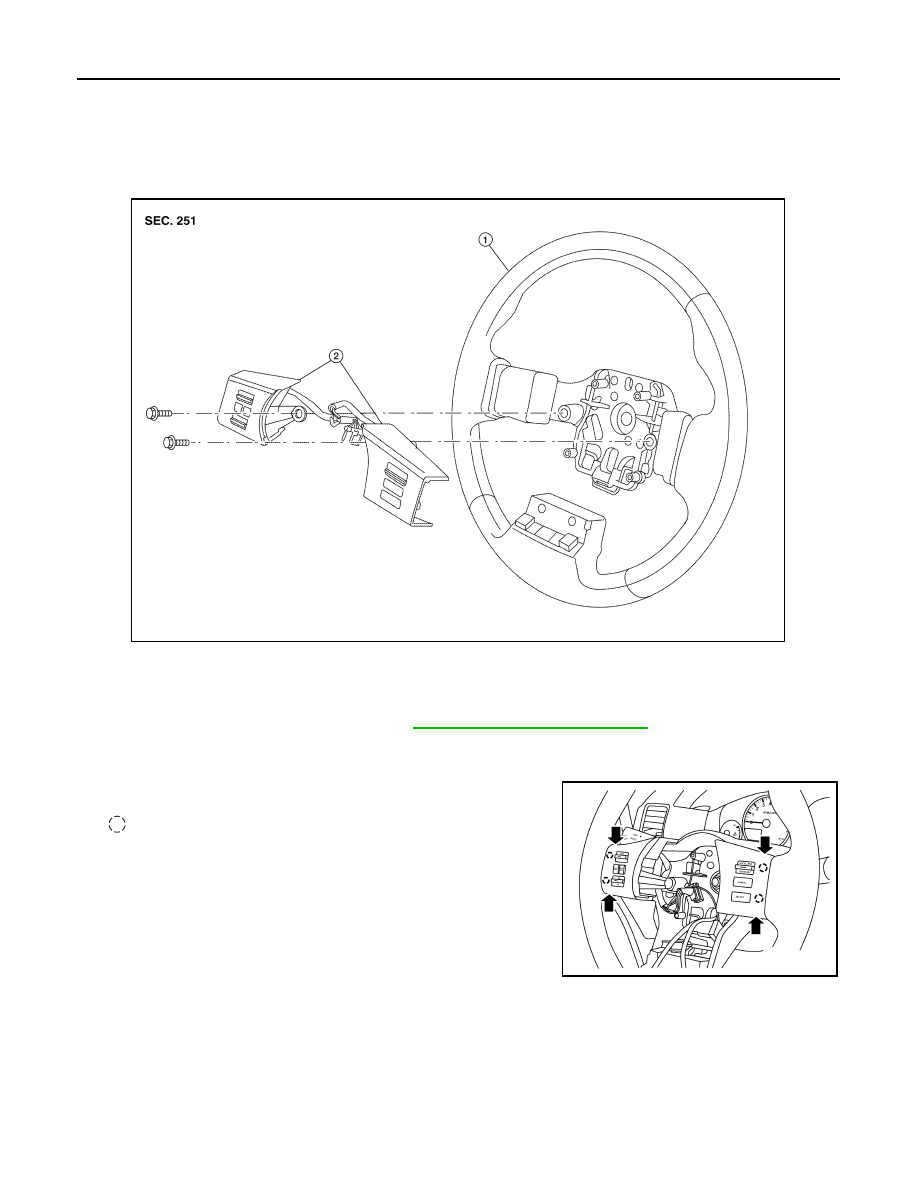
2. Remove the steering wheel audio control switch assembly screws.
3. Disconnect the harness connectors from the steering wheel audio control switches. 
4. Remove the steering wheel audio control switches by pulling on

steering wheel audio control switches to release the pawls.

: Pawl

CAUTION:

Do not tilt steering wheel audio control switches during

removal or damage may occur to the pawls.

INSTALLATION

Installation is in the reverse order of removal.

1. Steering wheel

2.

Steering wheel audio control switches

ALNIA0357ZZ

ALNIA1214ZZ

AV

BLUETOOTH CONTROL UNIT

AV-241

< REMOVAL AND INSTALLATION >

[DISPLAY AUDIO WITH AMPLIFIER]

C

D

E

F

G

H

I

J

K

L

M

B

A

O

P

BLUETOOTH CONTROL UNIT

Removal and Installation

INFOID:0000000009482180

REMOVAL

NOTE:

Do not remove the RH front seat from the vehicle.
1. Remove the RH front seat bolts, disconnect the harness connectors from the RH front seat. Refer to 

SE-

32, "Removal and Installation"

2. Tilt the RH front seat back to access the bluetooth control unit.

1.

Bluetooth control unit front bracket

2.

Bluetooth control unit/antenna

3.

Bluetooth control unit rear bracket

Front

ALNIA1069ZZ

AV-242

< REMOVAL AND INSTALLATION >

[DISPLAY AUDIO WITH AMPLIFIER]

BLUETOOTH CONTROL UNIT

3. Disconnect the harness connector (B) from the Bluetooth control

unit.

4. Remove the Bluetooth control unit screws (A), then remove the

Bluetooth control unit assembly (1).

5. Remove the Bluetooth control unit bracket screws and Bluetooth

control unit front and rear brackets.

INSTALLATION

Installation is in the reverse order of removal.

AWNIA1812ZZ

AV

MICROPHONE

AV-243

< REMOVAL AND INSTALLATION >

[DISPLAY AUDIO WITH AMPLIFIER]

C

D

E

F

G

H

I

J

K

L

M

B

A

O

P

MICROPHONE

Removal and Installation

INFOID:0000000009482181

REMOVAL

1. Remove the roof console. Refer to 

INT-25, "Removal and Installation"

.

2. Release the pawls that retain the Bluetooth microphone (1) to

the roof console.

3. Disconnect the harness connector (A) from the Bluetooth micro-

phone (1) and remove.

INSTALLATION

Installation is in the reverse order of removal.

ALNIA2931ZZ


Content   ..  60  61  62  63   ..