Nissan Leaf. Manual - part 874


  Index      Nissan     Nissan Leaf (2011-2014 year) - Service and Repair Manual


Search            


Content   ..  872  873  874  875   ..


Nissan Leaf. Manual - part 874


LUGGAGE FLOOR TRIM

INT-41

< REMOVAL AND INSTALLATION >

C

D

E

F

G

H

I

K

L

M

A

B

INT

N

O

P

2. Disengage and remove luggage side lower finisher.

INSTALLATION

Install in the reverse order of removal.

LUGGAGE FLOOR BOARD
LUGGAGE FLOOR BOARD : Removal and Installation

INFOID:0000000010119683

CAUTION:

Do not damage the body.

REMOVAL

1. Remove subwoofer (if equipped). Refer to 

AV-500, "Removal and Installation"

.

2. Remove luggage floor board from back door opening portion.

INSTALLATION

Install in the reverse order of removal.

LUGGAGE REAR PLATE
LUGGAGE REAR PLATE : Removal and Installation

INFOID:0000000010119684

CAUTION:

• When removing, always use a suitable tool that is made of plastic to prevent damage to the parts.

• Never damage the body.

REMOVE

1. Remove back door weather-strip. Refer to 

DLK-185, "BACK DOOR WEATHER-STRIP : Removal and

Installation"

.

2. Remove luggage floor board. Refer to 

INT-41, "LUGGAGE FLOOR BOARD : Removal and Installation"

.

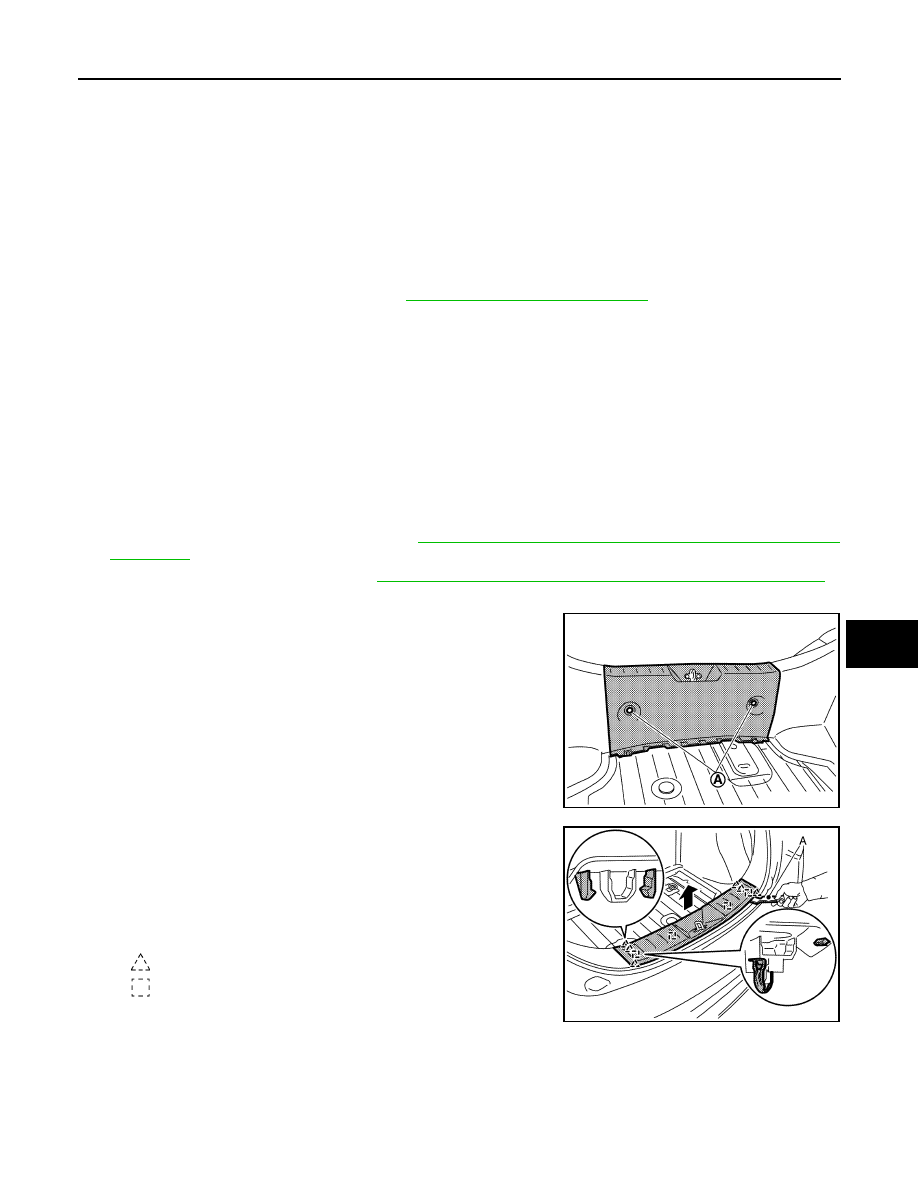
3. Remove luggage rear plate.
a. Disengage luggage rear plate fixing clips (A).

b. Disengage luggage rear plate fixing pawls and metal clips with a

suitable tool (A), and then remove luggage rear plate.

CAUTION:

Always remove the part while lifting it up toward vehicle

upper. Or otherwise, the parts that are stuck in luggage side

lower finisher may be damaged.

INSTALLATION

Note the following item, and install in the reverse order of removal.

CAUTION:

When installing, check in advance that pawls and metal clips are accurately aligned with the holes on

body side, and then install by pressing in.

LUGGAGE FLOOR UPPER FINISHER

JMJIA5146ZZ

: Pawl

: Metal clip

JMJIA5147ZZ

INT-42

< REMOVAL AND INSTALLATION >

LUGGAGE FLOOR TRIM

LUGGAGE FLOOR UPPER FINISHER : Removal and Installation

INFOID:0000000010119685

CAUTION:

• When removing, always use a suitable tool that is made of plastic to prevent damage to the parts.

• Never damage the body.

REMOVE

1. Remove rear parcel shelf finisher. Refer to 

INT-40, "REAR PARCEL SHELF FINISHER : Removal and

Installation"

.

2. Remove luggage floor board. Refer to 

INT-41, "LUGGAGE FLOOR BOARD : Removal and Installation"

.

3. Remove luggage floor upper finisher.
a. Apply protective tape (A) on the parts to protect it from damage.

b. Remove luggage floor upper finisher fixing clips (A).
c.

Disengage luggage floor upper finisher fixing pawls with a suit-

able tool (B), and then remove luggage floor upper finisher.

CAUTION:

Always remove the part while lifting it up toward vehicle

upper. Or otherwise, the parts that are stuck in luggage side

lower finisher may be damaged.

INSTALLATION

Note the following item, and install in the reverse order of removal.

CAUTION:

When installing, check in advance that pawls are accurately aligned with the holes on body side, and

then install by pressing in.

LUGGAGE FINISHER MASK
LUGGAGE FINISHER MASK : Removal and Installation

INFOID:0000000010119686

CAUTION:

• When removing, always use a suitable tool that is made of plastic to prevent damage to the parts.

• Never damage the body.

REMOVE

JMJIA6958ZZ

: Pawl

JMJIA6981ZZ

LUGGAGE FLOOR TRIM

INT-43

< REMOVAL AND INSTALLATION >

C

D

E

F

G

H

I

K

L

M

A

B

INT

N

O

P

1. Apply protective tape (A) on the parts to protect it from damage.

2. Disengage luggage finisher mask fixing pawls with a suitable

tool (A), and then remove luggage finisher mask.

INSTALLATION

Install in the reverse order of removal.

LUGGAGE FLOOR FRONT FINISHER
LUGGAGE FLOOR FRONT FINISHER : Removal and Installation

INFOID:0000000010119687

CAUTION:

• When removing, always use a suitable tool that is made of plastic to prevent damage to the parts.

• Never damage the body.

REMOVE

1. Remove rear seat cushion. Refer to 

SE-40, "SEAT CUSHION : Removal and Installation"

.

2. Remove rear seatback. Refer to 

SE-37, "SEATBACK : Removal and Installation"

.

3. Remove luggage floor upper finisher. Refer to 

INT-42, "LUGGAGE FLOOR UPPER FINISHER : Removal

and Installation"

.

4. Remove luggage floor front finisher.
a. Remove luggage floor front finisher fixing pawls (A) and screws

(B).

b. Pull up luggage floor front finisher, and then disengage luggage

floor front finisher fixing pawls, and then remove luggage floor

front finisher.

CAUTION:

Always remove the part while lifting it up toward vehicle

upper. Or otherwise, the parts that are stuck in luggage side

lower finisher may be damaged.

INSTALLATION

Install in the reverse order of removal.

LUGGAGE SIDE LOWER FINISHER
LUGGAGE SIDE LOWER FINISHER : Removal and Installation

INFOID:0000000010119688

CAUTION:

JMJIA6959ZZ

: Pawl

JMJIA6982ZZ

: Pawl

JMJIA5150ZZ

INT-44

< REMOVAL AND INSTALLATION >

LUGGAGE FLOOR TRIM

Never damage the body.

REMOVAL

1. Remove rear body side welt. Refer to 

INT-29, "BODY SIDE WELT : Removal and Installation"

.

2. Remove luggage rear plate. Refer to 

INT-41, "LUGGAGE REAR PLATE : Removal and Installation"

.

3. Remove luggage floor front finisher. Refer to 

INT-43, "LUGGAGE FLOOR FRONT FINISHER : Removal

and Installation"

.

4. Remove luggage hook.

Disengage luggage hook pin fixing pawl with a suitable tool (A),

and then remove luggage hook.

5. Remove luggage room lamp. Refer to 

INL-56, "Removal and Installation"

.

6. Remove luggage side lower finisher.
a. Remove hook that is hooked to body panel.

b. Disengage luggage side lower finisher fixing clips and pawls

with a suitable tool (A), and then remove luggage side lower fin-

isher.

INSTALLATION

Note the following item, and install in the reverse order of removal.

CAUTION:

When installing, check in advance that clips and pawls are accurately aligned with the holes on body

side, and then install by pressing in.

Removal and installation of shock absorber mask

CAUTION:

When removing, always use a suitable tool that is made of plastic to prevent damage to the parts.

REMOVAL

: Pawl

JMJIA5151ZZ

JMJIA5265ZZ

: Clip

: Pawl

JMJIA5152ZZ


Content   ..  872  873  874  875   ..