Nissan Leaf. Manual - part 678


  Index      Nissan     Nissan Leaf (2011-2014 year) - Service and Repair Manual


Search            


Content   ..  676  677  678  679   ..


Nissan Leaf. Manual - part 678


DOOR SASH MOLDING

EXT-31

< REMOVAL AND INSTALLATION >

C

D

E

F

G

H

I

J

L

M

A

B

EXT

N

O

P

• Replace EPT sealer of front door sash cover with a new EPT sealer if front door sash cover is

reused.

• Remove double-sided tape remaining on body and back of front door sash cover using double-sided

tape remover when removing front door sash molding.

• Install after cleaning adhesive parts of door side and back of front door sash cover.

• To secure contact, never wash vehicle within 24 hours after installation.

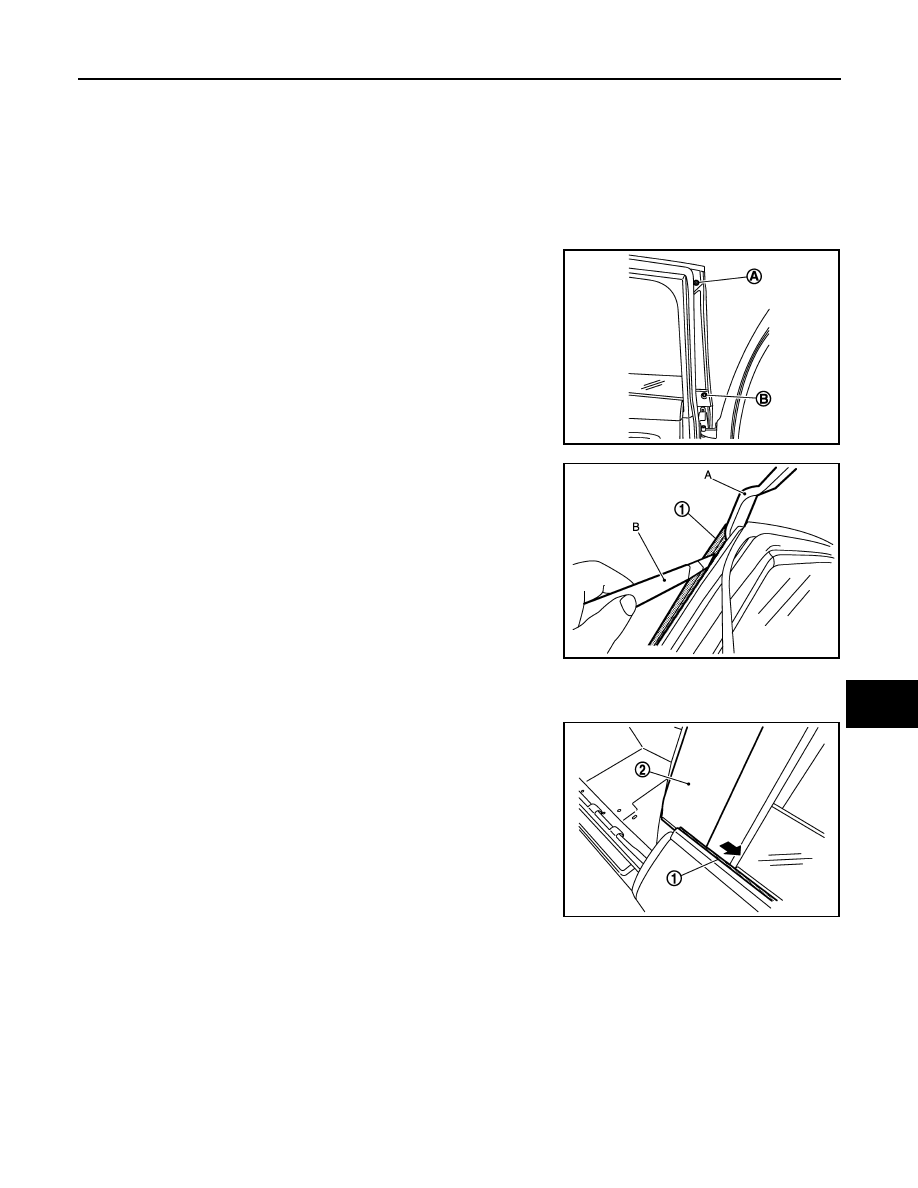
REAR DOOR SASH COVER

Removal

1. Remove rear door sash cover mounting screw (A) and clip (B).

2. Insert a suitable tool (A) between rear door sash cover (1) and

door panel, cut double-sided tape using a cutter (B) while lifting

rear door sash cover, and remove rear door sash cover.

CAUTION:

• Never use an item as a suitable tool that could damage

door panel to prevent damage to the parts.

• Never lift rear door sash cover with excessive force to

prevent damage to the parts.

Installation

Note the following items, and install in the reverse order of removal.

CAUTION:

• When installing, slide and install rear door sash cover (2) from

door front, so that rear door outside molding (1) is not

deformed.

• Replace double-sided tape on back of rear door sash cover with a new double-sided tape if rear door

sash cover is reused.

• Replace EPT sealer of rear door sash cover with a new EPT sealer if rear door sash cover is reused.

• Remove double-sided tape remaining on body and back of rear door sash cover using double-sided

tape remover when removing rear door sash cover.

• Install after cleaning adhesive parts of door side and back of rear door sash cover.

• To secure contact, never wash vehicle within 24 hours after installation.

JMKIA5006ZZ

JMKIA2034ZZ

JMKIA5007ZZ

EXT-32

< REMOVAL AND INSTALLATION >

DOOR OUTSIDE MOLDING

DOOR OUTSIDE MOLDING

Exploded View

INFOID:0000000010120002

Removal and Installation

INFOID:0000000010120003

REMOVAL

FRONT DOOR OUTSIDE MOLDING

1. Fully open front door glass.

1.

Front door outside molding

2.

Rear door outside molding

3.

Front door panel

4.

Rear door panel

: Pawl

JMKIA6463GB

DOOR OUTSIDE MOLDING

EXT-33

< REMOVAL AND INSTALLATION >

C

D

E

F

G

H

I

J

L

M

A

B

EXT

N

O

P

2. Disengage fixing pawl of front door outside molding rear end,

using suitable tool (A) and (B).

CAUTION:

• Apply a protective tape (C) on the body to protect the

painted surface from damage.

• Never lift front door outside molding with excessive force

to prevent damage to the parts.

3. Twist door outside molding toward the outside of the vehicle,

and then lift up and remove it while disengaging the pawls.

REAR DOOR OUTSIDE MOLDING

1. Fully open door window.
2. Disengage fixing pawl of front door outside molding front and

rear end, using suitable tool (A) and (B).

CAUTION:

• Apply a protective tape (C) on the body to protect the

painted surface from damage.

• Never lift rear door outside molding with excessive force

to prevent damage to the parts.

INSTALLATION

Install in the reverse order of removal.

: Pawl

JMKIA6270ZZ

JMKIA3824ZZ

: Pawl

JMKIA6491ZZ

EXT-34

< REMOVAL AND INSTALLATION >

DOOR PARTING SEAL

DOOR PARTING SEAL

Exploded View

INFOID:0000000010120004

Removal and Installation

INFOID:0000000010120005

REMOVAL

FRONT DOOR PARTING SEAL

1. Fully open front door.
2. Disengage front door parting seal fixing clips, using suitable tool.

CAUTION:

• Disengage the clips slowly and carefully.

• Never pull the front door parting seal strongly to prevent damage to the parts.

3. Remove front door parting seal.

REAR DOOR PARTING SEAL

1. Fully open rear door.
2. Disengage rear door parting seal fixing clips, using suitable tool.

CAUTION:

• Disengage the clips slowly and carefully.

• Never pull the rear door parting seal strongly to prevent damage to the parts.

3. Remove rear door parting seal.

INSTALLATION

Note the following items, and then install in the reverse order of removal.

CAUTION:

• When installing door parting seal, check that blind clips are securely fitted in door panel holes to

prevent damage to the parts.

• When installing, visually check the door parting seal and the clips, then replace them with new parts

if they are damaged.

1.

Rear door panel

2.

Rear door parting seal

3.

Front door parting seal

4.

Front door panel

AWKIA2417ZZ


Content   ..  676  677  678  679   ..