Nissan Leaf. Manual - part 426


  Index      Nissan     Nissan Leaf (2011-2014 year) - Service and Repair Manual


Search            


Content   ..  424  425  426  427   ..


Nissan Leaf. Manual - part 426


REAR DOOR LOCK

DLK-199

< REMOVAL AND INSTALLATION >

C

D

E

F

G

H

I

J

L

M

A

B

DLK

N

O

P

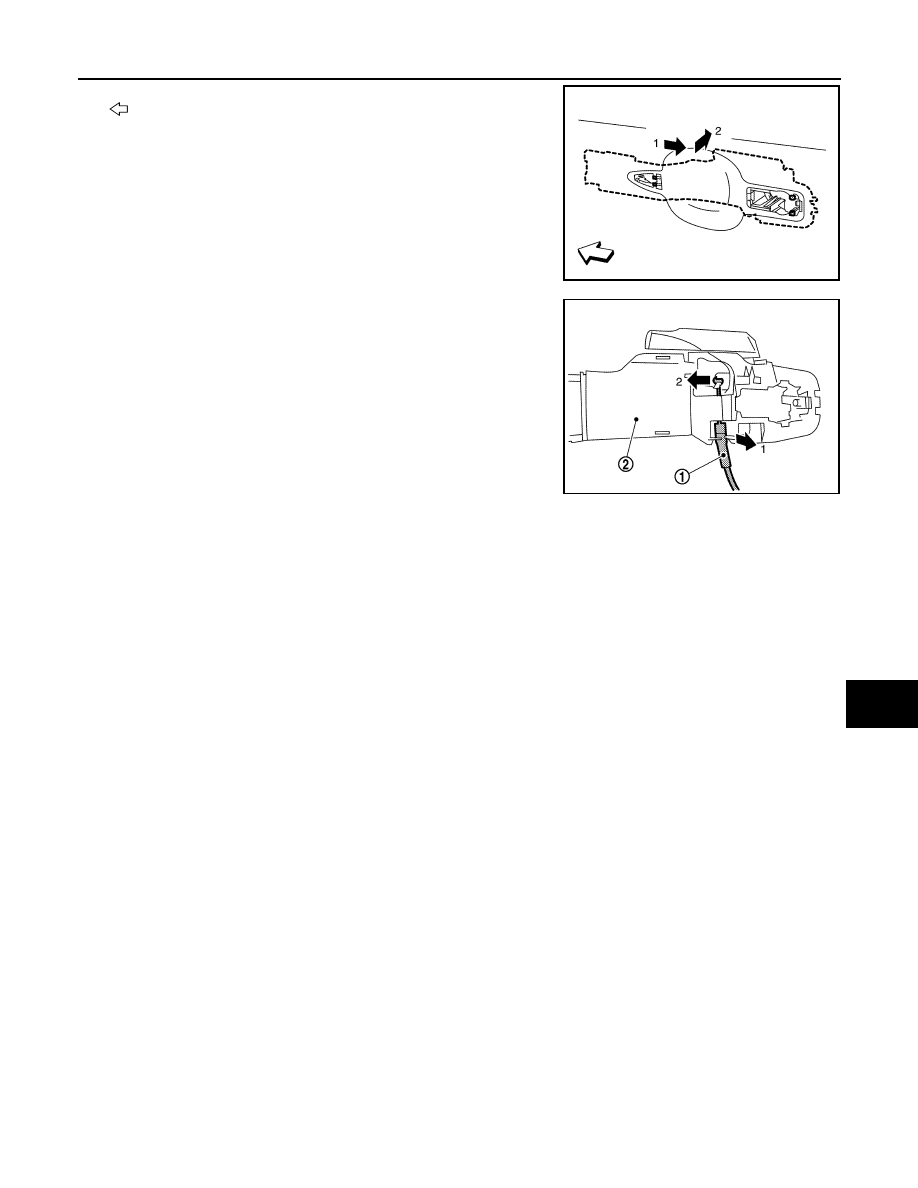
8. Slide outside handle bracket toward rear of vehicle to remove.

: Front

9. Disconnect outside handle cable (1) from outside handle bracket

(2).

INSTALLATION

Installation is in the reverse order of removal.

CAUTION:

• After installation, check door open/close and lock/unlock operation. 

• Check door lock cable is properly engaged with outside handle bracket.

JMKIA6416ZZ

JMKIA6417ZZ

DLK-200

< REMOVAL AND INSTALLATION >

BACK DOOR LOCK

BACK DOOR LOCK

Exploded View

INFOID:0000000010119901

DOOR LOCK
DOOR LOCK : Removal and Installation

INFOID:0000000010119902

REMOVAL

1. Remove the back door lower finisher. Refer to 

INT-48, "BACK DOOR LOWER FINISHER : Removal and

Installation"

.

2. Remove back door lock harness (1) from back door lock assem-

bly (2).

3. Disconnect the harness connector (A) from the back door lock

assembly.

4. Remove back door lock assembly bolts and back door lock assembly.

INSTALLATION

Installation is in the reverse order of removal.

CAUTION:

After installation, check back door open/close and lock/unlock operation.

OUTSIDE HANDLE
OUTSIDE HANDLE : Removal and Installation

INFOID:0000000010119903

REMOVAL

1. Remove the back door lower finisher. Refer to 

INT-48, "BACK DOOR LOWER FINISHER : Removal and

Installation"

.

1.

Back door lock assembly

2.

Bolt

3.

Back door striker

4.

Outside handle

Do not reuse

Grease

AWKIA2413ZZ

JMKIA6410ZZ

BACK DOOR LOCK

DLK-201

< REMOVAL AND INSTALLATION >

C

D

E

F

G

H

I

J

L

M

A

B

DLK

N

O

P

2. Disconnect the harness connectors from the outside handle and

rear view camera (if equipped).

3. Remove outside handle nuts.
4. Remove harness grommet from back door panel, then remove the outside handle.

INSTALLATION

Installation is in the reverse order of removal.

CAUTION:

After installation, check back door open/close and lock/unlock operation.

JMKIA6508ZZ

DLK-202

< REMOVAL AND INSTALLATION >

KEY CYLINDER

KEY CYLINDER

GLOVE BOX LID KEY CYLINDER
GLOVE BOX LID KEY CYLINDER : Removal and Installation

INFOID:0000000010436591

REMOVAL 

1. Insert key (1) into glove box lid lock cylinder (2).
2. Pull upward on glove box lid release handle (3).
3. Rotate key (1) and turn glove box lid key cylinder (2) to the lock

position.

4. Press tumbler stopper (1) into glove box lid lock cylinder (2)

using a suitable tool (A), and then remove key (3) and glove box

lid lock cylinder together from glove box lid release handle (4).

NOTE:

When removing glove box lid lock cylinder (2) note the position

of cylinder to glove box lid release handle (4).

5. Remove sleeve (3) from glove box lid release handle and then

install sleeve to glove box lid lock cylinder.

NOTE:

When removing sleeve note the position of sleeve to glove box

lid release handle.

CAUTION:

Do not pull out key (1) from glove box lid lock cylinder (2)

while sleeve (3) is removed. Otherwise, tumblers (4) may be

lost from glove box lid lock cylinder.

INSTALLATION 

Installation is in the reverse order of removal.

CAUTION:

After installation, check glove box assembly open/close, lock/unlock operation.

JMKIA5490ZZ

JMKIA5491ZZ

JMKIA5819ZZ


Content   ..  424  425  426  427   ..