Nissan Primera P11. Manual - part 373


  Index      Nissan     Nissan Primera P11 (2001 year) - Service and Repair Manual


Search            


Content   ..  371  372  373  374   ..


Nissan Primera P11. Manual - part 373


DIAGNOSTIC PROCEDURE 6
— With security indicator on dashboard —

“SECURITY INDICATOR LAMP DOES NOT LIGHT UP”

Check 10A fuse [No. 16 , located in the
fuse block (J/B)].

OK

NG

Replace fuse.

NATS INITIALISATION
1) Install the 10A fuse.
2) Perform initialisation with

CONSULT-II.
For the operation of
initialisation, refer to “CON-
SULT-II operation manual
NATS”.

Turn ignition switch “OFF”.

Start engine and turn ignition switch
“OFF”.

Check the security ind. lighting.

NG

OK

INSPECTION END

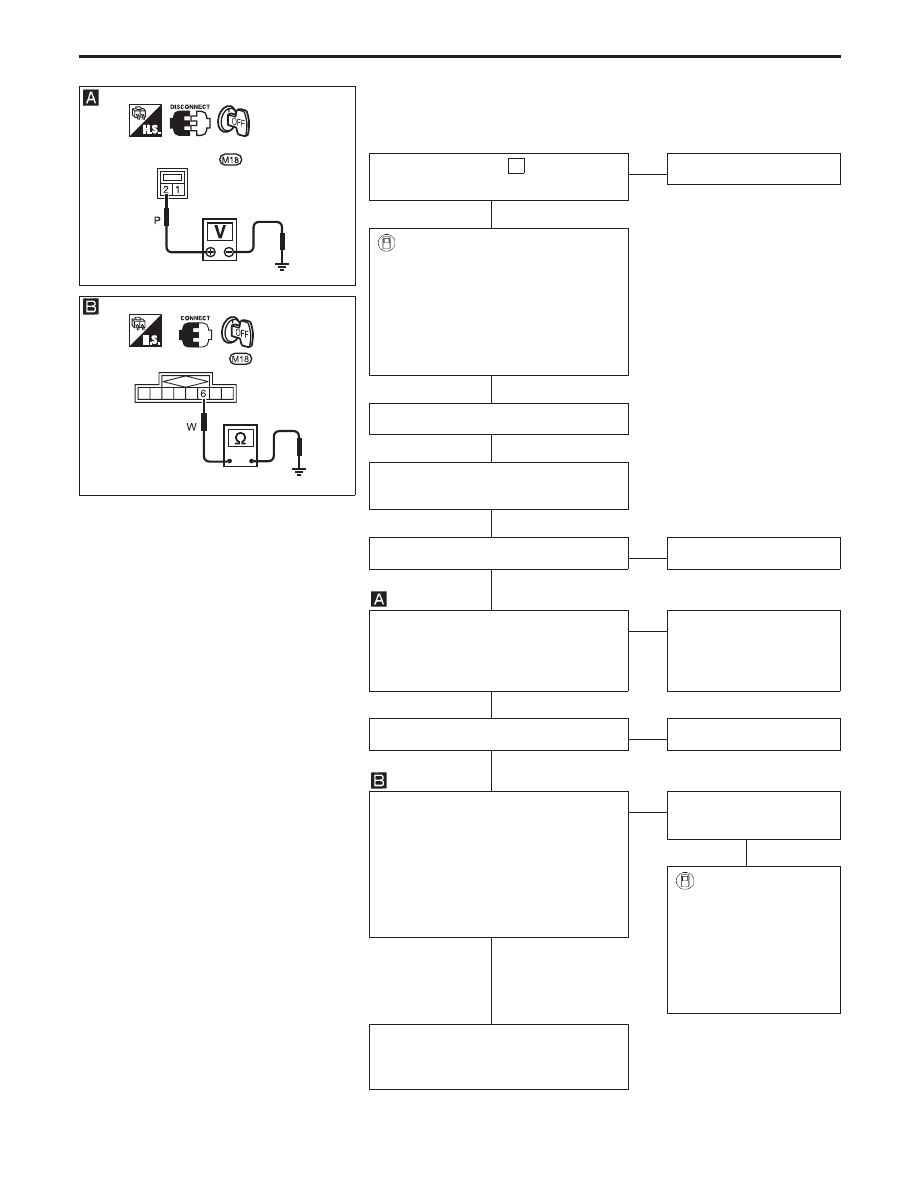
Check voltage between security indica-
tor lamp connector terminal

2

and

ground.

Voltage: Battery voltage

OK

NG

Check harness for open
or short between fuse
and security indicator
lamp.

CHECK INDICATOR LAMP.

OK

NG

Replace indicator lamp.

CHECK NATS IMMU FUNCTION.
1. Connect NATS IMMU connector.
2. Disconnect security indicator lamp

connector.

3. Check continuity between NATS

IMMU terminal

6

and ground.

Continuity should exist intermit-
tently.

OK

NG

NATS IMMU is malfunc-
tioning. Replace IMMU.

Perform initialisa-
tion with CON-
SULT-II.
For the operation
of initialisation,
refer to “CON-
SULT-II operation
manual NATS”.

Check harness for open or short
between security indicator and NATS
IMMU.

YEL482B

Security indicator
lamp connector

YEL483B

IMMU connector

NATS (Nissan Anti-Theft System)

Trouble Diagnoses (Cont’d)

EL-359

DIAGNOSTIC PROCEDURE 6
— With security indicator built-in combination
meter —

“SECURITY INDICATOR LAMP DOES NOT LIGHT UP”

Check 10A fuse [No. 16 , located in the
fuse block (J/B)].

OK

NG

Replace fuse.

NATS INITIALISATION
1) Install the 10A fuse.
2) Perform initialisation with

CONSULT-II.
For the operation of
initialisation, refer to “CON-
SULT-II operation manual
NATS”.

Turn ignition switch “OFF”.

Start engine and turn ignition switch
“OFF”.

Check the security ind. lighting.

NG

OK

INSPECTION END

Check voltage between combination
meter connector terminal

2

and

ground.

Voltage: Battery voltage

OK

NG

Check harness for open
or short between fuse
and combination meter.

CHECK INDICATOR LAMP.

OK

NG

Replace combination
meter.

CHECK NATS IMMU FUNCTION.
1. Connect NATS IMMU connector.
2. Disconnect combination meter con-

nector.

3. Check continuity between NATS

IMMU terminal

6

and ground.

Continuity should exist intermit-
tently.

OK

NG

NATS IMMU is malfunc-
tioning. Replace IMMU.

Perform initialisa-
tion with CON-
SULT-II.
For the operation
of initialisation,
refer to “CON-
SULT-II operation
manual NATS”.

Check harness for open or short
between combination meter and NATS
IMMU.

YEL037D

YEL483B

IMMU connector

NATS (Nissan Anti-Theft System)

Trouble Diagnoses (Cont’d)

EL-360

DIAGNOSTIC PROCEDURE 7

Self-diagnostic results:
“LOCK MODE” displayed on CONSULT-II screen

Confirm SELF-DIAGNOSTIC
RESULTS “LOCK MODE” is dis-
played on CONSULT-II screen.

1. Turn the ignition switch to OFF posi-

tion.

2. Turn the ignition key switch to ON

position with a registered key.
(Do not start engine.) Wait for 5 sec-
onds.

3. Return the key to the OFF position.
4. Repeat steps 2 and 3 twice (total of

three cycles).

5. Start the engine.

Can the engine start?

No

Yes

System is OK.
(Now the system is
escaped from “LOCK
MODE”.)

CHECK NATS IMMU INSTALLATION.
Refer to “How to Replace NATS IMMU”
in EL-363.

OK

NG

Reinstall NATS IMMU
correctly.

PERFORM INITIALISATION.
Perform initialisation with CONSULT-II.
For the initialisation procedure, refer to
“CONSULT-II operation manual NATS”.
Can the system be initialized?
Note: If the initialisation is incompleted

or failed, CONSULT-II shows

message on the screen.

No

Yes

System is OK.

Go to DIAGNOSTIC PROCEDURE 4,
EL-356 to check “CHAIN OF IMMU-
KEY”.

SELF DIAGNOSIS

TIME

DTC RESULTS

LOCK MODE

0

YEL484B

INITIALIZATION

FAIL

THEN IGN KEY SW ‘OFF’ AND

‘ON’, AFTER CONFIRMING

SELF-DIAG AND PASSWORD,

PERFORM C/U INITIALIZATION

AGAIN.

IMMU INITIALIZATION

YEL479B

NATS (Nissan Anti-Theft System)

Trouble Diagnoses (Cont’d)

EL-361

DIAGNOSTIC PROCEDURE 8

Perform initialization with CONSULT-II
Check the following harness connector
connection.

E125

/

M70

M85

Then initialize NATS. For the operation
of initialization, refer to “CONSULT-II
operation manual NATS”.
Does the security indicator blink just
after the initialization?

No

Yes

System is OK.
(The malfunction is
caused by improper con-
nector connection.)

CHECK GROUND CIRCUIT FOR
DONGLE UNIT.
Check continuity between dongle unit
terminal

3

and ground.

Continuity should exist.

Yes

No

Repair harness.

CHECK INTERFACE CIRCUIT.
1. Check continuity between IMMU ter-

minal

2

and dongle unit terminal

5

(Open circuit check)

Continuity should exist.

2. Check continuity between IMMU ter-

minal

2

and ground. (Short circuit

check)

Continuity should not exist.

Yes

No

Repair harness.

Dongle unit is malfunctioning.
1. Replace dongle unit.
2. Perform initialisation with CONSULT-

II.
For the initialisation procedure, refer
to “CONSULT-II operation manual
NATS”.

SEL417W

Dongle unit connector

SEL418W

IMMU connector

Dongle unit
connector

Short circuit check

SEL419W

Short circuit check

IMMU connector

NATS (Nissan Anti-Theft System)

Trouble Diagnoses (Cont’d)

EL-362


Content   ..  371  372  373  374   ..