Nissan March K13. Manual - part 421


  Index      Nissan     Nissan March K13 - Service and Repair Manual)


Search            


Content   ..  419  420  421  422   ..


Nissan March K13. Manual - part 421


FLOOR TRIM

INT-27

< REMOVAL AND INSTALLATION >

C

D

E

F

G

H

I

K

L

M

A

B

INT

N

O

P

11. Remove center pillar lower garnish (LH/RH). Refer to 

INT-23, "CENTER PILLAR LOWER GARNISH :

Removal and Installation"

.

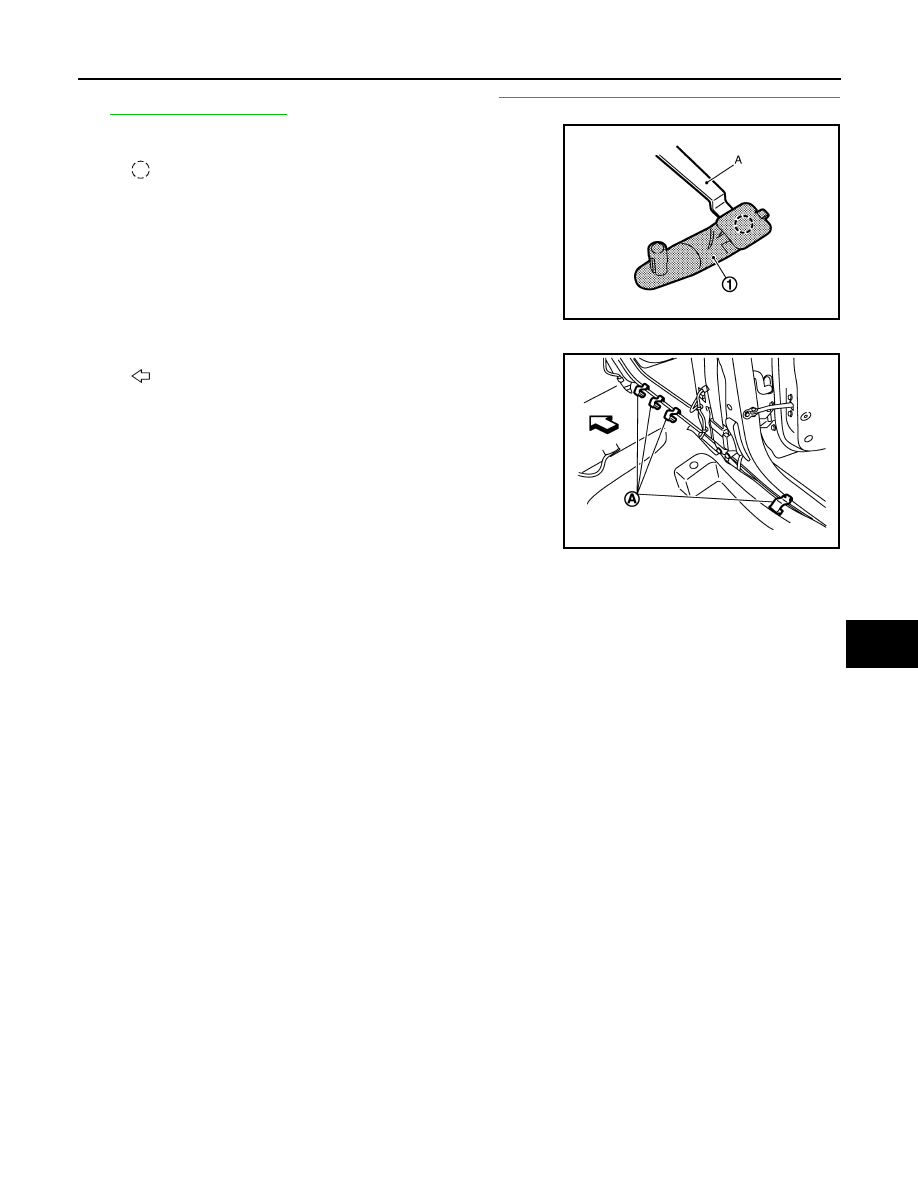
12. Disengage clip of floor hook (1) with remover tool (A).

13. Disengage floor trim fixing clip (A) and then remove floor trim.

INSTALLATION

Install in the reverse order of removal.

: Clip

JMJIA0092GB

: Vehicle front

JMJIA4083ZZ

INT-28

< REMOVAL AND INSTALLATION >

HEADLINING

HEADLINING

Exploded View

INFOID:0000000006054248

Removal and Installation

INFOID:0000000006054249

REMOVAL

1.

Remove front kicking plate inner (LH/RH) and rear kicking plate inner (LH/RH). Refer to 

INT-22, "KICKING

PLATE INNER : Removal and Installation"

.

2.

Remove center pillar lower garnish (LH/RH). Refer to 

INT-23, "CENTER PILLAR LOWER GARNISH :

Removal and Installation"

.

3.

Remove front body side welt (LH/RH) and rear body side welt (LH/RH). Refer to 

INT-23, "BODY SIDE

WELT : Removal and Installation"

4.

Remove luggage side upper finisher (LH/RH). Refer to 

INT-31, "LUGGAGE SIDE UPPER FINISHER :

Removal and Installation"

.

1.

Assist grip cap

2.

Rear assist grip (RH)

3.

Headlining assembly

4.

Inside mirror cover
Sunvisor assembly (RH)

5.

Sunvisor holder (LH/RH)

6.

Sunvisor assembly (LH)

7.

Front assist grip (LH)

8.

Rear assist grip (LH)

JMJIA4095ZZ

HEADLINING

INT-29

< REMOVAL AND INSTALLATION >

C

D

E

F

G

H

I

K

L

M

A

B

INT

N

O

P

5.

Remove center pillar upper garnish (LH/RH). Refer to 

INT-24, "CENTER PILLAR UPPER GARNISH :

Removal and Installation"

.

6.

Remove front pillar garnish (LH/RH). Refer to 

INT-22, "FRONT PILLAR GARNISH : Removal and Installa-

tion"

.

7.

Remove all assist grip.
• Lift assist grip cap while sliding and disengage assist grip cap

and assist grip.

• Remove mounting bolts.
• Pull out the assist grip to remove.

8.

Remove sunvisor assembly fixing screws, and then remove sunvisor assembly (LH/RH). 

9.

Rotate the sunvisor holder (LH/RH) at approximately 90 degrees and then pull it down to remove.

10. Remove map lamp assembly. Refer to 

INL-35, "Removal and Installation"

.

11. Remove headlining clips located at the rear side with a remover tool.

12. Remove headlining assembly through the back door.

CAUTION:

• When removing headlining, 2 workers are required.
• Be careful not to scratch or damage any part of the body

while taking out the headlining.

• Never bend headlining when removing.

INSTALLATION

Note the following item, and install in the reverse order of removal.

CAUTION:

• Never bend headlining when installing.
• When installing, start by installing both sunvisor holders and headlining clips in order to keep the

headlining in position.

JMJIA4130ZZ

JMJIA4131ZZ

JMJIA4084ZZ

INT-30

< REMOVAL AND INSTALLATION >

LUGGAGE FLOOR TRIM

LUGGAGE FLOOR TRIM

Exploded View

INFOID:0000000006046532

LUGGAGE REAR PLATE

LUGGAGE REAR PLATE : Removal and Installation

INFOID:0000000006046533

REMOVAL

1.

Luggage side upper finisher LH

2.

Luggage side lower finisher clip (LH/
RH)

3.

Luggage side lower finisher LH

4.

Luggage side lower finisher lid (LH/
RH)

5.

Luggage rear plate

6.

Rope hook

7.

Luggage room lamp

8.

Luggage side lower finisher RH

9.

Luggage side upper finisher RH

10. Tonneau cover

: Clip

: Pawl

: Metal clip

: Vehicle front

JMJIA4098ZZ


Content   ..  419  420  421  422   ..