Almera Tino V10 (2003 year). Manual - part 101
TROUBLE DIAGNOSIS
EC-635
[QG (WITHOUT EURO-OBD)]
C
D
E
F
G
H
I
J
K
L
M
A
EC
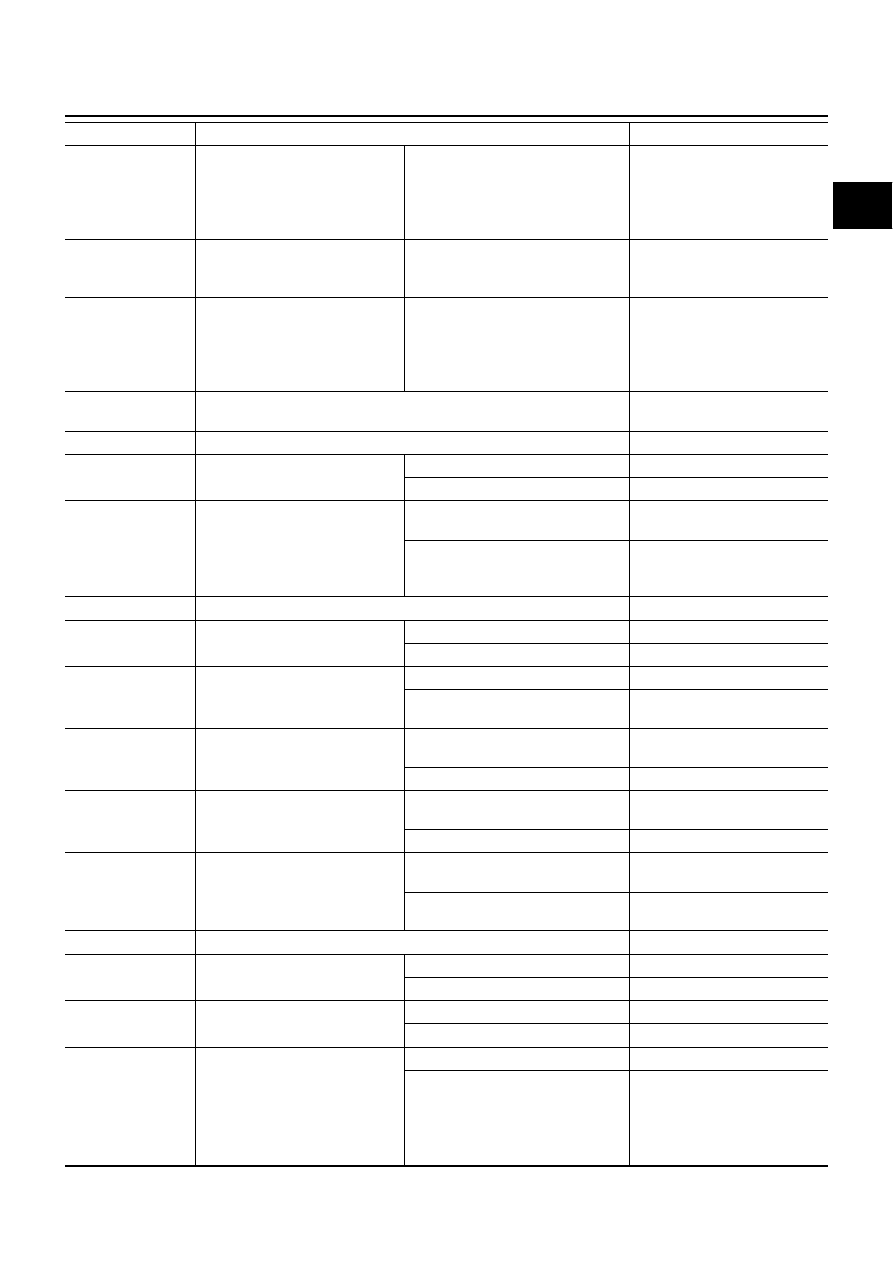
HO2S2 (B1)
HO2S2 (B2)
*2
●
Engine: After warming up
●
Keeping the engine speed
between 3,500 and 4,000 rpm
for one minute and at idle for
one minute under no load
Revving engine from idle to 3,000
rpm quickly.
0 - 0.3V
←→
Approx. 0.6 - 1.0V
HO2S1 MNTR (B1)
HO2S1 MNTR
(B2)
*2
●
Engine: After warming up
Maintaining engine speed at 2,000
rpm
LEAN
←→
RICH
Changes more than 5 times dur-
ing 10 seconds.
HO2S2 MNTR (B1)
HO2S2 MNTR
(B2)
*2
●
Engine: After warming up
●
Keeping the engine speed
between 3,500 and 4,000 rpm
for one minute and at idle for
one minute under no load
Revving engine from idle to 3,000
rpm quickly.
LEAN
←→
RICH
VEH SPEED SE
●
Turn drive wheels and compare CONSULT-II value with the speedometer
indication.
Almost the same speed as the
speedometer indication.
BATTERY VOLT
●
Ignition switch: ON (Engine stopped)
11 - 14V
ACCEL SEN1
ACCEL SEN2
*1
●
Ignition switch: ON
(engine stopped)
Accelerator pedal: Fully released
0.35 - 0.67V
Accelerator pedal: Fully depressed
More than 3.9V
THRTL SEN1
THRTL SEN2
*1
●
Ignition switch: ON
(Engine stopped)
Accelerator pedal: Fully released
More than 0.36V
●
Shift lever:
D (A/T models)
1st (M/T models)
Accelerator pedal: Fully depressed
Less than 4.75V
START SIGNAL
●
Ignition switch: ON
→
START
→
ON
OFF
→
ON
→
OFF
CLSD THL POS
●
Ignition switch: ON
Accelerator pedal: Fully released
ON
Accelerator pedal: Slightly depressed
OFF
AIR COND SIG
●
Engine: After warming up, idle
the engine
Air conditioner switch: OFF
OFF
Air conditioner switch: ON
(Compressor operates.)
ON
P/N POSI SW
●
Ignition switch: ON
Shift lever: P or N (A/T models)
Neutral (M/T models)
ON
Shift lever: Except above
OFF
PW/ST SIGNAL
●
Engine: After warming up, idle
the engine
Steering wheel is in neutral position.
(Forward direction)
OFF
Steering wheel is turned.
ON
LOAD SIGNAL
●
Ignition switch: ON
Rear window defogger switch is ON
and/or lighting switch is in 2nd.
ON
Rear window defogger switch is OFF
and lighting switch is OFF.
OFF
IGNITION SW
●
Ignition switch: ON
→
OFF
→
ON
ON
→
OFF
→
ON
HEATER FAN SW
●
Engine: After warming up, idle
the engine
Heater fan is operating.
ON
Heater fan is not operating
OFF
BRAKE SW
●
Ignition switch: ON
Brake pedal: Fully released
OFF
Brake pedal: Slightly depressed
ON
INJ PULSE-B1
INJ PULSE-B2
*2
●
Engine: After warming up
●
Shift lever:
N (A/T models)
Neutral (M/T models)
●
Air conditioner switch: OFF
●
No-load
Idle
2.0 - 3.5 msec
2,000 rpm
1.5 - 3.5 msec
MONITOR ITEM
CONDITION
SPECIFICATION