Nissan Almera Tino V10. Manual - part 903


  Index      Nissan     Nissan Almera Tino V10 - Service Manual (2003 year)


Search            


Content   ..  901  902  903  904   ..


Nissan Almera Tino V10. Manual - part 903


System Check

NLLC0054

WARNING:

Never remove the radiator cap when the engine is hot; serious
burns could be caused by high pressure fluid escaping from
the radiator.
Wrap a thick cloth around the cap and carefully remove it by
turning it a quarter turn to allow built-up pressure to escape
and then turn the cap all the way off.

CHECKING COOLING SYSTEM HOSES

NLLC0054S01

Check hoses for improper attachment, leaks, cracks, damage,
loose connections, chafing and deterioration.

CHECKING RADIATOR

NLLC0054S02

Check radiator for mud or clogging. If necessary, clean radiator as
follows.

I

Be careful not to bend or damage the radiator fins.

I

When radiator is cleaned without removal, remove all sur-
rounding parts such as cooling fan, radiator shroud and horns.
Then tape the harness and connectors to prevent water from
entering.

1.

Apply water by hose to the back side of the radiator core ver-
tically downward.

2.

Apply water again to all radiator core surfaces once per
minute.

3.

Stop washing if any stains no longer flow out from the radia-
tor.

4.

Blow air into the back side of radiator core vertically downward.

I

Use compressed air lower than 490 kPa (4.9 bar, 5 kg/cm

2

,

71 psi) and keep distance more than 30 cm (11.8 in).

5.

Blow air again into all the radiator core surfaces once per
minute until no water sprays out.

SLC755AC

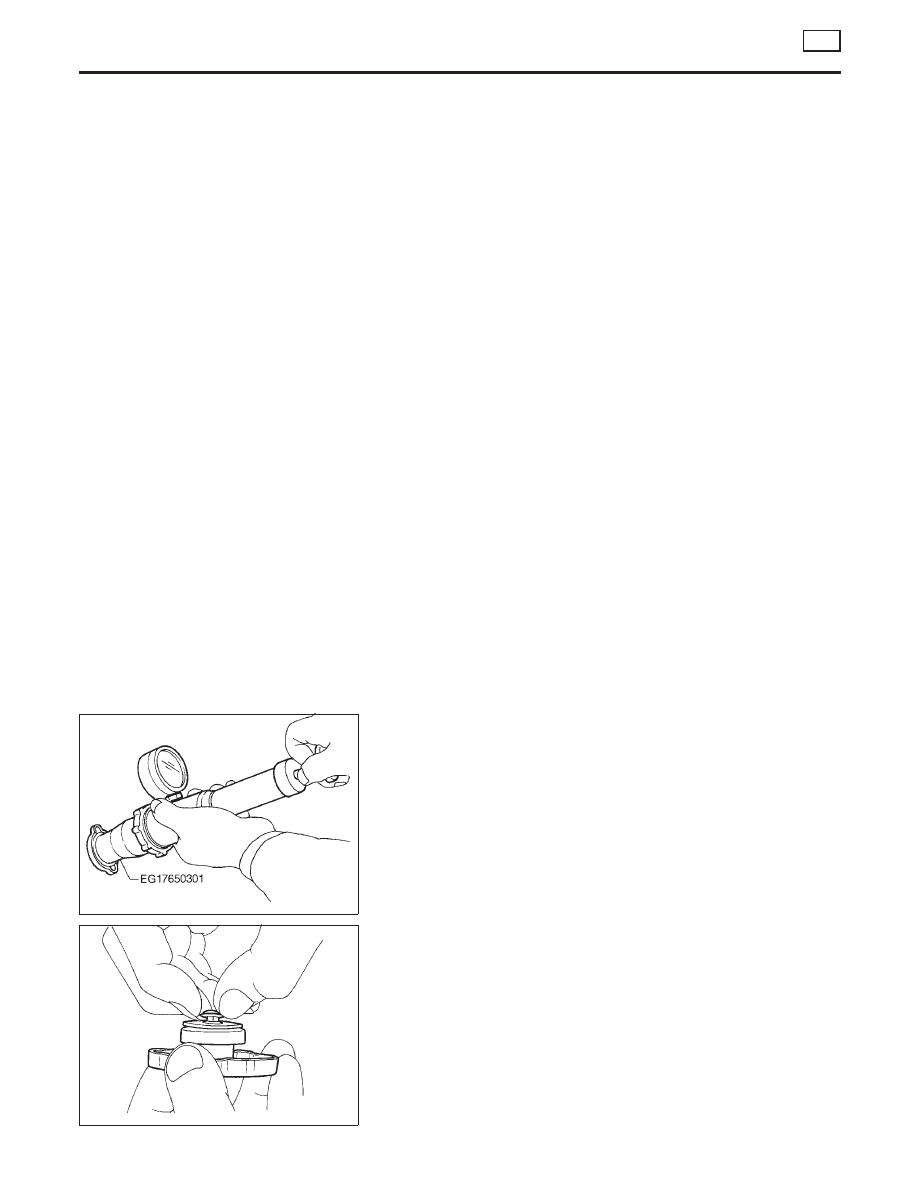
CHECKING RADIATOR CAP

NLLC0054S03

To check radiator cap, apply pressure to cap with a tester.

Radiator cap relief pressure:

Standard

78 - 98 kPa
(0.78 - 0.98 bar, 0.8 - 1.0 kg/cm

2

, 11 - 14 psi)

Limit

59 kPa (0.59 bar, 0.6 kg/cm

2

, 9 psi)

SMA967B

Pull the negative pressure valve to open it.
Check that it closes completely when released.

I

Check the radiator cap negative pressure valve for contamina-
tion or damage to the valve seat.

I

Move the negative pressure valve to check for abnormalities to
the opening/shutting operation.

CAUTION:

I

Be sure to perform the inspections after cooling down the
engine.

I

Before connecting the radiator cap to the tester, apply
water or LLC to the cap sealing.

ENGINE COOLING SYSTEM

YD

System Check

LC-34

I

Replace the radiator cap if abnormalities are found with the
negative pressure valve, or if the valve opening pressure is out
of the standard range.

SLC756AA

CHECKING COOLING SYSTEM FOR LEAKS

NLLC0054S04

To check for leakage, apply pressure to the cooling system with a
tester.

Testing pressure:

157 kPa (1.57 bar, 1.6 kg/cm

2

, 23 psi)

CAUTION:

I

Higher than the specified pressure may cause radiator
damage.

I

Be sure to perform the inspections after cooling down the
engine.

I

Use a hose adapter between the cap tester and filler neck
to prevent the radiator filler neck from deforming.

I

If any abnormalities are found, repair or replace the malfunc-
tioning parts.

Water Pump

REMOVAL AND INSTALLATION

NLLC0055

CAUTION:

I

When removing water pump assembly, be careful not to
get coolant on drive belt.

I

Water pump cannot be disassembled and should be
replaced as a unit.

I

After installing water pump, connect hose and clamp
securely, then check for leaks using radiator cap tester.

GI

MA

EM

EC

FE

CL

MT

AT

AX

SU

BR

ST

RS

BT

HA

SC

EL

IDX

ENGINE COOLING SYSTEM

YD

System Check (Cont’d)

LC-35

JLC294B

REMOVAL

NLLC0056

1.

Remove the undercover, splash cover (right), and accessory
belt.

2.

Drain engine coolant. Refer to LC-40, “Changing Engine Cool-
ant”.

3.

Support the bottom of the oil pan with a floor jack etc., and
remove the right engine mount bracket (front side of the
engine).

4.

Remove the water pump pulley.

I

Loosen the pulley bolts after fixing the pulley using a screw-
driver etc.

5.

Remove engine mount brackets.

6.

Remove the water pump.

INSPECTION

NLLC0057

I

Check for rust and contamination adhering to the water pump
and vane.

I

Turn the pump shaft by hand, and check that the pump turns
smoothly without looseness.

INSTALLATION

NLLC0058

I

Install the parts in the reverse order of removal.

I

Install the water pump pulley with the front mark (painted white,
used to prevent errors during assembly) facing the front of the
engine. Refer to the figure above.

ENGINE COOLING SYSTEM

YD

Water Pump (Cont’d)

LC-36

Thermostat

REMOVAL AND INSTALLATION

NLLC0059

YLC047

I

Be careful not to spill coolant over engine compartment.
Use a rag to absorb coolant.

1.

Drain engine coolant. Refer to LC-40, “Changing Engine Cool-
ant”.

2.

Remove exhaust manifold cover.

3.

Remove water inlet.

4.

Remove thermostat.

JLC300B

5.

Install thermostat with jiggle valve facing upward.

I

Carefully install the rubber ring to the flange of the
thermostat, making sure it does not slip out of place.

6.

After installation and refilling coolant, run engine for a few
minutes, and check for leaks.

GI

MA

EM

EC

FE

CL

MT

AT

AX

SU

BR

ST

RS

BT

HA

SC

EL

IDX

ENGINE COOLING SYSTEM

YD

Thermostat

LC-37


Content   ..  901  902  903  904   ..