Nissan Teana J32. Manual - part 1231


  Index      Nissan     Nissan Teana J32 (2008 year) - Service and Repair Manual


Search            


Content   ..  1229  1230  1231  1232   ..


Nissan Teana J32. Manual - part 1231


VTL-110

< ON-VEHICLE REPAIR >

[WITH 7 INCH DISPLAY]

DUCT AND GRILLE

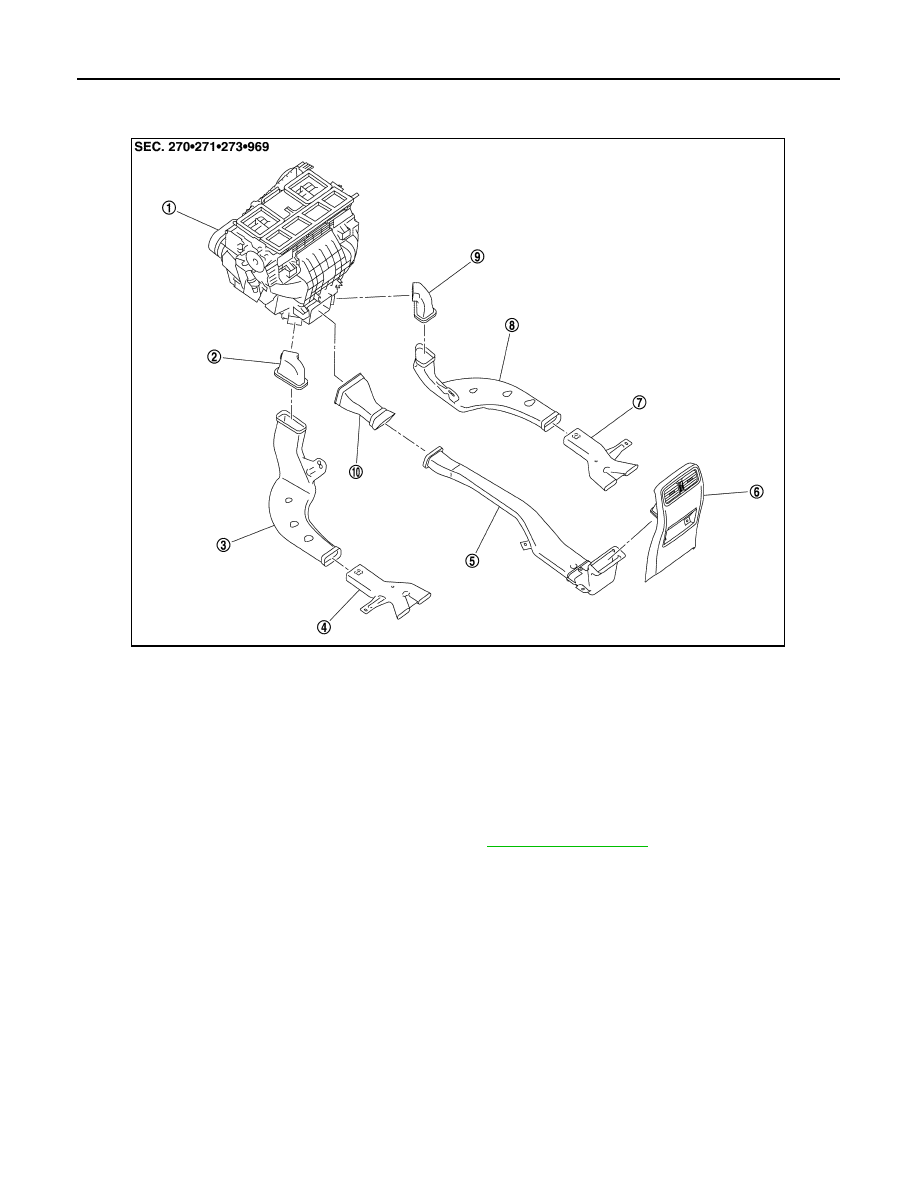
REAR VENTILATOR GRILLE : Exploded View

INFOID:0000000003894532

REAR VENTILATOR GRILLE : Removal and Installation

INFOID:0000000003894533

REMOVAL

Remove console rear cover (rear ventilator grille). Refer to 

IP-22, "Exploded View"

INSTALLATION

Installation is basically the reverse order of removal.

REAR VENTILATOR DUCT 1

1.

Heater & cooling unit assembly

2.

Rear foot duct 1 (left)

3.

Rear foot duct 2 (left)

4.

Rear foot duct 3 (left)

5.

Rear ventilator duct 2

6.

Console rear cover (Rear 
ventilator grille)

7.

Rear foot duct 3 (right)

8.

Rear foot duct 2 (right)

9.

Rear foot duct 1 (right)

10.

Rear ventilator duct 1

JPIIA0935ZZ

DUCT AND GRILLE

VTL-111

< ON-VEHICLE REPAIR >

[WITH 7 INCH DISPLAY]

C

D

E

F

G

H

J

K

L

M

A

B

VTL

N

O

P

REAR VENTILATOR DUCT 1 : Exploded View

INFOID:0000000003894534

REAR VENTILATOR DUCT 1 : Removal and Installation

INFOID:0000000003894535

REMOVAL

1.

Remove rear ventilator duct 2. Refer to 

VTL-112, "REAR VENTILATOR DUCT 2 : Exploded View"

.

2.

Remove mounting clip (A), and then remove rear ventilator duct
1 (1).

INSTALLATION

Installation is basically the reverse order of removal.

REAR VENTILATOR DUCT 2

1.

Heater & cooling unit assembly

2.

Rear foot duct 1 (left)

3.

Rear foot duct 2 (left)

4.

Rear foot duct 3 (left)

5.

Rear ventilator duct 2

6.

Console rear cover (Rear 
ventilator grille)

7.

Rear foot duct 3 (right)

8.

Rear foot duct 2 (right)

9.

Rear foot duct 1 (right)

10.

Rear ventilator duct 1

JPIIA0935ZZ

JPIIA0936ZZ

VTL-112

< ON-VEHICLE REPAIR >

[WITH 7 INCH DISPLAY]

DUCT AND GRILLE

REAR VENTILATOR DUCT 2 : Exploded View

INFOID:0000000003894536

REAR VENTILATOR DUCT 2 : Removal and Installation

INFOID:0000000003894537

REMOVAL

1.

Remove center console assembly. Refer to 

IP-22, "Exploded View"

2.

Remove screws (A), and then remove rear ventilator duct 2 (1). 

INSTALLATION

Installation is basically the reverse order of removal.

REAR FOOT DUCT 1

1.

Heater & cooling unit assembly

2.

Rear foot duct 1 (left)

3.

Rear foot duct 2 (left)

4.

Rear foot duct 3 (left)

5.

Rear ventilator duct 2

6.

Console rear cover (Rear 
ventilator grille)

7.

Rear foot duct 3 (right)

8.

Rear foot duct 2 (right)

9.

Rear foot duct 1 (right)

10.

Rear ventilator duct 1

JPIIA0935ZZ

JPIIA0937ZZ

DUCT AND GRILLE

VTL-113

< ON-VEHICLE REPAIR >

[WITH 7 INCH DISPLAY]

C

D

E

F

G

H

J

K

L

M

A

B

VTL

N

O

P

REAR FOOT DUCT 1 : Exploded View

INFOID:0000000003894542

REAR FOOT DUCT 1 : Removal and Installation

INFOID:0000000003894543

REMOVAL

Driver side

1.

Remove instrument lower cover LH. Refer to 

IP-11, "Exploded View"

.

2.

Remove rear foot duct 1 (left) (1).

Passenger side

1.

Remove instrument lower cover RH. Refer to 

IP-11, "Exploded View"

.

1.

Heater & cooling unit assembly

2.

Rear foot duct 1 (left)

3.

Rear foot duct 2 (left)

4.

Rear foot duct 3 (left)

5.

Rear ventilator duct 2

6.

Console rear cover (Rear 
ventilator grille)

7.

Rear foot duct 3 (right)

8.

Rear foot duct 2 (right)

9.

Rear foot duct 1 (right)

10.

Rear ventilator duct 1

JPIIA0935ZZ

JPIIA0938ZZ


Content   ..  1229  1230  1231  1232   ..