Nissan Murano Z51. Manual - part 832


  Главная      Nissan     Nissan Murano Z51 (2010 year) - Service Manual


поиск по сайту            


содержание   ..  830  831  832  833   ..


Nissan Murano Z51. Manual - part 832


HA-44

< REMOVAL AND INSTALLATION >

LOW-PRESSURE PIPE

3.

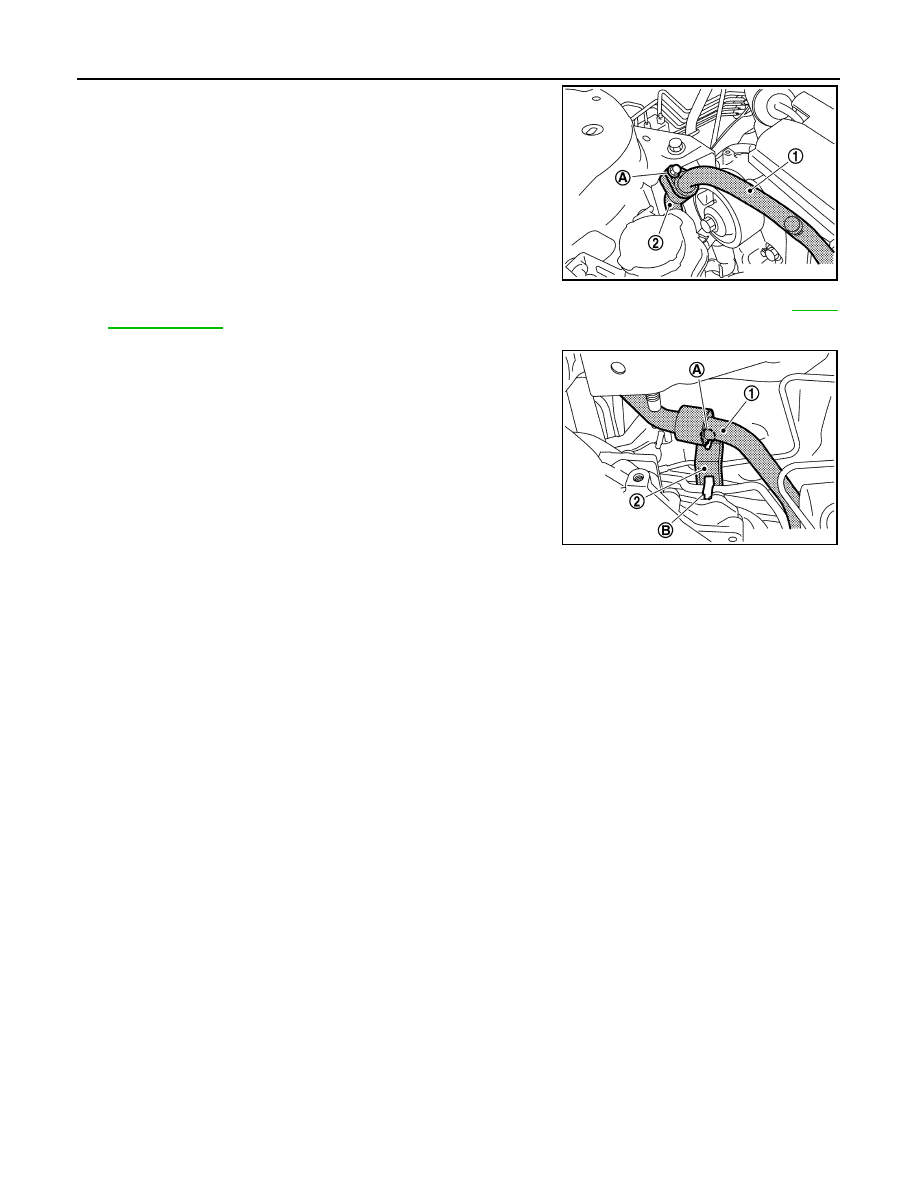
Remove the mounting bolt (A), and then disconnect the low-
pressure flexible hose (1) from the low-pressure pipe (2). 

CAUTION:

Cap or wrap the joint of the A/C piping with suitable mate-
rial such as vinyl tape to avoid the entry of air.

4.

Move the power steering reservoir tank to a position where it dose not inhibit work.  Refer to 

ST-44,

"Exploded View"

5.

Remove the mounting nut (A) and clip (B), and then remove the
low-pressure pipe (1) together with the low-pressure pipe
bracket (2). 

INSTALLATION

Installation is basically the reverse order of removal.

CAUTION:

• Replace O-rings with new ones. Then apply compressor oil to them when installing. 
• Check for leakages when recharging refrigerant.

JPIIA0533ZZ

JPIIA0537ZZ

HIGH-PRESSURE PIPE

HA-45

< REMOVAL AND INSTALLATION >

C

D

E

F

G

H

J

K

L

M

A

B

HA

N

O

P

HIGH-PRESSURE PIPE

Exploded View

INFOID:0000000005514548

Refer to 

HA-15, "Refrigerant Connection"

.

Removal and Installation

INFOID:0000000005514549

REMOVAL

1.

Use refrigerant collecting equipment (for HFC-134a) to discharge the refrigerant.

2.

Remove the mounting bolt (A), and then disconnect the high-
pressure pipe (1) from the expansion valve. 

CAUTION:

Cap or wrap the joint of the A/C piping and expansion valve
with suitable material such as vinyl tape to avoid the entry
of air.

1.

High-pressure pipe

2.

O-ring

3.

Condenser assembly

4.

High-pressure flexible hose

5.

Compressor

6.

Low-pressure flexible hose

7.

Low-pressure pipe

8.

Heater & cooling unit assembly

9.

Evaporator pipe assembly

10. Expansion valve

11.

Evaporator

Refer to 

GI-4, "Components"

 for symbols in the figure.

JPIIA1257GB

JPIIA0538ZZ

HA-46

< REMOVAL AND INSTALLATION >

HIGH-PRESSURE PIPE

3.

Remove the mounting bolt (A), and then disconnect the high-
pressure pipe (1) from the condenser pipe assembly (2). 

CAUTION:

Cap or wrap the joint of the A/C piping with suitable mate-
rial such as vinyl tape to avoid the entry of air.

4.

Move the power steering reservoir tank to a position where it dose not inhibit work. Refer to 

ST-44,

"Exploded View"

5.

Remove the reservoir tank. Refer to 

CO-16, "Exploded View"

6.

Remove the washer tank inlet. Refer to 

WW-124, "Exploded View"

7.

Remove the clip (A), and then remove the high-pressure pipe (1). 

INSTALLATION

Installation is basically the reverse order of removal.

CAUTION:

• Replace O-rings with new ones. Then apply compressor oil to them when installing. 
• Check for leakages when recharging refrigerant.

JPIIA0539ZZ

JPIIA0540ZZ

CONDENSER PIPE ASSEMBLY

HA-47

< REMOVAL AND INSTALLATION >

C

D

E

F

G

H

J

K

L

M

A

B

HA

N

O

P

CONDENSER PIPE ASSEMBLY

Exploded View

INFOID:0000000005514550

Removal and Installation

INFOID:0000000005514551

REMOVAL

1.

Use refrigerant collecting equipment (for HFC-134a) to discharge the refrigerant.

2.

Remove the front grille. Refer to 

EXT-19, "Exploded View"

3.

Remove the mounting bolt (A), and then disconnect the high-
pressure flexible hose (2) and the high-pressure pipe (3) from
the condenser pipe assembly (1). 

CAUTION:

Cap or wrap the joint of the A/C piping with suitable mate-
rial such as vinyl tape to avoid the entry of air.

4.

Remove the mounting bolt (A), and then remove the condenser
pipe assembly (1) from the condenser. 

CAUTION:

Cap or wrap the joint of the A/C piping and condenser with
suitable material such as vinyl tape to avoid the entry of air. 

1.

Condenser pipe assembly

2.

O-ring

3.

Condenser assembly

4.

Condenser lower bracket LH

5.

Bracket

6.

Liquid tank

7.

Refrigerant pressure sensor

8.

Liquid tank bracket

9.

Condenser upper bracket LH

10. Condenser upper bracket RH

Refer to 

GI-4, "Components"

 for symbols in the figure.

JPIIA0460GB

JPIIA0541ZZ

JPIIA0542ZZ


содержание   ..  830  831  832  833   ..