Nissan X-Trail 32. Manual - part 2115


  Главная      Nissan     Nissan X-Trail 32 - Service Manual


поиск по сайту            


содержание   ..  2113  2114  2115  2116   ..


Nissan X-Trail 32. Manual - part 2115


TM-418

< REMOVAL AND INSTALLATION >

[CVT: RE0F10D]

AIR BREATHER

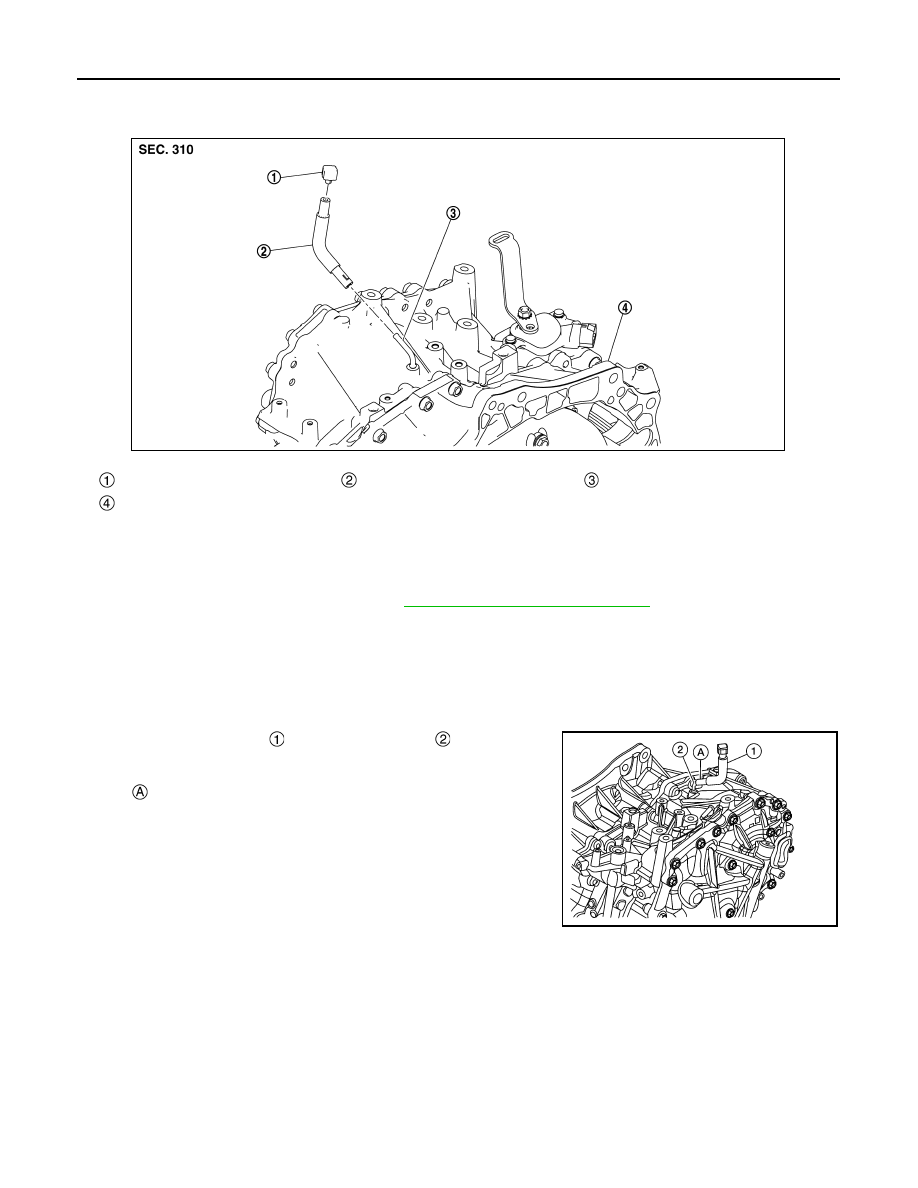
QR25DE : Exploded View

INFOID:0000000010622603

QR25DE : Removal and Installation

INFOID:0000000010622604

REMOVAL

1.

Remove air duct 1 and air duct 2. Refer to 

EM-175, "Removal and Installation"

.

2.

Remove air breather hose from transaxle assembly.

INSTALLATION

Note the followings and installation is in the reverse order of removal.

CAUTION:

• Never bend the air breather hose to prevent damage to the hose.
• Insert air breather hose to the end of air breather cap.
• Insert air breather hose 

 to air breather tube 

 all the way to

the curve of the tube.

• Insert air breather hose to air breather tube so that the paint

mark 

 is facing upward.

Air breather cap

Air breather hose

Air breather tube

Transaxle assembly

JSDIA5140ZZ

ALDIA0501ZZ

OIL PAN

TM-419

< REMOVAL AND INSTALLATION >

[CVT: RE0F10D]

C

E

F

G

H

I

J

K

L

M

A

B

TM

N

O

P

OIL PAN

Exploded View

INFOID:0000000010622605

Removal and Installation

INFOID:0000000010622606

REMOVAL

1.

Remove the engine under cover. Refer to 

EXT-40, "ENGINE UNDER COVER : Removal and Installation"

.

2.

Remove the drain plug 

 from oil pan and drain the CVT fluid.

Transaxle assembly

Oil pan gasket

Oil pan

Drain plug

Drain plug gasket

Magnet

Overflow plug

O-ring

: Always replace after every disassembly.

: N·m (kg-m, ft-lb)

: N·m (kg-m, in-lb)

: Apply CVT fluid

JSDIA4194GB

JSDIA5205ZZ

TM-420

< REMOVAL AND INSTALLATION >

[CVT: RE0F10D]

OIL PAN

3.

Remove the drain plug gasket 

.

4.

Remove the oil pan bolts (

) and remove the oil pan and oil pan

gasket.

5.

Remove the oil pan gasket 

 from the oil pan.

6.

Remove the magnets 

 from the oil pan.

INSTALLATION

Note the followings and installation is in the reverse order of removal.

CAUTION:

• Never reuse oil pan gasket.
• Never reuse drain plug gasket.
• Completely clean the iron powder from the magnet area of oil pan and the magnets.
• Install the oil pan to the transaxle case with the following procedure.
1.

Install the oil pan gasket to the oil pan.

CAUTION:

Completely wipe out any moisture, oil, and old gasket from the oil pan gasket surface and bolt
hole of oil pan and transaxle case.

2.

Install the oil pan assembly to the transaxle case and temporarily tighten the oil pan bolt.

JSDIA5206ZZ

: Vehicle front

JSDIA5207ZZ

JSDIA5208ZZ

JSDIA5209ZZ

OIL PAN

TM-421

< REMOVAL AND INSTALLATION >

[CVT: RE0F10D]

C

E

F

G

H

I

J

K

L

M

A

B

TM

N

O

P

3.

Tighten the oil pan bolts in the order shown to the specified
torque.

4.

Tighten the oil pan bolts again clockwise from (1) shown to the
specified torque.

• Fill ATF after installation. Refer to 

TM-399, "Replacement"

.

Inspection

INFOID:0000000010622607

INSPECTION AFTER REMOVAL

Check oil pan for foreign material.
• If a large amount of worn material is found, clutch plate may be worn.
• If iron powder is found, bearings, gears, or clutch plates may be worn.
• If aluminum powder is found, bushing may be worn, or chips or burrs of aluminum casting parts may enter.
Check points where wear is found in all cases.

INSPECTION AFTER INSTALLATION

Check the CVT fluid leakage. Refer to 

TM-399, "Inspection"

.

: Vehicle front

JSDIA5211ZZ


содержание   ..  2113  2114  2115  2116   ..