Nissan X-Trail 32. Manual - part 2031


  Главная      Nissan     Nissan X-Trail 32 - Service Manual


поиск по сайту            


содержание   ..  2029  2030  2031  2032   ..


Nissan X-Trail 32. Manual - part 2031


TM-82

< PRECAUTION >

[6MT: RS6F52A]

PRECAUTIONS

• The auto acc function is adapted to this vehicle. For this reason, even when the ignition switch is turned

to OFF position, the accessory power source does not turned OFF and continues to be supplied for a
certain amount of time.

6.

Disconnect both battery cables. The steering lock will remain released with both battery cables discon-
nected and the steering wheel can be turned.

7.

Perform the necessary repair operation.

8.

When the repair work is completed, re-connect both battery cables. With the brake pedal released, turn
the ignition switch from OFF position to ON position, then to LOCK position. (The steering wheel will lock
when the ignition switch is turned to LOCK position.)

9.

Perform self-diagnosis check of all control units using CONSULT.

Precaution for Procedure without Cowl Top Cover

INFOID:0000000010921069

When performing the procedure after removing cowl top cover, cover
the lower end of windshield with urethane, etc to prevent damage to
windshield.

Precautions for Removing Battery Terminal

INFOID:0000000010921070

• With the adoption of Auto ACC function, ACC power is automatically supplied by operating the intelligent key

or remote keyless entry or by opening/closing the driver side door. In addition, ACC power is supplied even
after the ignition switch is turned to the OFF position, i.e. ACC power is supplied for a certain fixed time.

• When disconnecting the 12V battery terminal, turn off the ACC

power before disconnecting the 12V battery terminal, observing
“How to disconnect 12V battery terminal” described below.
NOTE:
Some ECUs operate for a certain fixed time even after ignition
switch is turned OFF and ignition power supply is stopped. If the
battery terminal is disconnected before ECU stops, accidental DTC
detection or ECU data damage may occur.

•  For vehicles with the 2-batteries, be sure to connect the main bat-

tery and the sub battery before turning ON the ignition switch.
NOTE:
If the ignition switch is turned ON with any one of the terminals of
main battery and sub battery disconnected, then DTC may be detected.

•  After installing the 12V battery, always check "Self Diagnosis Result" of all ECUs and erase DTC.

NOTE:
The removal of 12V battery may cause a DTC detection error.

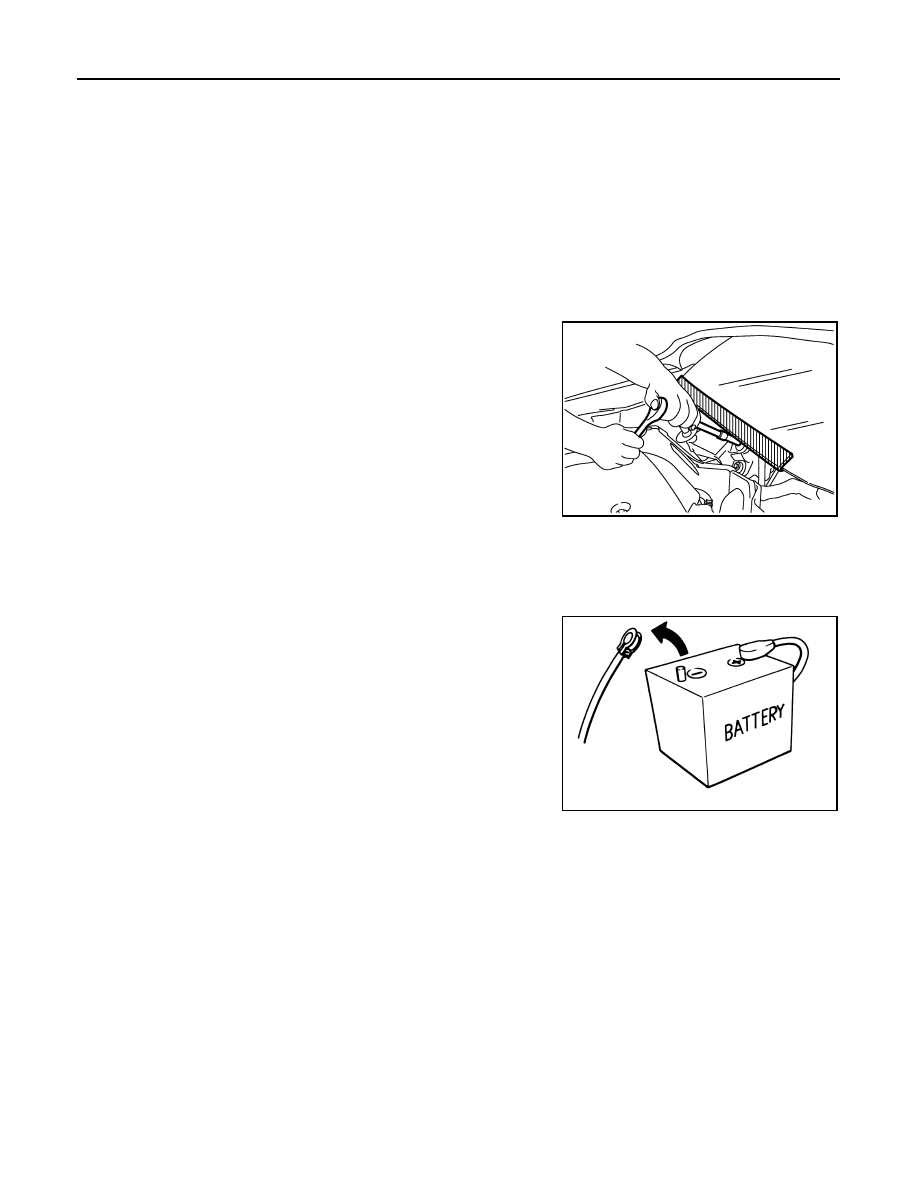
HOW TO DISCONNECT 12V BATTERY TERMINAL

Disconnect 12V battery terminal according to Instruction 1 or Instruction 2 described below.
For vehicles parked by ignition switch OFF, refer to Instruction 2.

INSTRUCTION 1

1.

Open the hood.

2.

Turn key switch to the OFF position with the driver side door opened.

3.

Get out of the vehicle and close the driver side door.

4.

Wait at least 3 minutes. For vehicle with the engine listed below, remove the battery terminal after a lapse
of the specified time.

PIIB3706J

SEF289H

D4D engine

: 20 minutes

HRA2DDT

: 12 minutes

PRECAUTIONS

TM-83

< PRECAUTION >

[6MT: RS6F52A]

C

E

F

G

H

I

J

K

L

M

A

B

TM

N

O

P

CAUTION:

While waiting, never operate the vehicle such as locking, opening, and closing doors. Violation of
this caution results in the activation of ACC power supply according to the Auto ACC function.

5.

Remove 12V battery terminal.

CAUTION:

After installing 12V battery, always check self-diagnosis results of all ECUs and erase DTC.

INSTRUCTION 2 (FOR VEHICLES PARKED BY IGNITION SWITCH OFF)

1.

Unlock the door with intelligent key or remote keyless entry.
NOTE:
At this moment, ACC power is supplied.

2.

Open the driver side door.

3.

Open the hood.

4.

Close the driver side door.

5.

Wait at least 3 minutes.

CAUTION:

While waiting, never operate the vehicle such as locking, opening, and closing doors. Violation of
this caution results in the activation of ACC power supply according to the Auto ACC function.

6.

Remove 12V battery terminal.

CAUTION:

After installing 12V battery, always check self-diagnosis results of all ECUs and erase DTC.

Precaution for Stop/Start System Service

INFOID:0000000011045997

CAUTION:

When performing an inspection and its related work with the engine at idle, always turn the stop/start
OFF switch ON or open the hood to release the stop/start system.

Service Notice or Precautions for Manual Transaxle

INFOID:0000000010921071

CAUTION:

Never reuse CSC (Concentric Slave Cylinder). Because CSC slides back to the original position every
time when removing transaxle assembly. At this timing, dust on the sliding parts may damage a seal of
CSC and may cause clutch fluid leakage. Refer to 

CL-30, "Removal and Installation"

.

• Use recommended gear oil only, refer to 

MA-23, "Fluids and Lubricants"

.

• Never reuse transaxle gear oil, once it has been drained.
• Check oil level or replace gear oil with vehicle on level surface.
• During removal or installation, keep inside of transaxle clear of dust or dirt.
• Check for the correct installation status prior to removal or disassembly. If matching marks are required, be

certain they never interfere with the function of the parts when applied.

• Overhaul should be done in a clean work area, it is preferable to work in dustproof area.
• Before disassembly, using steam or white gasoline, completely remove sand and mud from the exterior of

the unit, preventing them from entering into the unit during disassembly or assembly.

• Check appearance of the disassembled parts for damage, deformation, and unusual wear. Replace them

with a new ones if necessary.

• Gaskets, seals and O-rings should be replaced any time when the unit is disassembled.
• In principle, tighten bolts or nuts gradually in several steps working diagonally from inside to outside. If tight-

ening sequence is specified, observe it.

• Clean and flush the parts sufficiently and blow-dry them.
• Never damage sliding surfaces and mating surfaces.
• When applying sealant, remove the old sealant from the mounting surface; then remove any moisture, oil,

and foreign materials from the application and mounting surfaces.

• During assembly, observe the specified tightening torque, and apply new gear oil, petroleum jelly, or multi-

purpose grease as specified for each vehicle, if necessary.

K9K engine

: 4 minutes

M9R engine

: 4 minutes

R9M engine

: 4 minutes

V9X engine

: 4 minutes

TM-84

< PREPARATION >

[6MT: RS6F52A]

PREPARATION

PREPARATION

PREPARATION

Special Service Tools

INFOID:0000000010921072

Tool number
Tool name

Description

KV381054S0
Puller

• Removing differential side bearing outer 

race (transaxle case side)

• Removing mainshaft front bearing
• Removing differential side bearing outer 

race (clutch housing side)

ST33400001
Drift
a: 60 mm (2.36 in) dia.
b: 47 mm (1.85 in) dia.

Installing differential side oil seal (clutch hous-
ing side)

ST35321000
Drift
a: 49 mm (1.93 in) dia.
b: 41 mm (1.61 in) dia.

• Installing input shaft oil seal 
• Installing reverse main gear
• Installing 1st main gear bushing
• Installing 1st-2nd synchronizer hub assem-

bly

• Installing 2nd main gear bushing
• Installing 3rd main gear

KV40105320
Drift
a: 88 mm (3.46 in) dia.
b: 80 mm (3.15 in) dia.

Installing differential side bearing outer race 
(clutch housing side)

ST33200000
Drift
a: 60 mm (2.36 in) dia.
b: 44.5 mm (1.752 in) dia.

• Installing mainshaft front bearing
• Installing 6th input gear bushing
• Installing 4th main gear
• Installing 5th main gear
• Installing 6th main gear

ST30720000
Drift
a: 77 mm (3.03 in) dia.
b: 55.5 mm (2.185 in) dia.

• Installing differential side oil seal (transaxle 

case side)

• Installing differential side bearing outer race 

(clutch housing side)

• Installing differential side bearing outer race 

(transaxle case side)

• Installing mainshaft rear bearing
• Installing differential side bearing (clutch 

housing side)

• Installing differential side bearing (transaxle 

case side)

ZZA0601D

ZZA0814D

ZZA1000D

ZZA1000D

ZZA1002D

ZZA0811D

PREPARATION

TM-85

< PREPARATION >

[6MT: RS6F52A]

C

E

F

G

H

I

J

K

L

M

A

B

TM

N

O

P

ST33061000
Drift
a: 38 mm (1.50 in) dia.
b: 28.5 mm (1.122 in) dia.

• Installing bore plug
• Removing differential side bearing (transax-

le case side)

• Removing differential side bearing (clutch 

housing side)

ST33052000
Drift
a: 22 mm (0.87 in) dia.
b: 28 mm (1.10 in) dia.

• Removing input shaft rear bearing
• Removing 6th input gear, 6th input gear 

bushing, 5th-6th synchronizer hub assem-
bly, and 5th input gear

• Removing 5th input gear bushing, 4th input 

gear, 4th input gear bushing, 3rd-4th syn-
chronizer hub assembly, and 3rd input gear

• Installing input shaft front bearing
• Removing mainshaft rear bearing
• Removing 6th main gear
• Removing 4th main gear and 5th main gear

KV40105020
Drift
a: 39.7 mm (1.563 in) dia.
b: 35 mm (1.38 in) dia.
c: 15 mm (0.59 in)

Removing 3rd main gear, 2nd main gear, 2nd 
main gear bushing, 1st-2nd synchronizer hub 
assembly, 1st main gear, 1st main gear bush-
ing, and reverse main gear

ST30031000
Puller

Measuring wear of inner baulk ring

KV40105710
Press stand
a: 46 mm (1.81 in) dia.
b: 41 mm (1.61 in)

• Installing 3rd-4th synchronizer hub assem-

bly

• Installing 4th input gear bushing
• Installing 5th input gear bushing
• Installing 5th-6th synchronizer hub assem-

bly 

• Installing 2nd main gear bushing
• Installing 3rd main gear

ST30901000
Drift
a: 79 mm (3.11 in) dia.
b: 45 mm (1.77 in) dia.
c: 35.2 mm (1.386 in) dia.

• Installing input shaft rear bearing
• Installing 4th main gear
• Installing 5th main gear
• Installing 6th main gear
• Installing mainshaft rear bearing

Tool number
Tool name

Description

ZZA1000D

ZZA1023D

ZZA1133D

ZZA0537D

ZZA1058D

ZZA0978D


содержание   ..  2029  2030  2031  2032   ..