Nissan X-Trail 32. Manual - part 1954


  Главная      Nissan     Nissan X-Trail 32 - Service Manual


поиск по сайту            


содержание   ..  1952  1953  1954  1955   ..


Nissan X-Trail 32. Manual - part 1954


SR-30

< REMOVAL AND INSTALLATION >

CURTAIN AIR BAG MODULE

REMOVAL

1.

Remove headlining assembly. Refer to 

INT-37, "Removal and Installation"

.

2.

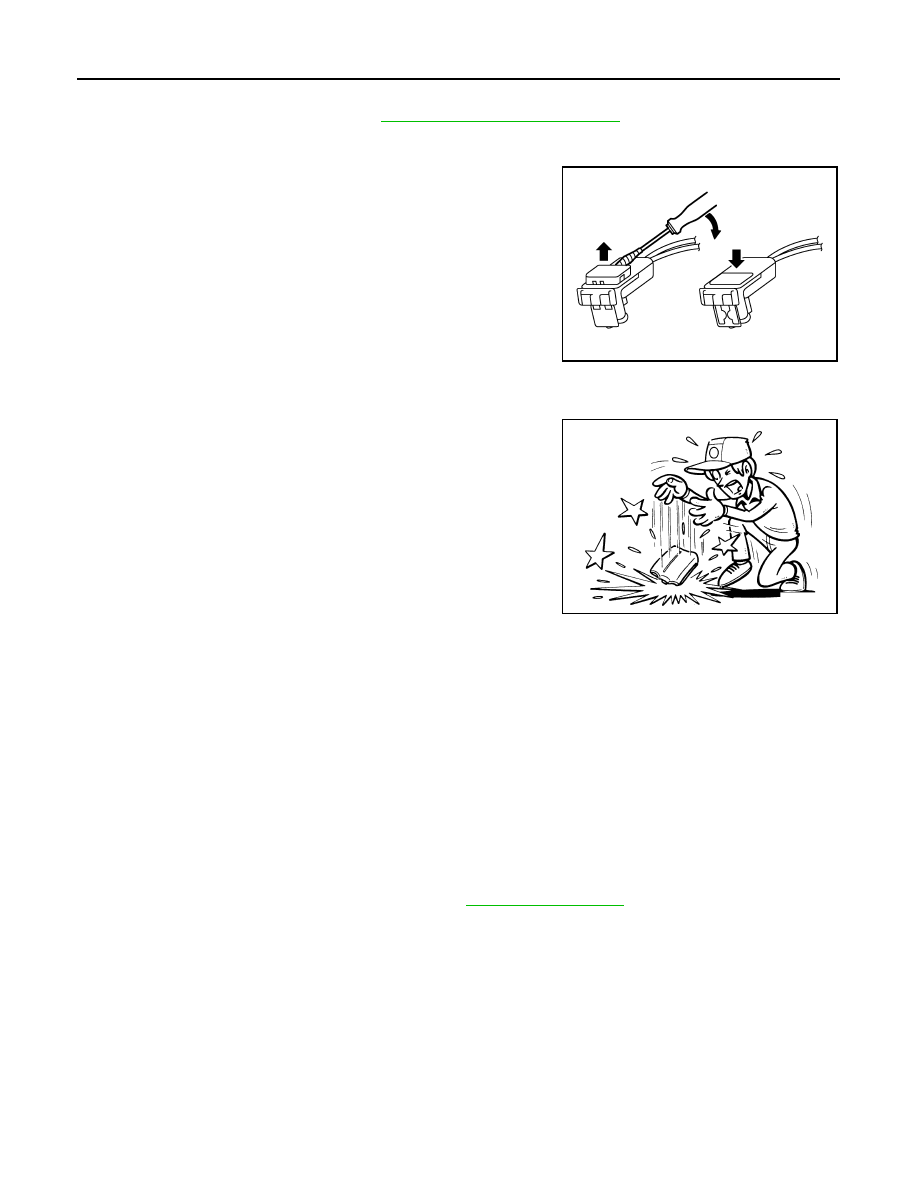
Disengage curtain air bag harness connector.

CAUTION:

• For installing/removing the curtain air bag harness con-

nector, insert a thin screwdriver wrapped in tape into
notch, lift lock and remove the connector.

• Install the connector with lock raised, and push lock into

the connector.

• After installing the connector, check that the lock is

pushed securely into it.

3.

Remove curtain air bag module mounting bolts, and then remove curtain air bag module.

CAUTION:

• To prevent damage to the parts, never impact the curtain air

bag module.

• Replace the curtain air bag module if it is dropped or sustains

an impact.

• To prevent accidental explosion, never insert any foreign objects (screwdriver, etc.) into the curtain

air bag module.

• To prevent accidental explosion, never disassemble the curtain air bag module.
• To prevent accidental explosion, never expose the curtain air bag module to temperatures of more

than 90

°

C (194

°

F).

• To prevent damage to the parts, never allow oil, grease, detergent, or water to come in contact with

the curtain air bag module.

INSTALLATION

Note the following items, and then install in the reverse order of removal.

CAUTION:

• Check perforation of curtain air bag module to check that curtain air bag module is not twisted.
• Never damage the harness while installing.
• After installation is complete, perform self-diagnosis using CONSULT or air bag warning lamp, if the

system is normal and 

PAST

 of 

Self Diagnostic Result

 is indicated, always perform 

ERASE

 of

Self Diagnostic Result

 using CONSULT. Refer to 

SRC-28, "Work Flow"

.

• After the work is completed, check that no system malfunction is detected by air bag warning lamp.

PHIA0953J

JMHIA0009ZZ

CRASH ZONE SENSOR

SR-31

< REMOVAL AND INSTALLATION >

C

D

E

F

G

I

J

K

L

M

A

B

SR

N

O

P

CRASH ZONE SENSOR

Exploded View

INFOID:0000000010927734

Removal and Installation

INFOID:0000000010927735

WARNING:

Always observe the following items for preventing accidental activation.
• Before servicing, turn ignition switch OFF, disconnect battery negative terminal and wait for 3 min-

utes or more (discharges electricity held in the additional power supply circuit of the air bag diagno-
sis sensor unit).

REMOVAL

1.

Remove the crash zone sensor mounting nuts, and then remove bracket.

2.

Disconnect the crash zone sensor harness connector, and then remove crash zone sensor.

CAUTION:

• To prevent damage to the parts, never impact the crash zone

sensor.

• Replace the crash zone sensor if it is dropped or sustains an

impact.

Crash zone sensor

Bracket

: Always replace after every disassembly.

: N·m (kg-m, ft-lb)

JMHIA2882GB

JMHIA0009ZZ

SR-32

< REMOVAL AND INSTALLATION >

CRASH ZONE SENSOR

• Replace the crash zone sensor of deployed driver air bag module, deployed passenger air bag mod-

ule, seat belt pre-tensioner and deployed lap pre-tensioner.

INSTALLATION

Note the following items, and then install in the reverse order of removal.

CAUTION:

• Never reuse mounting nut after removal, replace with new nut.
• Always install normally aligning to the cutout hole, because performance of the crash zone sensor

excessively fluctuates according to the installation position.

• After installation is complete, perform self-diagnosis using CONSULT or air bag warning lamp, if the

system is normal and 

PAST

 of 

Self Diagnostic Result

 is indicated, always perform 

ERASE

 of

Self Diagnostic Result

 using CONSULT. Refer to 

SRC-28, "Work Flow"

.

• After the work is completed, check that no system malfunction is detected by air bag warning lamp.

SATELLITE SENSOR

SR-33

< REMOVAL AND INSTALLATION >

C

D

E

F

G

I

J

K

L

M

A

B

SR

N

O

P

SATELLITE SENSOR

Exploded View

INFOID:0000000010927736

Removal and Installation

INFOID:0000000010927737

WARNING:

Always observe the following items for preventing accidental activation.
• Before servicing, turn ignition switch OFF, disconnect battery negative terminal and wait for 3 min-

utes or more (discharges electricity held in the additional power supply circuit of the air bag diagno-
sis sensor unit).

REMOVAL

B-pillar Satellite Sensor

1.

Remove center pillar lower garnish. Refer to 

INT-27, "CENTER PILLAR LOWER GARNISH : Removal

and Installation"

.

2.

Remove B-pillar satellite sensor mounting nuts.

3.

Pull out B-pillar satellite sensor from the vehicle.

CAUTION:

Never damage the B-pillar satellite sensor harness.

4.

Disconnect the B-pillar satellite sensor harness connector, and then remove the B-pillar satellite sensor. 

CAUTION:

B-pillar satellite sensor

C-pillar satellite sensor (if equipped)

: Vehicle front

: Always replace after every disassembly.

: N·m (kg-m, ft-lb)

JMHIA2883GB


содержание   ..  1952  1953  1954  1955   ..