Nissan Tiida C11. Manual - part 202


  Главная      Nissan     Nissan Tiida C11 - Service Manual


поиск по сайту            


содержание   ..  200  201  202  203   ..


Nissan Tiida C11. Manual - part 202


DLK-218

< REMOVAL AND INSTALLATION >

[WITH I-KEY, WITHOUT SUPER LOCK]

HOOD

1.

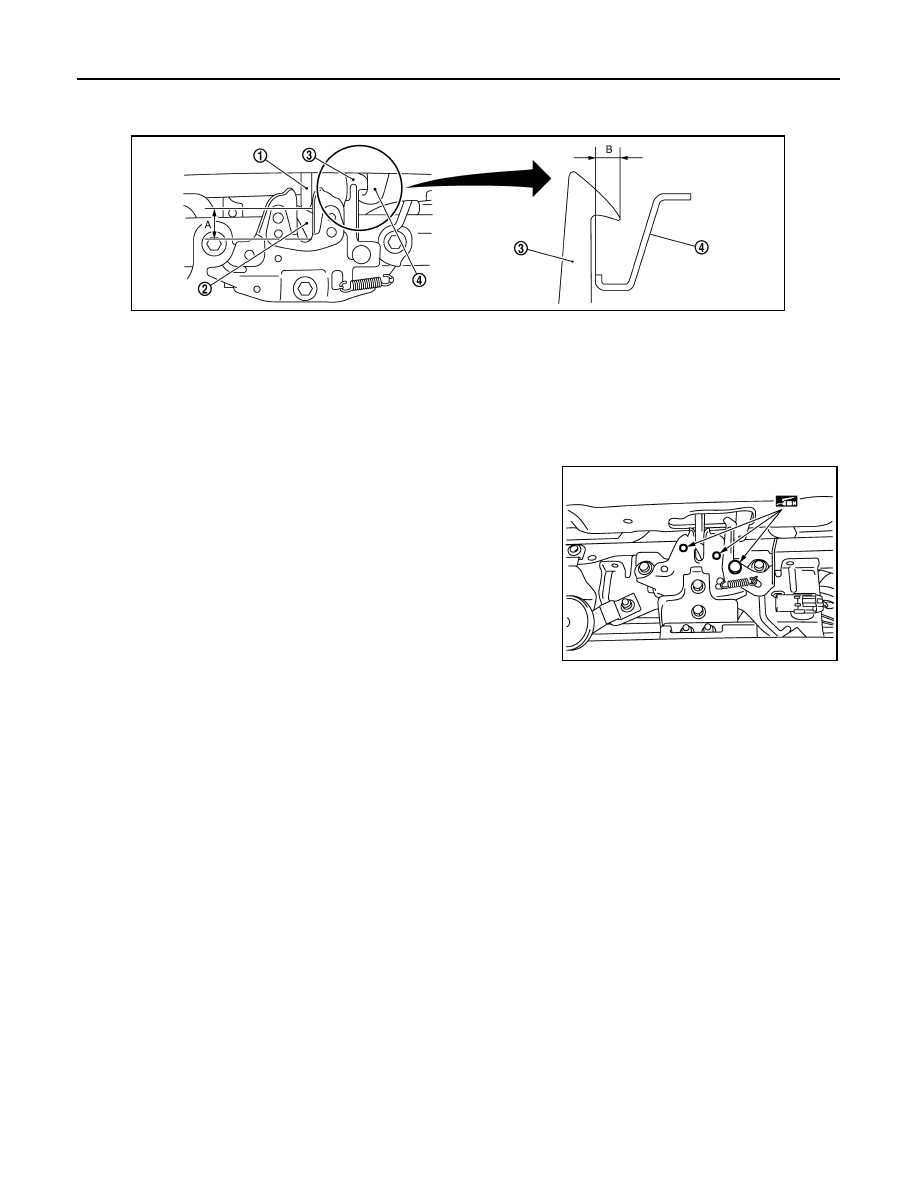
Check that the secondary latch is properly engaged with the secondary striker (B: 6.8 mm (0.268 in) with
hood's own weight.

2.

While operating the hood release handle, carefully check that the front end of the hood is raised by
approx. 20 mm (0.79 in). Also check that the hood release handle returns to the original position.

3.

Check that the secondary hood release operates at 29.4 N (3.0 kg) or below.

4.

Confirm static closing force of the hood is 343 – 441 N·m (35 – 44 kg-m).

5.

Check the hood lock lubrication condition. If necessary, apply
“body grease” to the points as shown.

1.

Hood striker

2.

Primary latch

3.

Secondary striker

4.

Secondary latch

PIIB5794E

PIIB6514E

RADIATOR CORE SUPPORT

DLK-219

< REMOVAL AND INSTALLATION >

[WITH I-KEY, WITHOUT SUPER LOCK]

C

D

E

F

G

H

I

J

L

M

A

B

DLK

N

O

P

RADIATOR CORE SUPPORT

Removal and Installation

INFOID:0000000001315835

REMOVAL

Radiator Core Support Upper

1.

Remove the air duct. Refer to 

EM-27, "Removal and Installation"

 (HR16DE), 

EM-154, "Removal and

Installation"

 (MR18DE), or 

EM-269, "Removal and Installation"

 (K9K).

2.

Remove the headlamp (LH/RH). Refer to 

EXL-84, "Removal and Installation"

 .

3.

Remove the hood lock assembly, and remove hood lock cable. Refer to 

DLK-215

 .

4.

Remove the air guide and hood lock cable clip.

5.

Remove the washer tank inlet. Refer to 

WW-64, "Removal and Installation"

 .

6.

Remove the radiator core support upper.

Radiator Core Support Lower

1.

Remove the air duct. Refer to 

EM-27, "Removal and Installation"

 (HR16DE), 

EM-154, "Removal and

Installation"

 (MR18DE), or 

EM-269, "Removal and Installation"

 (K9K).

2.

Remove the front bumper. Refer to 

EXT-13, "Removal and Installation"

 .

3.

Remove the headlamp (LH/RH). Refer to 

EXL-84, "Removal and Installation"

 .

4.

Remove the hood lock assembly, and remove hood lock cable. Refer to 

DLK-215

 .

5.

Remove the air guide and hood lock cable mounting clip.

6.

Remove the front bumper reinforcement. Refer to 

EXT-13, "Removal and Installation"

.

7.

Remove the radiator core lower stay.

8.

Remove the undercover.

PIIB6515E

1.

Radiator core support upper

2.

Radiator core support lower

3.

Radiator core support lower stay

4.

Radiator core support side stay

5.

Air guide

 24.5 N·m (2.5 kg-m, 18 ft-lb)

DLK-220

< REMOVAL AND INSTALLATION >

[WITH I-KEY, WITHOUT SUPER LOCK]

RADIATOR CORE SUPPORT

9.

Remove radiator core support lower side stay.

10. Tie a cord to all radiator core upper supports of the radiator and

condenser.
NOTE:
To prevent the compressor and radiator from being dropped
when the radiator core lower support is removed.

11. Remove the bolts, and lower radiator core lower supports.
12. Remove the radiator core lower supports.

INSTALLATION

Installation is in the reverse order of removal.

 55.0 N·m (5.6 kg-m, 41 ft-lb)

PIIB2800J

PIIB2799J

FRONT FENDER

DLK-221

< REMOVAL AND INSTALLATION >

[WITH I-KEY, WITHOUT SUPER LOCK]

C

D

E

F

G

H

I

J

L

M

A

B

DLK

N

O

P

FRONT FENDER

Removal and Installation

INFOID:0000000001315836

REMOVAL

1.

Remove the headlamp assemblies. Refer to 

EXL-84, "Removal and Installation"

.

2.

Remove the cowl top cover (LH/RH). Refer to 

EXT-20, "Removal and Installation"

.

3.

Remove the front fender protector. Refer to 

DLK-221, "Removal and Installation"

.

4.

Remove the bolt and the front fender.

CAUTION:

While removing use a shop cloth to protect the vechicle body from damage.

INSTALLATION

Installation is in the reverse order of removal.

CAUTION:

• After installing, apply touch-up paint onto the head of the front fender bolts.
• After installing, check front fender adjustment. Refer to 

DLK-213, "Fitting Adjustment"

 and 

DLK-222,

"Fitting Adjustment"

.

1.

Front fender

2

Bolt (LH 7 bolts required) (RH 8 bolts 
required) 

LIIA2657E


содержание   ..  200  201  202  203   ..