Mitsubishi Outlander (2022 year). Manual in english - page 7

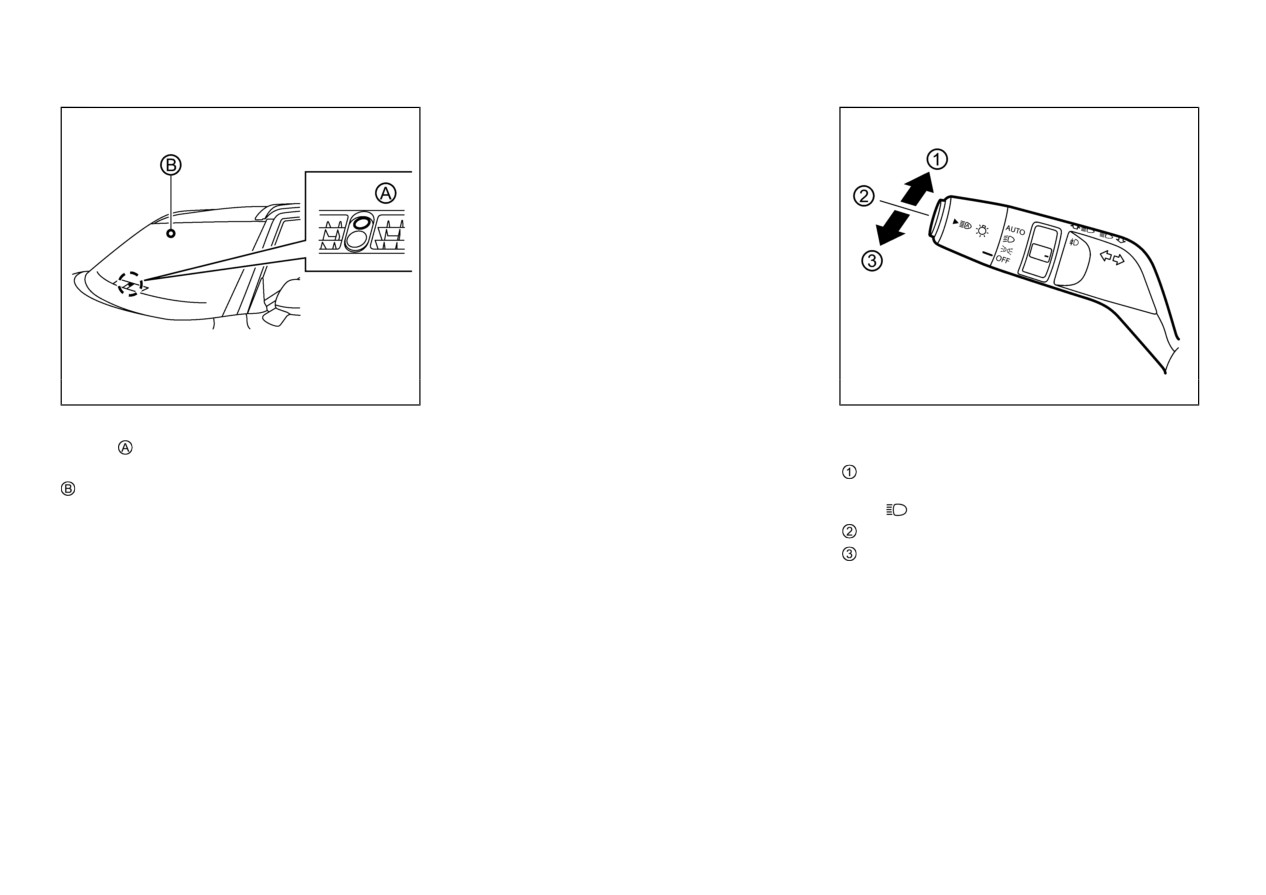
HEAD-UP DISPLAY(HUD) (if so equipped)
Outside air temperature (°F or °C)
The outside air temperature is displayed in °F or
°C in the range of −40 to 140°F (−40 to 60°C).
The outside air temperature mode includes a
low temperature warning feature. If the outside
air temperature is below
37°F
(3°C), the
warning is displayed (if so equipped).
The outside temperature sensor is located in
front of the radiator. The sensor may be affected
by road or engine heat, wind directions and
other driving conditions. The display may differ
from the actual outside temperature or
the
temperature
displayed
on
various
signs
or
WAC0550X
WAC0369X
billboards.
Example
CLOCK AND OUTSIDE AIR
TEMPERATURE
WARNING
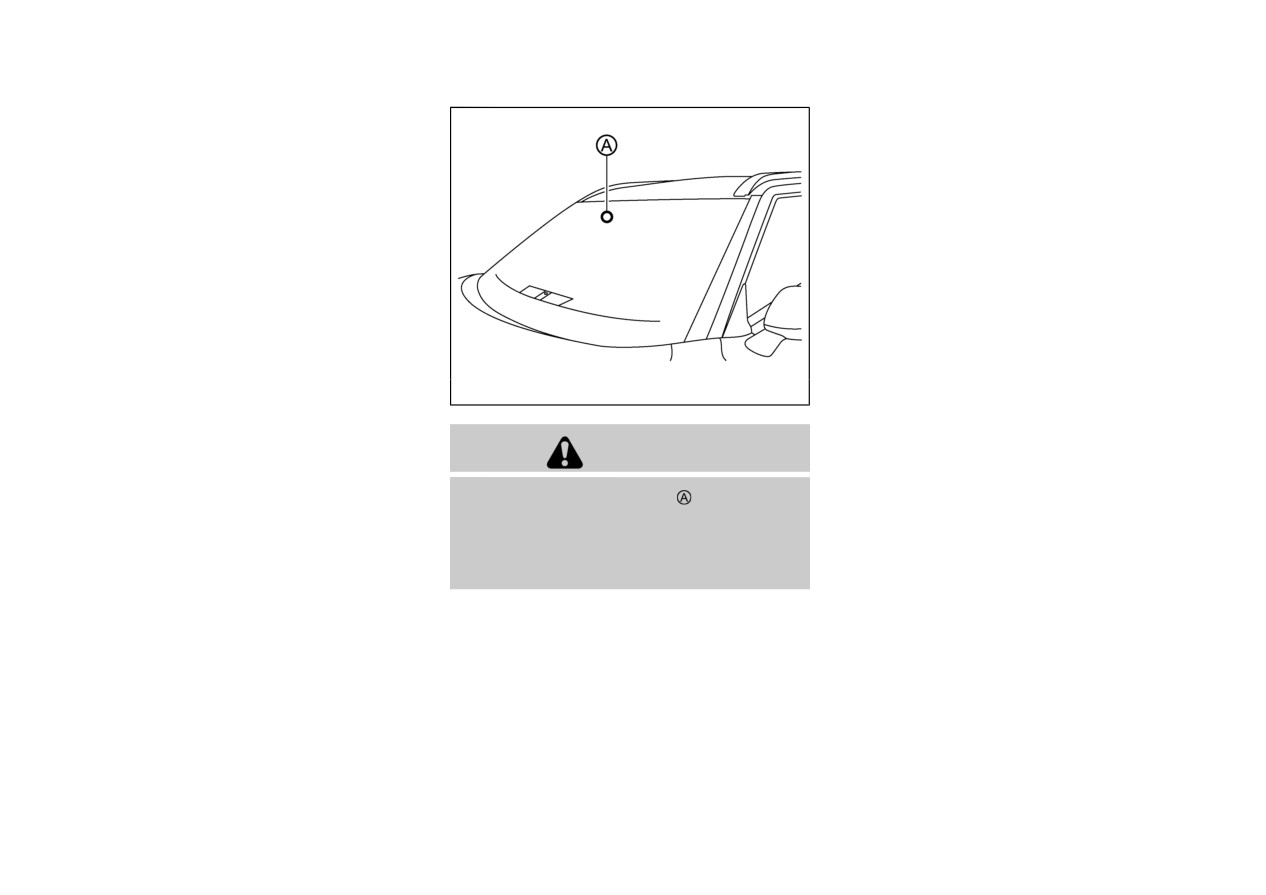
The clock and outside air temperature are
displayed on the upper side of the multi-
Failure to
properly adjust the brightness
information display.
and position of the displayed image may
interfere with the driver’s ability to see
Clock
through the windshield, which could cause
an accident leading to severe injury or
For clock adjustment, see “Clock” (P.2-26) or
death.
the separate Smartphone-link Display Audio
Do not use the Head-Up Display (HUD) for
extended periods of time as that can cause
you to not see other vehicles, pedestrians
or objects, which could cause an accident
leading to severe injury or death.
Instruments and controls
2-43
Do not place any objects on the instru-
. Do not place any type of liquid on or spray
ment panel which may obstruct the
water or spill beverages in the HUD
Opening or near.
display of the HUD.
If you wear polarized sunglasses, the
If the switches, wires, or electrical compo-
display may be difficult to see.
nents become wet, they could malfunction
or cause a vehicle fire.
Depending on weather conditions (rain,
snow, sunlight, etc.), the display may be
If you accidentally spill a beverage, wipe
difficult to see.
up as much liquid as possible and im-
mediately consult an authorized
Mitsubishi Motors dealer or a repair
facility of your choice.
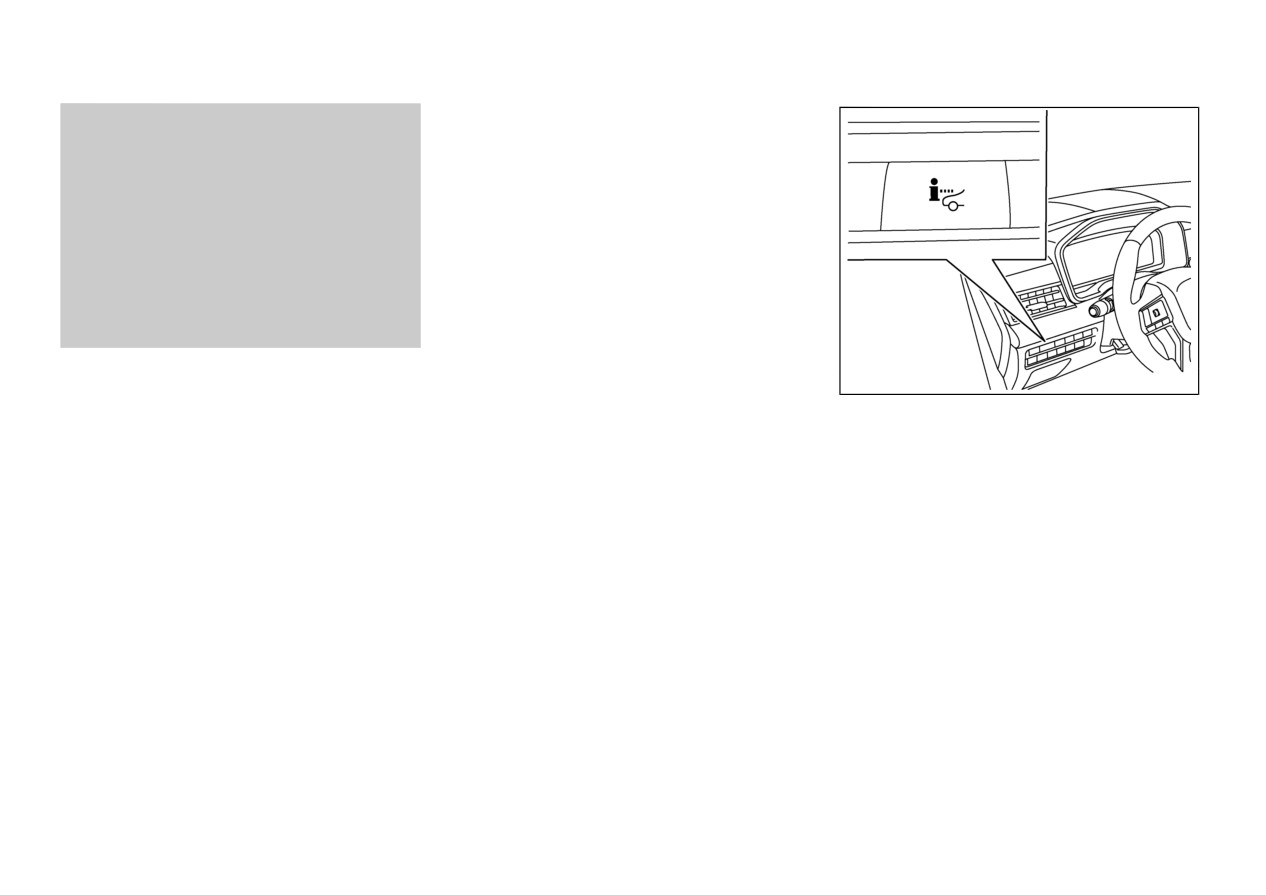
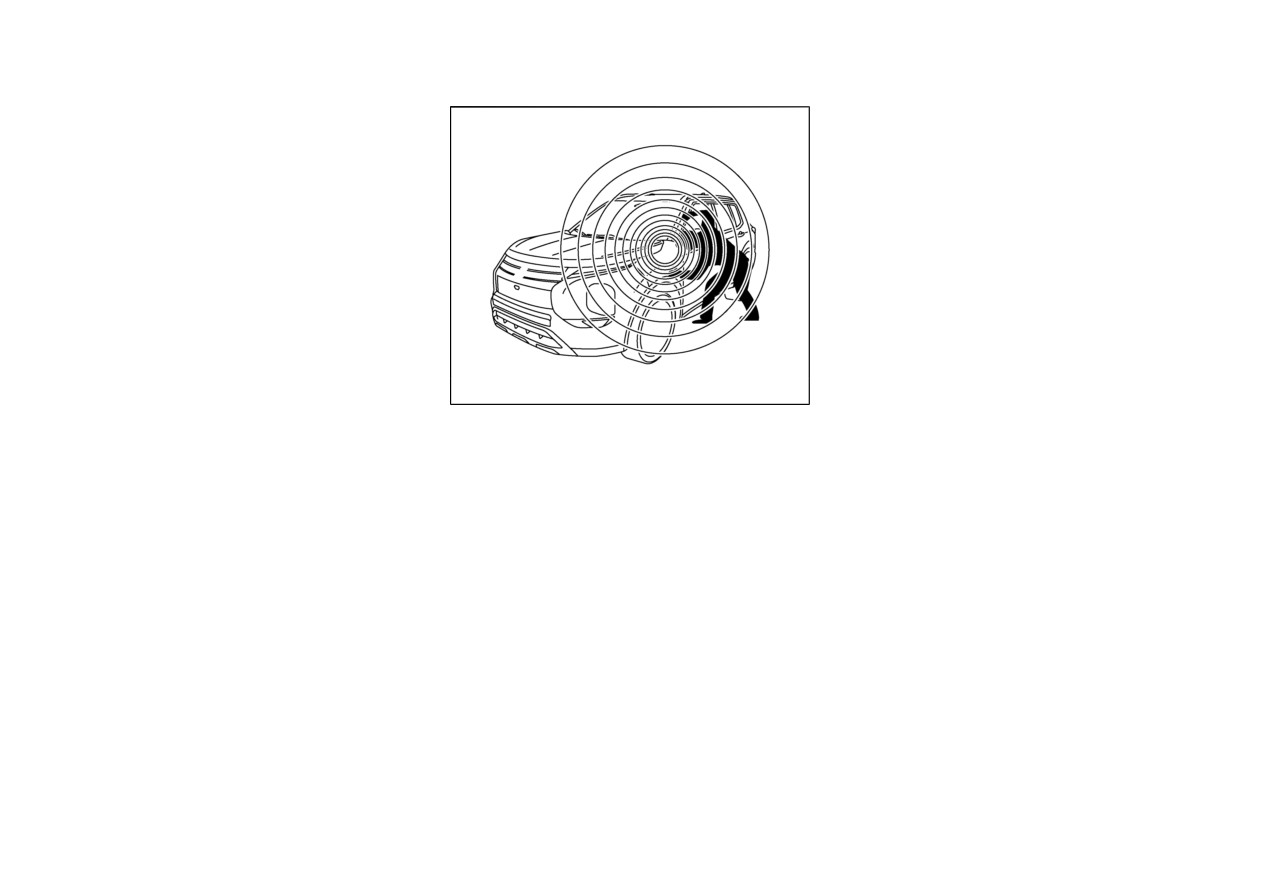
The Head-Up Display (HUD) is displayed on
WAC0484X
the windshield in front of the driver.
The HUD can display one or more of the
HOW TO USE THE HUD
following features:
To turn the HUD system on, push the HUD
. Vehicle speed
switch located on the driver’s left side instru-
. Navigation (if so equipped)
ment panel. To turn the HUD off, push the
. Driving Assist
switch again.
. Traffic Sign (if so equipped)
If the HUD system is turned off, it will remain
. Audio
off even if the vehicle is restarted.
. TEL/SMS
The following settings can be changed in the
multi-information display:
NOTE:
. Do not touch any internal parts of the
. Brightness
projector. Doing so may cause malfunc-
. Height
tion of the equipment.
. Rotation
. To prevent scratches to the projector
. Displayed information
glass, do not place any sharp objects on
or near the projector opening.
2-44
Instruments and controls

. Reset Settings
DRIVER ASSISTANCE/NAVI-
NOTE:
GATION/TRAFFIC SIGN/
Emergency information may display even if
AUDIO/TEL/SMS LINKING
the HUD system is turned off.
The HUD will display driver assistance and
For more details, refer to the separate Smart-
navigation information (if so equipped).
phone-link Display Audio
(SDA) Owner’s
The driver assistance display will display
Manual.
warning situations for the following systems if
This product includes the following software.
the vehicle is equipped with them:
(1) Panasonic Corporation or software devel-
. Forward Collision Mitigation System
oped for Panasonic Corporation
(FCM)
(2) Third-party software licensed to Panasonic
. Predictive Forward Collision Warning sys-
Corporation
tem
WAC0267X
(3) Open source software
. Cruise control
Regarding (3) Open source software, it includes
NOTE:
. Adaptive Cruise Control System (ACC)
open source software (OSS), including various
. The HUD has a built-in sensor
that
. MI-PILOT Assist
software to which license information applies.
controls the brightness of the displayed
. Lane Departure Warning (LDW) system
image. If you block the sensor with an
Refer to the license web site at: http://car.
. Lane Departure Prevention
object, the display will darken, making it
panasonic.jp/oss/i02lln39
difficult to see.
The Navigation System linking display will
display the following items (if so equipped):
Display brightness
. Do not expose the HUD sensor to
excessive light. This could cause failure
. Intersection names
The brightness of the display may be controlled
or malfunction.
. Arrows indicating turning direction
in the multi-information display. The brightness
will also be adjusted automatically according to
. Distance to the next intersection
the exterior ambient lighting brightness.
. Recommended lane indicator
For more details, refer to the separate Smart-
For the navigation system, refer to the separate
phone-link Display Audio
(SDA) Owner’s
Smartphone-link Display Audio (SDA) Own-
Manual.
er’s Manual.
The Traffic Signs Recognition System linking
Instruments and controls
2-45
SECURITY SYSTEMS
display will display the following items (if so
or exterior vehicle components in all situations.
equipped):
Always secure your vehicle even if parking for
a brief period. Never leave your keys in the
. Speed limit sign
vehicle, and always lock it when unattended. Be
The Audio System linking display will display
aware of your surroundings, and park in secure,
the following items (if so equipped):
well-lit areas whenever possible.
. Songs
. Radio stations
How to arm the anti-theft alarm
. Television stations
system
The TEL/SMS linking display will display the
1. Close all windows. The system can be
following items (if so equipped):
armed even if the windows are open.
Caller’s name or phone number
2. Remove the keys from the vehicle.
3. Close all doors, hood and liftgate. Lock all
WAC0483X
doors. The doors can be locked with F.A.S.
Your vehicle has two types of security systems,
T.-key, door handle request switch (if so
as follows:
equipped) or liftgate request switch (if so
equipped).
. Anti-theft alarm system
Even when the driver and/or passengers are
. Anti-theft engine immobilizer
in the vehicle, the system will activate with all
ANTI-THEFT ALARM SYS-
the doors, hood and liftgate locked with the
TEM
ignition switch placed in the LOCK position.
When placing the ignition switch in the ON
The anti-theft alarm system system provides
position, the system will be released.
visual and audio alarm signals if someone opens
the doors, hood and liftgate when the system is
armed. It is not, however, a motion detection
type system that activates when a vehicle is
moved or when a vibration occurs.
The system helps deter vehicle theft but cannot
prevent it, nor can it prevent the theft of interior
2-46
Instruments and controls
NOTE:
Anti-theft alarm system activation
ANTI-THEFT ENGINE IMMO-
. The key may not operate properly when
The anti-theft alarm system will give the
BILIZER
it is near an object or facility that emits
following alarm:
strong electromagnetic waves.
. The headlights blink and the horn sounds
. Anti-theft engine immobilizer is not
CAUTION
intermittently.
compatible with commercially available
. The alarm automatically turns off after
remote starting systems. Use of commer-
. Do not make any alterations or additions
approximately
30 seconds. However, the
cially available remote starting systems
to the immobilizer system. Alterations or
alarm reactivates if the vehicle is tampered
may result in vehicle starting problems
additions could cause failure of the im-
with again.
and a loss of security protection.
mobilizer.
The alarm is activated by:
Statement related to section 15 of FCC rules
. opening any doors, the hood or liftgate
The anti-theft engine immobilizer will not allow
for Anti-theft engine immobilizer
(CON-
without using the F.A.S.T.-key (even if the
the engine to start without the use of the
TROL UNIT, KOS)
door is unlocked by releasing the door
registered key.
FCC Notice:
inside lock knob).
If the engine does not start using the registered
For USA:
F.A.S.T.-key, it may be due to interference
How to stop an activated alarm
FCC ID : KR5MTXN1
caused by:
The alarm stops only by unlocking a door or the
FCC ID : KR5HFM401
. Another F.A.S.T.-key.
liftgate with pressing the UNLOCK
button
. Automated toll road device.
This device complies with Part 15 of the FCC
on the F.A.S.T.-key, or pushing the request
. Automated payment device.
Rules. Operation is subject to the following
switch
(if so equipped) on the driver’s or
two conditions: (1) this device may not cause
passenger’s door in range of the door handle.
. Other devices that transmit similar signals.
harmful interference, and
(2) this device
Start the engine using the following procedure:
The alarm also stops when the ignition switch is
must accept any interference received, in-
placed in the ON position.
1. Remove any items that may be causing the
cluding interference that may cause unde-
interference away from the F.A.S.T.-key.
sired operation. Changes or modifications
2. Start the engine again.
not expressly approved by the party respon-
sible for compliance could void the user’s
If this procedure allows the engine to start,
authority to operate the equipment.
Mitsubishi Motors recommends placing the
registered F.A.S.T.-key separate from other
devices to avoid interference.
Instruments and controls
2-47
WIPER AND WASHER SWITCH
For Canada:
moving to protect its motor. If this occurs,
IC ID : 7812D-MTXN1
WARNING
turn the wiper switch to the OFF position
and remove the snow or ice that is on and
IC ID : 7812D-HFM401
In freezing temperatures the washer solution
around the wiper arms. In approximately 1
This device complies with Industry Canada
may freeze on the windshield and obscure your
minute, turn the switch on again to operate
licence-exempt RSS standard(s). Operation
vision which may lead to an accident. Warm
the wiper.
is subject to the following two conditions: (1)
windshield with the defroster before you wash
this device may not cause interference, and
the windshield.
(2) this device must accept any interference,
including interference that may cause un-
desired operation of the device.
CAUTION
Le présent appareil est conforme aux CNR
d’Industrie Canada applicables aux appa-
Do not operate the washer continuously for
reils radio exempts de licence. L’exploitation
a long period of time or the pump may fail.
est autorisée aux deux conditions suivantes :
Do not operate the washer if the reservoir
(1) l’appareil ne doit pas produire de
tank is empty.
brouillage, et
(2) l’utilisateur de l’appareil
Do not fill the window washer reservoir
doit accepter tout brouillage radioélectrique
tank with washer fluid concentrates at full
subi, même si le brouillage est susceptible
strength. Some methyl alcohol based
d’en compromettre le fonctionnement.
washer fluid concentrates may perma-
nently stain the grille if spilled while filling
the window washer reservoir tank.
Pre-mix washer fluid concentrates with
water to the manufacturer’s recommended
levels before pouring the fluid into the
window washer reservoir tank. Do not use
the window washer reservoir tank to mix
the washer fluid concentrate and water.
If the windshield wiper operation is inter-
rupted by snow or ice, the wiper may stop
2-48
Instruments and controls

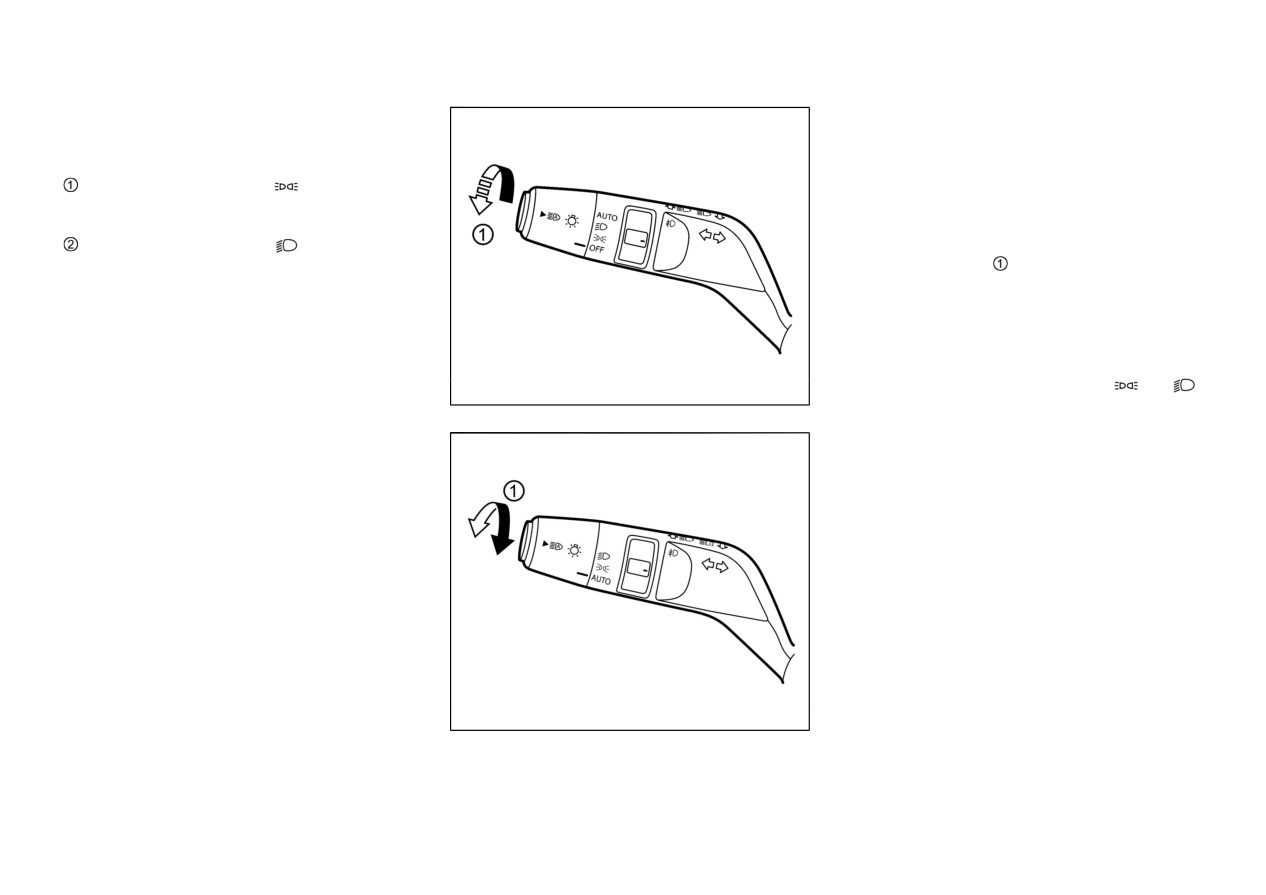
Push the lever up
to have one sweep
operation of the wiper.
Pull the lever toward you
to operate the
washer. Then the wiper will also operate several
times.
NOTE:
The speed dependent feature may be dis-
abled. For additional information, refer to
“Vehicle Settings” (P.2-26).
WAC0288X
WAC0357X
WINDSHIELD WIPER AND
RAIN-SENSING AUTO WIPER
WASHER OPERATION
SYSTEM (if so equipped)
The windshield wiper and washer operates
The rain-sensing auto wiper system can auto-
when the ignition switch is in the ON position.
matically turn on the wipers and adjust the
wiper speed depending on the rainfall and the
Push the lever down to operate the wiper at the
vehicle speed by using the rain sensor located
following speed:
on the upper part of the windshield.
Intermittent
— intermittent operation can be
adjusted by turning the knob toward
(Faster)
To set the rain-sensing auto wiper system, push
or
(Slower). Also, the intermittent operation
the lever down to the AUTO position. The
speed varies in accordance with the vehicle
wiper will sweep once while the engine is
speed. (For example, when the vehicle speed is
running.
high, the intermittent operation speed will be
faster.)
The rain sensor sensitivity level can be adjusted
by turning the knob upwards
(High) or
Low — continuous low speed operation
downwards
(Low).
High — continuous high speed operation
Instruments and controls
2-49
. High — High sensitive operation
ure affect the rain sensor.
. Low — Low sensitive operation
Do not attach a sticker or label on the
To turn the rain-sensing auto wiper system off,
windshield. Otherwise the rain sensor
push up the lever to the OFF position, or pull
may not detect the amount of the water
down the lever to the LO or HI position.
properly and the wiper may not operate
automatically.
If the replacement of the windshield is
necessary, it is recommended to contact
an authorized Mitsubishi Motors dealer.
The rain-sensing auto wipers may not
operate if rain does not hit the rain
sensor even if it is raining.
When the windshield glass is coated with
WAC0557X
water repellent, the speed of the rain-
sensing auto wipers may be higher even
though the amount of the rainfall is
CAUTION
small.
Be sure to turn off the rain-sensing auto
Do not touch the rain sensor and around it
wiper system when you use a car wash.
when the wiper switch is in the AUTO position
Using genuine wiper blades is recom-
and the engine is running. The wipers may
mended for proper operation of the rain-
operate unexpectedly and cause to an injury or
may damage a wiper.
sensing auto wiper system. (See “Wind-
shield wiper blades” (P.8-15) for wiper
blade replacement.)
. The rain-sensing auto wipers are in-
tended for use during rain. If the switch
is left in the AUTO position, the wipers
may operate unexpectedly when dirt,
fingerprints, oil film or insects are stuck
on or around the sensor. The wipers may
also operate when exhaust gas or moist-
2-50
Instruments and controls

REAR WINDOW WIPER
AND WASHER SWITCH
stop moving to protect its motor. If this
WARNING
occurs, turn the wiper switch to the OFF
position and remove the snow or ice that is
In freezing temperatures the washer solution
on and around the wiper arms. In approxi-
may freeze on the rear window glass and
mately 1 minute, turn the switch on again to
obscure your vision. Warm the rear window
operate the wiper.
with the defroster before you wash the rear
window.
CAUTION
Do not operate the washer continuously for
more than 30 seconds.
WAC0289X
Do not operate the washer if the reservoir
The rear window wiper and washer operate
tank is empty.
when the ignition switch is in the ON position.
Do not fill the window washer reservoir
Turn the switch clockwise from the OFF
tank with washer fluid concentrates at full
position to operate the wiper.
strength. Some methyl alcohol based
washer fluid concentrates may perma-
Intermittent
(INT)
— intermittent operation
nently stain the grille if spilled while filling
(not adjustable)
the window washer reservoir tank.
Low (ON) — continuous low speed operation
Pre-mix washer fluid concentrates with
Push the switch forward
to operate the
water to the manufacturer’s recommended
washer. Then the wiper will also operate several
levels before pouring the fluid into the
times.
window washer reservoir tank. Do not use
the window washer reservoir tank to mix
Reverse Link feature:
the washer fluid concentrate and water.
When the windshield wiper switch is on,
moving the shift lever to the R
(Reverse)
If the rear window wiper operation is
position will operate the rear window wiper.
interrupted by snow or ice, the wiper may
Instruments and controls
2-51

ELECTRIC REAR WINDOWAND
DOOR MIRROR DEFROSTER SWITCH
NOTE:
To defog/defrost the rear window glass and
The Reverse Link feature may be disabled.
door mirrors (if so equipped), start the engine
For additional information, refer to “Vehicle
and push the switch on. The indicator light
Settings” (P.2-26).
will illuminate. Push the switch again to turn the
defroster off.
It will automatically turn off in approximately
20 minutes.
CAUTION
When cleaning the inner side of the rear
window, be careful not to scratch or damage
the electric rear window defroster.
WAC0290X
Type A
WAC0485X
Type B
2-52
Instruments and controls

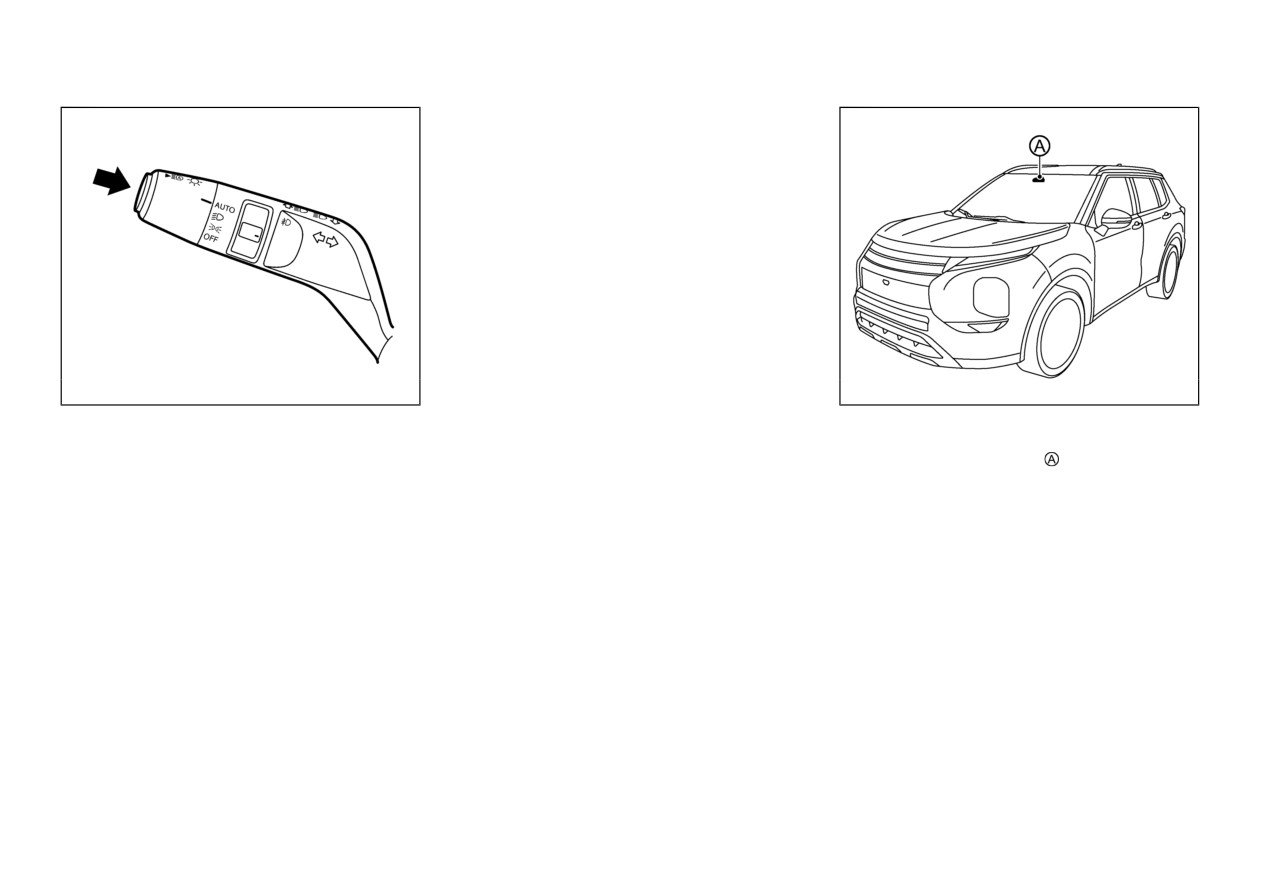
WIPER DEICER SWITCH (if so equipped)
HEADLIGHTAND TURN SIGNAL SWITCH
CAUTION
. When cleaning the inner side of the
window, be careful not to scratch or
damage the electrical conductors on the
surface of the window.
WAC0358X
WAC0291X
Type A
The wiper deicer switch
(defroster switch)
operates when the engine is running.
The deicer is used to remove ice from the
windshield when a wiper is frozen to the
windshield.
When the switch is pushed, the indicator light
illuminates and the deicer operates for approxi-
mately 10 minutes. After the preset time has
passed, the deicer will turn off automatically. To
turn off the deicer manually, push the deicer
switch again, and the indicator light turns off.
WAC0568X
Type B
Instruments and controls
2-53
HEADLIGHT SWITCH
Auto Headlight system
The Auto Headlight system allows the head-
Lighting
lights to be set so they turn on and off
Rotate the switch to the
position, and the
automatically.
front parking, tail, license plate, and instrument
panel lights will come on.
To set the Auto Headlight system:
Rotate the switch to the
position, and the
1. Make sure the headlight switch is in the
headlights will come on and all the other lights
AUTO position
remain on.
2. Start the engine.
3. The Auto Headlight system automatically
turns the headlights on and off.
To turn the Auto Headlight system off, turn the
switch to the OFF (if so equipped),
or
WAC0292X
position.
Type A
The Auto Headlight system can turn on the
headlights automatically when it is dark and
turn off the headlights when it is light.
If the ignition switch is placed in the OFF
position and one of the doors is opened and this
condition is continued, the headlights remain on
for 5 minutes.
WAC0567X
Type B
2-54
Instruments and controls
Models equipped with rain-sensing auto
wiper system:
If the replacement of the windshield or the
repair on the windshield near the rain sensor is
necessary, it is recommended to contact an
authorized Mitsubishi Motors dealer.
Headlights off delay:
When the lever is pulled towards the rearmost
position after the ignition is switched off, the
headlights will turn on and stay on for
30
seconds. The lever can be pulled
4
times for up
to
2
minutes.
WAC0293X
WAC0294X
Example
Be sure not to put anything on top of the light
sensor
(if so equipped) located on the top
Headlight beam select
of the instrument panel or rain/light sensor
To select the high beam function, push the lever
(if so equipped) located above the inside
forward. The high beam lights come on and the
mirror. The sensor controls the Auto Head-
light illuminates.
light; if it is covered, the sensor reacts as if it
Push the lever again to select the low beam.
is dark and the headlights will illuminate.
Pulling and releasing the lever flashes the
headlight high beams on and off.
Models not equipped with rain-sensing
auto wiper system:
Do not put anything on or spray glass cleaner on
top of the photo sensor, located on the top of the
instrument panel. Otherwise the photo sensor
may not detect the ambient light and the
headlights may not operate automatically.
Instruments and controls
2-55
Automatic High Beam (AHB)
— When the headlights of the on-
— The brightness of the headlights
The Automatic High Beam (AHB) system will
coming vehicle or the leading
of the oncoming vehicle or leading
operate when the vehicle is driven at speeds of
vehicle are turned off, when the
vehicle.
approximately 34 MPH (55 km/h) and above. If
color of the light is affected due to
— The movement and direction of
an oncoming vehicle or leading vehicle appears
foreign materials on the lights, or
the oncoming vehicle and the
in front of your vehicle when the headlight high
when the light beam is out of
leading vehicle.
beam is on, the headlight will be switched to the
position.
low beam automatically.
— When only one light on the
— When there is a sudden, contin-
oncoming vehicle or the leading
uous change in brightness.
Precautions on Automatic High Beam
vehicle is illuminated.
(AHB):
— When driving on a road that
— When the oncoming vehicle or the
passes over rolling hills, or a road
leading vehicle is a two-wheeled
that has level differences.
vehicle.
WARNING
— When driving on a road with
— Road conditions (incline, curve,
many curves.
The Automatic High Beam (AHB) system
the road surface, etc.).
is a convenience but it is not a substitute
— When a sign or mirror-like sur-
— The number of passengers and
for safe driving operation. The driver
face is reflecting intense light
should remain alert at all times, ensure
the amount of cargo.
towards the front of the vehicle.
safe driving practices and switch the high
beams and low beam manually when
— When the container, etc. being
necessary.
towed by a leading vehicle is
The high beam or low beam may not
reflecting intense light.
switch automatically under the following
— When a headlight on your vehicle
conditions. Switch the high beam and low
is damaged or dirty.
beam manually.
— During bad weather (rain, fog,
— When the vehicle is leaning at an
snow, wind, etc.).
angle due to a punctured tire,
being towed, etc.
— When a light source similar to a
headlight or tail light is in the
The timing of switching the low beam and
high beam may change under the following
vicinity of the vehicle.
situations.
2-56
Instruments and controls
approximately 28 MPH (45 km/h), the headlight
remains the low beam.
To turn off the Automatic High Beam (AHB)
system, push the switch again.
WAC0295X
WAC0359X
Example
Ambient image sensor maintenance:
Automatic High Beam (AHB) opera-
The ambient image sensor for the Automatic
tions:
High Beam (AHB) system is located in front of
To activate the Automatic High Beam (AHB)
the inside mirror. To keep the proper operation
system, push the switch as illustrated with the
of the Automatic High Beam (AHB) system and
AUTO position. The Automatic High Beam
prevent a system malfunction, be sure to
(AHB) indicator light in the meter will
observe the following:
illuminate while the headlights are turned on.
. Always keep the windshield clean.
If the Automatic High Beam (AHB) indicator
. Do not attach a sticker (including transpar-
light does not illuminate in the above condition,
ent material) or install an accessory near the
it may indicate that the system is not function-
ambient image sensor.
ing properly. It is recommended you have the
. Do not strike or damage the areas around
system checked by an authorized Mitsubishi
the ambient image sensor. Do not touch the
Motors dealer.
sensor lens that is located on the ambient
When the vehicle speed lowers to less than
image sensor.
Instruments and controls
2-57
If the ambient image sensor is damaged due to
Daytime running light system
HEADLIGHT CLEANER (if so
an accident, it is recommended you contact an
The LED parking lights automatically illumi-
equipped)
authorized Mitsubishi Motors dealer.
nate at
100% intensity when the engine is
The headlight cleaner operates when the head-
Battery saver system
started and the parking brake released. The LED
light is on and the ignition switch is in the ON
daytime running light operate with the headlight
When the headlight switch is in the
or
position.
switch in the OFF position or in the
position while the ignition switch is in
The headlight cleaner operates when:
position. When you turn the headlight switch to
the ON position, the lights will automati-
the
position for full illumination, the
. the first windshield washer operation after
cally turn off within a period of time after
daytime running light switches to the parking
the ignition switch turns on.
the ignition switch has been placed in the
light.
. every tenth windshield washer operation
OFF position.
If the parking brake is applied before the engine
after the ignition switch turns on.
When the headlight switch remains in the
is started, the daytime running light will not
. the windshield washer switch is pulled and
or
position after the lights
illuminate. The daytime running light illuminate
hold.
automatically turn off, the lights will turn
when the parking brake is released. The daytime
on when the ignition switch is placed in the
running light will remain on until the ignition
ON position.
CAUTION
switch is placed in the OFF position.
It is necessary at dusk to turn the headlight
Do not operate the headlight cleaner if
the
CAUTION
switch ON for interior controls and switches to
window washer fluid reservoir is empty.
illuminate, as those remain OFF while the
. When you turn on the headlight switch
switch is in the OFF position.
again after the lights automatically turn
off, the lights will not turn off automati-
cally. Be sure to turn the light switch to the
WARNING
OFF position when you leave the vehicle
for extended periods of time, otherwise the
When the daytime running light system is
battery will be discharged.
active, tail lights on your vehicle are not on. It
. Never leave the light switch on when the
is necessary at dusk to turn on your headlights.
engine is not running for extended periods
Failure to do so could cause an accident
of time even if the headlights turn off
injuring yourself and others.
automatically.
2-58
Instruments and controls

Also, when you move the lever to
slightly
then release it, the turn signal light and indicator
light in the instrument cluster will flash three
times.
WAC0296X
WAC0297X
Example
Example
TURN SIGNAL SWITCH
FOG LIGHT SWITCH (if so
equipped)
Turn signal
To turn the fog lights on, turn the headlight
Move the lever up or down to signal the turning
switch to the
position, then turn the fog
direction. When the turn is completed, the turn
light switch to the
position.
signals cancel automatically.
To turn the fog lights on with the headlight
Lane change signal
switch in the AUTO position (if so equipped),
When moving the lever to slightly to change
the headlights must be on, then turn the fog
a lane, the turn signal light and indicator light in
light switch to the
position.
the instrument cluster will only flash while the
To turn them off, turn the fog light switch to the
lever is operated.
OFF position.
The headlights must be on for the fog lights to
operate. The fog lights automatically turn off
when the high beam headlights are selected.
Instruments and controls
2-59
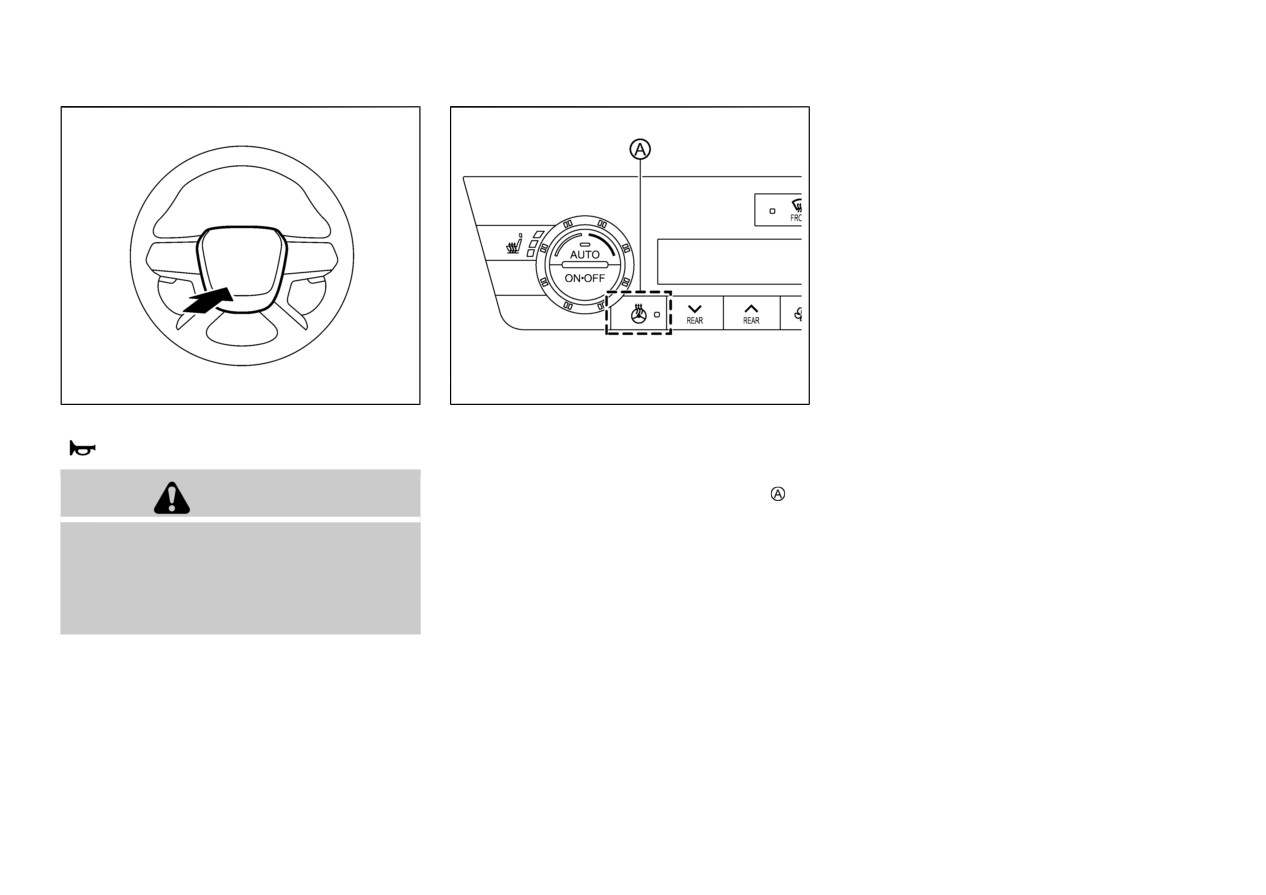
HORN
HEATEDSTEERINGWHEEL(if so equipped)
will turn off.
NOTE:
If the surface temperature of the steering
wheel is above 68°F (20°C) when the switch is
turned on, the system will not heat the
steering wheel. This is not a malfunction.
WAC0298X
WAC0360X
To sound the horn, push the center pad area
The heated steering wheel system is designed to
(
) of the steering wheel.
operate only when the surface temperature of
the steering wheel is below 68°F (20°C).
Push the heated steering wheel switch
to
WARNING
warm the steering wheel after the engine starts.
The indicator light on the switch will illuminate.
Do not disassemble the horn. Doing so could
affect proper operation of the supplemental
If the surface temperature of the steering wheel
front airbag system. Tampering with the
is below 68°F (20°C), the system will heat the
supplemental front airbag system may result
steering wheel and cycle off and on to maintain
in serious personal injury.
a temperature above 68°F (20°C). The indicator
light will remain on as long as the system is on.
The heated steering wheel system is automati-
cally turned off after 30 minutes.
Push the switch again to turn the heated steering
wheel system off manually. The indicator light
2-60
Instruments and controls

HEATED SEATS (if so equipped)
is recommended you visit an authorized
WARNING
Mitsubishi Motors dealer for this service.
Do not use or allow occupants to use the seat
heater if you or the occupants cannot monitor
elevated seat temperatures or have an inability
to feel pain in body parts that contact the seat.
Use of the seat heater by such people could
result in serious injury.
CAUTION
Do not use the seat heater for extended
WAC0361X
periods or when no one is using the seat.
Front
Do not put anything on the seat which
insulates heat, such as a blanket, cushion,
seat cover, etc. Otherwise, the seat may
become overheated.
Do not place anything hard or heavy on
the seat or pierce it with a pin or similar
object. This may result in damage to the
heater.
Any liquid spilled on the heated seat
should be removed immediately with a
dry cloth.
When cleaning the seat, never use gasoline,
thinner, or any similar materials.
If any malfunctions are found or the
heated seat does not operate, turn the
WAC0363X
switch off and have the system checked. It
Rear
Instruments and controls
2-61
REAR SEAT ALERT
The front and rear (if so equipped) seats are
The Rear Seat Alert system functions under
With the system enabled, when the driver
warmed by built-in heaters. The switches are
certain conditions to indicate there may be an
exits the vehicle, an audible alert
(horn
located on the instrument panel and the back of
object or passenger in the rear seat(s). Check the
sound) will occur unless a rear door is
the center console box and can be operated
seat(s) before exiting the vehicle.
opened and closed within a short time to
independently of each other.
The Rear Seat Alert system is initially disabled.
deactivate the alert.
The driver can enable the system using the
If the doors are locked before the alert is
OPERATION WITH SWITCH
multi-information display. For additional infor-
deactivated by opening a rear door, the horn
1.
Start the engine.
mation, see “Vehicle Settings” (P.2-26).
will sound.
2.
Push the heated seat switch and select the
If the system is activated but the liftgate is
When the system is enabled:
desired heat range.
opened before opening a rear door, the horn
. The system is activated when a rear door is
. For high heat, push the switch once.
will be delayed until after the liftgate is
opened and closed within 10 minutes of the
. For medium heat, push the switch twice.
closed.
vehicle being driven. When the vehicle is
. For low heat, push the switch three
If the audible horn alert occurs, a message
started and the system is activated, a visual
times.
will also appear in the multi-information
message appears in the multi-information
. The indicator light
on the switch will
display that states, “Check Rear Seat”. For
display. For additional information, see “37.
illuminate depending on the heat level
additional information, see “38. Check Rear
Rear Seat Alert is Activated” (P.2-37).
when the heater is on.
Seat” (P.2-38).
. If a rear door is opened and closed but the
3.
To turn off the heater, push the heated seat
vehicle is not driven within approximately
switch until the indicator light turns off.
10 minutes, the system will not be activated.
WARNING
The heater is controlled by a control
A rear door must be opened and closed and
module, automatically turning the heater
the vehicle is driven within 10 minutes for
. If the driver selects “Disable Alert”, no
on and off.
the system to activate.
audible alert will be provided regardless of
The indicator light will remain on as long as
When the Rear Seat Alert system is activated
rear door open/close status.
the switch is on.
and a driver exits the vehicle after arriving at a
. There may be times when there is an object
destination:
or passenger in the rear seat(s) but the
When the vehicle’s interior is warmed, or
audible alert does not sound. For example,
before you leave the vehicle, be sure to turn
. When the driver puts the vehicle in the P
this may occur if rear seat passengers enter
off the seat heater.
(Park) position, a message appears in the
or exit the vehicle during a trip.
multi-information display for the driver to
. The system does not directly detect objects
“Dismiss Message” or “Disable Alert” if
or passengers in the rear seat(s). Instead, it
desired.
2-62
Instruments and controls
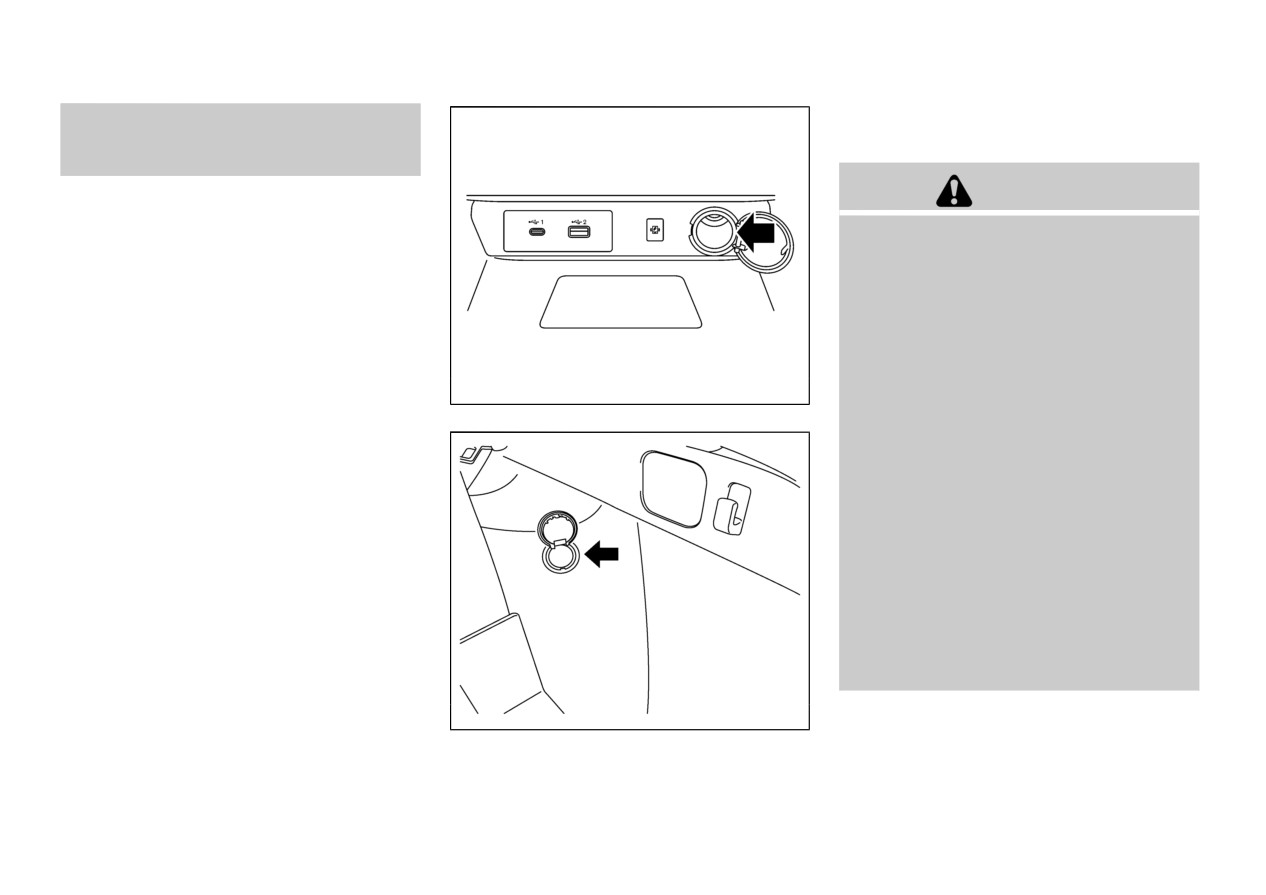
POWER OUTLET
The power outlet is located in the instrument
can detect when a rear door is opened and
closed, indicating that there may be some-
panel and cargo area.
thing in the rear seat(s).
CAUTION
NOTE:
There may be times when the horn sounds
The outlet and plug may be hot during or
but there are no objects or passengers in the
immediately after use.
rear seat(s).
Do not use with accessories that exceed a
For additional information, see “37. Rear Seat
12 volt, 120W (10A) power draw. Do not
Alert is Activated” (P.2-37).
use double adapters or more than one
electrical accessory.
Use power outlet with the engine running
to avoid discharging the vehicle battery.
WAC0300X
Avoid using power outlet when the air
Instrument Panel
conditioner, headlights or electric rear
window defroster is on.
This power outlet is not designed for use
with a cigarette lighter unit.
Push the plug in as far as it will go. If good
contact is not made, the plug may overheat
or the internal temperature fuse may open.
Before inserting or disconnecting a plug,
be sure the electrical accessory being used
is turned OFF.
When not in use, be sure to close the cap.
Do not allow water or any liquid to contact
the outlet.
WAC0362X
Cargo area
Instruments and controls
2-63