Mitsubishi Outlander (2022 year). Manual in english - page 6

STARTUP DISPLAY
PERSONAL DISPLAY (model
When the ignition switch is placed in the ON
with full-screen display)
position, the multi-information display may
The personal display shows several informa-
display the following screens if the vehicle is
tion items. To select an information item:
equipped with them:
1. Push the control switch on the left side of
. Home
the steering wheel.
. Drive Computer — Average Speed-Trip
2. "Short Cut Menu" appears on the multi-
(Distance & Time)-Fuel Economy
information display area.
. Compass or Navigation
3. Select "Personal Display" by rotating the
. Audio
scroll dial
and push the scroll dial to
. MI-PILOT Assist
confirm.
. Driving Aids
The information item can be selected from
WAC0355X
. Tire Pressures
below:
Example
. S-AWC
. Blank (nothing is displayed)
. Warnings
. Navigation (including compass)
. Settings
. Time to Destination
Warnings will only display if there are any
. Fuel Economy
present. For more information on warnings and
. Trip
indicators, see
“Multi-information display
. Gear position
warnings and indicators” (P.2-33).
. Average speed
To control what items display in the multi-
The personal display
will move when the
information display, see “Settings” (P.2-23).
meter screen view is changed. For additional
information, refer to
“Changing the meter
screen view (model with type 2 display)” (P.2-
7).
WAC0356X
2-22
Instruments and controls
NOTE:
SETTINGS
Lane:
The vehicle should be driven with the Active
The setting mode allows you to change the
. Warning (LDW)
stability control (ASC) ON for most driving
information displayed in the multi-information
Allows user to turn the Lane Departure
conditions.
(See
“Active stability control
display. The following items are available if the
Warning (LDW) system ON/OFF.
(ASC)” (P.5-159).)
vehicle is equipped with them:
. Prevention (LDP)
Driver Assistance
. ASC Setting
Allows user to turn the Lane Departure
. Driver Assistance
To change the status, warnings or turn on or off
Prevention (LDP) system ON/OFF.
any of the systems/warnings displayed in the
. Personal Display
(See “Lane Departure Warning (LDW)” (P.5-
“Driver Assistance” menu, use the scroll dial to
33) and “Lane Departure Prevention (LDP)”
. Head-Up Display
select and change a menu item. The displayed
(P.5-38).)
. ECO Mode Setting
menu items vary depending
on
the
vehicle’s
. TPMS Setting
equipment.
Blind Spot:
. Clock
. Steering Assist
. Warning (BSW)
. Vehicle Settings
. Lane
Allows user to turn the Blind Spot Warning
. Maintenance
. Blind Spot
(BSW) system ON/OFF.
. Customize Display
. Active Assist (ABSA)
. Emergency Brake
. Units/Language
. Traffic Sign
Allows user to turn the Active Blind Spot
. Key- Linked Settings
Assist (ABSA) system ON/OFF.
. Speed Adjust by Route
. Factory Reset
(See “Blind Spot Warning (BSW)” (P.5-43) and
. Spd.Limit Assist
“Active Blind Spot Assist (ABSA)” (P.5-51).)
. Parking sensors
ASC Setting
. Rear Cross Traffic Alert
Emergency Brake:
To change the setting, use
the
scroll
dial
to
. Driver Attention Alert
Models without Rear Automatic Emergency
select and push it.
. Timer Alert
Braking (Rear AEB) :
. System
. Low Temp. Alert
Allows user to turn the Forward Collision
This allows you to turn the Active stability
Mitigation System (FCM) system and Predic-
control (ASC) ON or OFF. By default the
Steering Assist:
tive Forward Collision Warning (PFCW) sys-
ASC will be turned ON. If the ASC is
. Allows user to turn the Lane Keep Assist
tem ON/OFF.
turned off, the ASC OFF indicator light will
(LKA) ON/OFF.
illuminate.
(See “MI-PILOT Assist” (P.5-90).)
Instruments and controls
2-23
Models with Rear Automatic Emergency
MI-PILOT Assist with Navi-link” (P.5-110).)
(Long, Medium or Short).
Braking (Rear AEB) :
. Volume
Spd. Limit Assist:
Allows user to turn the Forward Collision
Allows user to select sensor volume (High,
Allows user tocustomize the Speed Limit Assist
Mitigation System (FCM) system and Predic-
Medium or Low).
(MI-PILOT Assist with Navi-link) options.
tive Forward Collision Warning (PFCW) sys-
(See “Moving Object Detection (MOD)” (P.4-
tem ON/OFF
. OFF
23),
“Parking sensor system”
(P.5-164) and
. Front
. Manual
“Rear parking sensor system” (P.5-169).)
. Auto
Allows user to turn the Forward Collision
Rear Cross Traffic Alert:
Mitigation System (FCM) system and Pre-
(See “Speed Limit Assist - a feature of MI-
Allows user to turn the Rear Cross Traffic Alert
dictive Forward Collision Warning (PFCW)
PILOT Assist with Navi-link” (P.5-108).)
system ON/OFF. (See “Rear Cross Traffic Alert
system ON/OFF
Parking sensors:
(RCTA)” (P.5-62).)
. Rear
To change the status or turn on or off any of the
Allows user to turn the Rear Automatic
Driver Attention Alert:
systems displayed in the
“Parking sensors”
Emergency Braking
(Rear AEB) system
Allows the customer to turn the Driver Atten-
menu, use the scroll dial to select and change
ON/OFF.
tion Alert
(DAA) on or off.
(See
“Driver
a menu item:
(See
“Forward Collision Mitigation System
Attention Alert (DAA)” (P.5-143).)
. Moving Object
(FCM)” (P.5-126), “Predictive Forward Colli-
Push the scroll dial
to turn the Moving
Timer Alert:
sion Warning (PFCW)” (P.5-135) and “Rear
Automatic Emergency Braking (Rear AEB)”
Object Detection (MOD) ON/OFF.
Allows user to adjust the Timer Alert or reset.
(P.5-146).)
. Auto Show Sonar
. Current Time/Set Time
Allows user to turn the parking sensor
. Reset
Traffic Sign:
system display ON/OFF.
This menu allows the customer to turn the
Low Temp. Alert:
. Front
Traffic Sign Recognition ON/OFF. (See “Traf-
Allows user to turn the front sensor ON/
Allows user to turn the Low Temperature Alert
fic Sign Recognition (TSR)” (P.5-30).)
OFF.
function ON/OFF.
Speed Adjust by Route:
. Rear
Allows user to turn the Speed Adjust by Route
Allows user to turn the rear sensor ON/OFF.
(MI-PILOT Assist with Navi-link) function ON/
. Distance
OFF. (See “Speed Adjust by Route - a feature of
Allows user to select the sensor range
2-24
Instruments and controls
Personal Display
Head-Up Display
. View History
To reset the View History:
To change the display in the “Personal Display”
To change the status or turn on or off any of the
menu, use the scroll dial
to select and change
systems displayed in the “Head-Up Display”
1) Select “View History” using the scroll
a menu item:
menu, use the scroll dial button to select and
dial
and push it.
change a menu item:
2) Push the scroll dial
Blank
3) Select “Yes” by pushing the scroll dial
Navigation
. Brightness
Time to Destination
. Height
. Tire Pres Eco advice
Fuel Economy
. Rotation
Push the scroll dial to turn the “Tire Pres
— Manual Reset1
. Displayed information
Eco advice” ON/OFF.
— Manual Reset2
— Navigation
— Auto Refuel
— Driving Assist
TPMS setting
Trip
— Traffic Sign
The settings under the “TPMS setting” menu is
— Manual Reset1
— Audio
related to the Tire Pressure Monitoring System
— Manual Reset2
— TEL/SMS
(TPMS). (See “Tire Pressure Monitoring Sys-
— Auto Refuel
. Reset Settings
tem (TPMS)” (P.5-6), “Tire Pressure Monitor-
ing System
(TPMS)” (P.6-3),
“Tire Pressure
Gear Position
(See “Head-Up Display (HUD)” (P.2-43).)
Monitoring System (TPMS)” (P.8-25).)
Average Speed
ECO Mode Setting
. Tire Pressure Unit
— Manual Reset1
This setting allows you to change the ECO
— Manual Reset2
mode system settings.
— Auto Refuel
To change the status or turn on or off any of the
See “Personal Display (model with full-screen
systems displayed in the “ECO Mode Setting”
display)” (P.2-22).
menu, use the scroll dial to select and change
a menu item:
. ECO Drive Assist
— ECO Indicator
— ECO Drive Report
Instruments and controls
2-25

Tire Pressure Unit:
The unit for tire pressure that displays in the
multi-information display can be changed to:
. psi
. kPa
. bar
. Kgf/cm2
Use the scroll dial
to select and change the
unit.
If necessary, refer to
the
following
table
to
convert between units.
WAC0569X
Clock
Vehicle Settings
Allows user to adjust the clock settings and time
The vehicle settings allows the customer to
within the multi-information display. The avail-
change settings for the following settings if the
able items vary depending on the vehicle’s
vehicle is equipped with them. The displayed
equipment.
menu items vary depending on the vehicle’s
equipment.
. Clock Mode
. Clock Format
. Electric Tail Gate
. Daylight Saving Time
. Lighting
. Time Zone
. Turn Indicator
. Set Clock Manually
. Locking
The clock may also be set in the center (audio)
. Wiper
display. For additional information, refer to the
. Driving Position
separate Smartphone-link Display Audio (SDA)
. Rear Seat Alert
The vehicle settings can be changed using the
2-26
Instruments and controls
scroll dial
button.
activated. From the “Locking” menu, select
options.
“Ext. Door Switch”. Use the scroll dial to
— Vehicle Speed
Electric Tail Gate:
activate or deactivate this function.
— Shift out of Park
This allows the user to turn the Electric Tail
Selective Unlock
— OFF
Gate ON or OFF.
When this item is turned on, and the request
Wiper:
Lighting:
switch is pushed, only the corresponding
door or the liftgate is unlocked. All the
There are the following options in the “Wiper”
The “Lighting” menu has the following options:
doors can be unlocked if the door handle
menu:
. Welcome Light
request switch is pushed again within
2
. Speed Sensing
The welcome lighting can be set to be ON
seconds. When this item is turned to off, all
The “Speed Sensing Wiper” feature can be
or OFF. From the “Lighting” menu, select
the doors will be unlocked when the door
activated or deactivated. From the “Wiper”
“Welcome Light”. Use the scroll dial to turn
handle request switch is pushed once. From
menu, select
“Speed Sensing”. Use the
this feature ON or OFF.
the
“Locking” menu, select
“Selective
scroll dial to turn this feature ON or OFF.
. Auto Room Lamp
Unlock”. Use the scroll dial
to activate
. Rain Sensor
The interior light timer can be set to be ON
or deactivate this function.
The “Rain Sensor” feature can be activated
or OFF. From the “Lighting” menu, select
Auto Door Unlock
or deactivated. From the
“Wiper” menu,
“Auto Room Lamp”. Use the scroll dial to
The “Auto Door Unlock” feature allows the
select “Rain Sensor”. Use the scroll dial to
turn this feature ON or OFF.
customer to customize the auto door unlock
turn this feature ON or OFF.
. Accent Lighting
options.
. Reverse Link
The brightness of the Accent Lighting can
— Shift to P
The “Reverse Link” wiper feature can be set
be adjusted. From the
“Lighting” menu,
— IGN OFF
to be ON or OFF. From the “Wiper” menu,
select “Accent Lighting”. Use the scroll dial
— OFF
select “Reverse Link”. Use the scroll dial to
to select the brightness.
Horn beeps on lock
turn this feature ON or OFF.
Locking:
When the horn beeps on lock is on, the horn
Driving Position:
will chirp and the hazard indicators will
There are the following options in the “Lock-
flash when locking the vehicle with the F.A.
Displays the available driving position options.
ing” menu:
S.T.-key.
. Exit Seat Slide (Driver)
. Ext. Door Switch
Auto Door Lock
When this item is turned on, this feature
When this item is turned on, the request
The “Auto Door Lock” feature allows the
will move the driver’s seat backward for an
switches on the doors and the liftgate are
customer to customize the auto door unlock
easy exit when the ignition is turned off and
Instruments and controls
2-27

the driver’s door is opened. After getting
Maintenance
Display
into the vehicle and placing the ignition
when
The maintenance mode allows you to set alerts
Display timing
Action Required
switch in the ON position, the driver’s seat
ignition
for the reminding of maintenance intervals. The
will move to the previous set position. (See
is ON
displayed menu items vary depending on the
“Driver memory settings” (P.3-37).)
vehicle’s equipment. To change an item:
Engine
Plan to have
Remaining oil
Rear Seat Alert:
Oil Ser-
your vehicle ser-
Select “Maintenance” using the scroll dial and
life is less than
vice due
viced.
The “Rear Seat Alert” feature allows user to
push it.
940 miles (1,500
in xxx
customize the Rear Seat Alert options. Use the
. Oil Control System (if so equipped)
km).
miles
scroll dial to change the mode.
. Oil and Filter (if so equipped)
Have your vehi-
. Horn & Alert
. Tire
cle serviced
When selected, the alert is displayed and the
. Other
Engine
Remaining oil
within two
horn sounds.
Oil Ser-
life is 0 miles (0
weeks or less
. Alert Only
Oil Control System (if so equipped):
vice due
km).
than 500 miles
When selected, only the alert is displayed.
The oil control system can be accessed in the
(800 km).
Maintenance portion of the multi-information
. OFF
display settings.
The oil change interval cannot be adjusted
When selected, no alert or
horn will be
10,000 miles (16,000 km) between oil change
manually.
active.
intervals for the PR25DD engine.
The distance to oil change interval is calculated
(See “Rear Seat Alert” (P.2-62).)
The oil change interval cannot be adjusted
depending on the driving conditions and set
manually.
automatically by the oil control system. A
reminder will be displayed when approaching
the end of the service interval.
When the Factory Reset option is selected in the
multi-information display, the oil control sys-
tem will also be reset to initial value. Please
change the engine oil when Factory Reset is
selected.
2-28
Instruments and controls

Tire:
replacing the items.
CAUTION
This indicator appears when the customer set
Customize Display
distance comes for replacing tires. You can set
If the oil replacement indicator is displayed,
The display settings allows you to choose from
or reset the distance for replacing tires.
change the engine oil within two weeks or less
the various meter selections. The displayed
than 500 miles (800 km).
menu items vary depending on the vehicle’s
Operating the vehicle with deteriorated oil can
WARNING
equipment.
damage the engine.
The display settings can be changed using the
The tire replacement indicator is not a
scroll dial.
substitute for regular tire checks, including
To reset oil control system:
tire pressure checks. See “Replacing tires and
Main Menu Selection:
1. Place the ignition switch in the ON position.
wheels” (P.8-30). Many factors including tire
Displays available screens that can be shown in
2. Push the
and
buttons on the
inflation, alignment, driving habits and road
the multi-information display.
conditions affect tire wear and when tires
steering wheel until “Settings” appears in
should be replaced. Setting the tire replace-
The available items vary depending on the
the multi-information display. Use the scroll
ment indicator for a certain driving distance
vehicle’s equipment.
dial to select “Maintenance”. Then, push the
does not mean your tires will last that long. Use
scroll dial.
the tire replacement indicator as a guide only
Navigation Settings:
3. Select the “Oil Control System” and push
and always perform regular tire checks. Fail-
This menu allows user to turn the Navigation
ure to perform regular tire checks, including
the scroll dial.
Settings ON or OFF.
tire pressure checks could result in tire failure.
4. Push the scroll dial according to the reset
Serious vehicle damage could occur and may
Cruise Screen:
instructions displayed at the bottom of the
lead to a collision, which could result in serious
The ”Cruise Screen” allows you to turn the
“Oil Control System” maintenance screen.
personal injury or death.
cruise screen transition on or off.
Oil and Filter (if so equipped):
Other:
Welcome Effect:
This indicator appears when user set distance
This indicator appears when the customer set
The “Welcome Effect” displays the available
comes for changing the engine oil and filter.
You can set or reset the distance for checking or
distance comes for checking or replacing
welcome effect settings.
replacing these items.
maintenance items other than the engine oil,
. Animation
oil filter and tires. Other maintenance items can
include such things as air filter or tire rotation.
You can set or reset the distance for checking or
Instruments and controls
2-29
Operation Guidance:
Tire Pressure:
2.
Select
“YES” and push the scroll
dial
to
return all settings back to default.
The “Operation Guidance” displays the avail-
The unit for tire pressures that displays in the
able light and wiper guidance settings.
multi-information display can be changed.
The available items vary depending on the
(See “TPMS setting” (P.2-25).)
vehicle’s equipment.
Temperature:
. Lights
The temperature that displays in the multi-
. Wiper
information display can be changed from:
. Seat Memory
°F
. Speed Limiter
°C
. Cruise Control
Use the scroll dial to toggle choices.
Units/Language
Language:
The units that are shown in the multi-informa-
The language of the multi-information display
tion display can be changed:
can be changed.
. Mileage/Fuel
Use the scroll dial
to select and change the
. Tire Pressure
language of the multi-information display.
. Temperature
. Language
Key-Linked Settings
Use the scroll dial
to select and change the
The Key-Linked Settings can be turned ON/
units of the multi-information display.
OFF using the scroll dial. It will display the key
synchronized and in use for this vehicle.
Mileage/Fuel:
Factory Reset
The unit for the mileage that displays in
the
multi-information display can be changed.
The settings in the multi-information display
Use the scroll dial
to select and change the
can be reset back to the factory default. To reset
unit.
the multi-information display:
1. Select “Factory Reset” using the scroll dial
and push it.
2-30
Instruments and controls
WAC0383X
Instruments and controls
2-31

WAC0384X
2-32
Instruments and controls
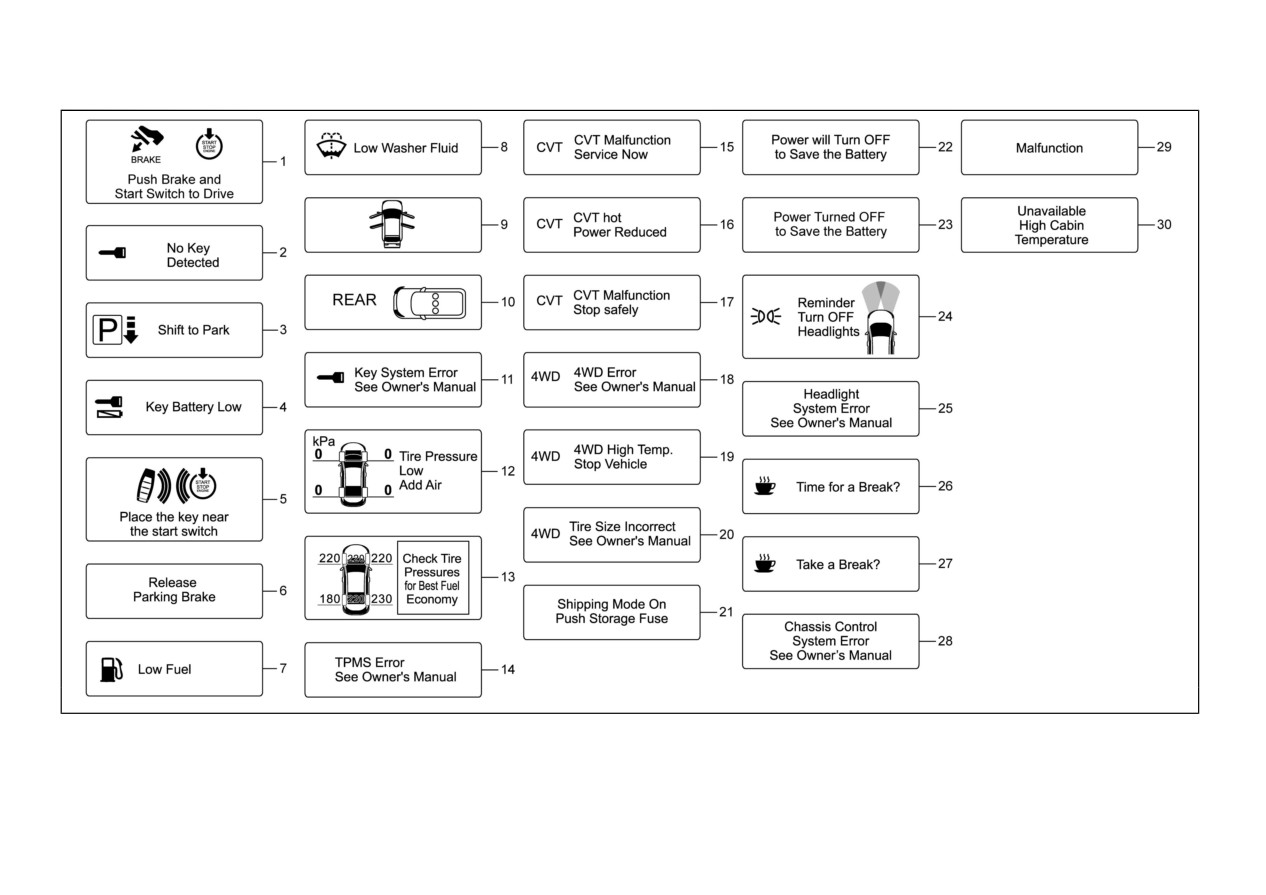
MULTI-INFORMATION DIS-
3. Shift to Park warning
6. Release Parking Brake warning
PLAY WARNINGS AND INDI-
This warning appears when the door is opened
This warning appears when the vehicle speed is
while the shift lever is in positions other than
above 2 MPH (4 km/h) and the parking brake is
CATORS
the P (Park) position.
applied. Stop the vehicle and release the parking
NOTE:
brake.
If this warning appears, push the park button to
The displayed messages are varied depend-
shift to the P
(Park) position or place the
7. Low Fuel warning
ing on the vehicle’s specification and equip-
ignition switch in the ON position.
ment.
This warning appears when the fuel level in the
An inside warning chime will also sound. (See
fuel tank is getting low. Refuel as soon as it is
1. Engine start operation indicator
“Free-hand Advanced Security Transmitter (F.
convenient, preferably before the fuel gauge
This indicator appears when the shift lever is in
A.S.T.-key)” (P.3-7).)
reaches 0 (Empty). There will be a small reserve
the P (Park) position.
of fuel in the tank when the fuel gauge reaches 0
4. Key Battery Low warning
This indicator means that the engine will start
(Empty).
This warning appears when the F.A.S.T.-key
by pushing the ignition switch with the brake
battery is running out of power.
8. Low Washer Fluid warning
pedal depressed. You can start the engine
directly in any position of the ignition switch.
If this indicator appears, replace the battery with
This warning appears when the window washer
a new one. See “F.A.S.T.-key battery replace-
fluid is at a low level. Add window washer fluid
2. No Key Detected warning
ment” (P.8-20).
as necessary. For additional information, refer
This warning appears when the door is closed
to “Window washer fluid” (P.8-10).
5. Place the key near the start switch
with the F.A.S.T.-key left outside the vehicle
indicator
9. Door/liftgate open warning
and the ignition switch in the ON position.
Make sure that the F.A.S.T.-key is inside the
This indicator appears when the F.A.S.T.-key
This warning appears if any of the doors and/or
vehicle.
battery is running out of power and when the F.
the liftgate are open or not closed securely. The
A.S.T.-key and vehicle are not communicating
vehicle icon indicates which door or the liftgate
See “Free-hand Advanced Security Transmitter
normally.
is open on the display.
(F.A.S.T.-key)” (P.3-7) for more details.
If this indicator appears, touch the ignition
switch with the F.A.S.T.-key while depressing
the brake pedal.
(See
“F.A.S.T.-key battery
discharge” (P.5-15).)
Instruments and controls
2-33
10. Rear seat belt warning
recommended that you visit an authorized
14. TPMS Error: See Owner’s
Mitsubishi Motors dealer for repair as soon as
This rear seat belt warning appears after the
Manual warning
possible.
ignition switch is placed in the ON position. If
When this warning appears, the system may not
any of the rear passenger’s seat belts is not
12. Tire Pressure Low — Add Air
be able to detect or signal low tire pressure as
fastened, the seat icon illuminates in red to
intended. TPMS malfunctions may occur for a
warning
show which seat belt is not fastened. The seat
variety of reasons, including the installation of
This warning appears when the low tire
icon illuminates in red until the corresponding
replacement or alternate tires or wheels on the
rear passenger’s seat belt is fastened. The
pressure warning light in the meter illuminates
vehicle that prevent the TPMS from functioning
warning will automatically turn off after
and low tire pressure is detected. The warning
properly.
approximately 35 seconds. When a rear passen-
appears each time the ignition switch is placed
in the ON position as long as the low tire
(See
“Tire Pressure Monitoring System
ger unfastens the seatbelt while vehicle is
pressure warning light remains illuminated. If
(TPMS)” (P.5-6).)
stopped, the seat icon illuminates in red. When
this warning appears, stop the vehicle and adjust
the vehicle speed exceeds 10 MPH (15 km/h)
15. CVT Malfunction Service Now
the pressure to the recommended COLD tire
and if a rear passenger unfastens the seatbelt
warning
while driving, a buzzer will sound and the seat
pressure shown on the Tire and Loading
icon illuminates in red. The seat icon illumi-
Information placard. (See “Low tire pressure
This warning illuminates when there is a
nates in red until the corresponding rear
warning light”
(P.2-17) and
“Tire Pressure
problem with the CVT system. If this warning
passenger’s seat belt is fastened. The warning
Monitoring System (TPMS)” (P.5-6).)
comes on, have the system checked. It is
recommended that you visit an authorized
will automatically turn off after approximately
13. Check Tire Pressures for Best
Mitsubishi Motors dealer for this service.
35 seconds. For precautions on seat belt usage,
Fuel Economy indicator
see “Seat belts” (P.1-16).
16. CVT hot Power Reduced warn-
When this message appears, the tire pressure
11. Key System Error: See Owner’s
relatively low or high and not in the range for
ing
Manual warning
the best fuel economy. Check the tire pressure
This transmission has a high fluid temperature
This warning appears if there is a malfunction
and adjust to the designated cold tire pressure.
protection mode. If the fluid temperature
in the F.A.S.T.-key.
(See
“Tire and loading information placard”
becomes too high (for example, climbing steep
(P.10-12).)
grades in high temperatures with heavy loads,
If this warning appears while the engine is
such as when towing a trailer), engine power
stopped, the engine cannot be started. If this
and, under some conditions, vehicle speed will
warning appears while the engine is running,
be decreased automatically to reduce the chance
the vehicle can be driven. However, it is
of transmission damage. Vehicle speed can be
2-34
Instruments and controls
controlled with the accelerator pedal, but the
warning is displayed, stop the vehicle with the
tended storage fuse switch” (P.8-19).
engine and vehicle speed may be reduced.
engine idling, as soon as it is safe to do so. In
these cases, the AWC changes to FWD to
22. Power will Turn OFF to Save the
17. CVT Malfunction: Stop safely
protect the powertrain parts. Then if the
Battery warning
warning
warning turns off, you can continue AWC
This warning appears after the ignition switch is
This warning appears when there is a malfunc-
driving. See “S-AWC (Super-All Wheel Con-
in the ON position for a certain period of time.
tion with the CVT system. If the warning
trol)” (P.5-153).
23. Power Turned OFF to Save the
appears, pull off the road in a safe area and stop
20. Tire Size Incorrect: See Owner’s
the engine immediately. It is recommended that
Battery warning
Manual warning
you call an authorized Mitsubishi Motors deal-
This warning appears after the ignition switch is
er.
This warning may appear if there is a large
automatically turned OFF to save the battery.
difference between the diameters of front and
18. 4WD Error: See Owner’s Man-
rear wheels and tires. Pull off the road in a safe
24. Reminder: Turn OFF Headlights
ual warning
area, with the engine idling. Check that all the
warning
This warning appears when the All-Wheel
tire sizes, brand, construction and tread pattern
This warning appears when the driver side door
Control
(AWC) system is not functioning
are the same, that the tire pressure is correct and
is opened with the headlight switch is left ON
properly while the engine is running. Reduce
that the tires are not excessively worn. If you
and the ignition switch is placed in the OFF or
vehicle speed and have the system checked. It is
have any problems, please change tires or adjust
LOCK position. Place the headlight switch in
the correct tire pressure. Do not select the
recommended that you visit an authorized
OFF or AUTO (if so equipped) position. For
GRAVEL, SNOW or MUD (AWC model) mode
Mitsubishi Motors dealer for this service. See
additional information, see “Headlight and turn
“S-AWC (Super-All Wheel Control)” (P.5-153).
with drive mode selector and do not drive fast.
signal switch” (P.2-53).
See “Drive Mode Selector” (P.5-28) and “S-
19. 4WD High Temp. Stop Vehicle
AWC (Super-All Wheel Control)” (P.5-153).
25. Headlight System Error: See
warning
21. Shipping Mode On Push Storage
This warning appears when the oil temperature
Fuse warning
This warning appears if the LED headlights are
of the powertrain parts will increase due to the
malfunctioning. Have the system checked. It is
difference in rotation between the front and rear
This warning may appear if the extended
recommended that you visit an authorized
storage fuse switch is not pushed in (switched
wheels is large
(wheel slip), such as when
Mitsubishi Motors dealer for this service.
on). When this warning appears, push in (switch
driving the vehicle on rough roads, through
on) the extended storage fuse switch to turn off
sand or mud, or freeing a stuck vehicle. If this
the warning. For more information, see “Ex-
Instruments and controls
2-35
26. Time for a Break? indicator
. Predictive Forward Collision Warning
31. Not Available: Poor Road Con-
(PFCW)
This indicator appears when the set “Time for a
ditions warning
For more details, see “Active Blind Spot Assist
Break?” indicator activates. You can set the
This message appears when Adaptive Cruise
(ABSA)” (P.5-51), “Rear Cross Traffic Alert
time for up to 6 hours.
Control System (ACC) or Active Blind Spot
(RCTA)” (P.5-62), “Traffic Sign Recognition
Assist
(ABSA) system becomes unavailable
27. Take a Break? indicator
(TSR)” (P.5-30), “Forward Collision Mitigation
because the road is slippery. For additional
System (FCM)” (P.5-126) or “Predictive For-
This indicator appears when the Driver Atten-
information, refer to “Adaptive Cruise Control
ward Collision Warning (PFCW)” (P.5-135).
tion Alert (DAA) system detects driver fatigue
System
(ACC)”
(P.5-71),
“Adaptive Cruise
or that driver attention is decreasing.
(See
30. Unavailable High Cabin Tem-
Control System (ACC) with Stop & Go” (P.5-
“Driver Attention Alert (DAA)” (P.5-143).)
103) or “Active Blind Spot Assist (ABSA)”
perature warning
(P.5-51).
28. Chassis Control System Error:
This warning appears if the interior temperature
of the vehicle has reached such a high
32. Currently not available warning
temperature that the sensor for the Active Blind
This warning appears if the chassis control
This message appears when the Active Blind
Spot Assist (ABSA), Lane Departure Warning
module detects an error in the chassis control
Spot Assist (ABSA), Lane Departure Preven-
(LDW) (if so equipped), Lane Departure
system. Have the system checked. It is recom-
tion
(LDP) system or the Adaptive Cruise
Prevention (LDP) (if so equipped) or Traffic
mended that you visit an authorized Mitsubishi
Control System
(ACC) system becomes un-
Sign Recognition (TSR) (if so equipped) system
Motors dealer for this service. (See “Chassis
available because the ASC is turned off. For
can no longer function reliably. Once the
control” (P.5-160).)
additional information, refer to “Active Blind
interior temperature has reached normal levels,
Spot Assist (ABSA)” (P.5-51), “Lane Departure
29. Malfunction warning
the warning should disappear.
Prevention (LDP)” (P.5-38), “Adaptive Cruise
This warning appears when the following
If the warning continues to display, have the
Control System (ACC)” (P.5-71) or “Adaptive
systems malfunction if the vehicle is equipped
system checked. It is recommended that you
Cruise Control System (ACC) with Stop & Go”
with them.
visit an authorized Mitsubishi Motors dealer for
(P.5-103).
this service.
. Active Blind Spot Assist (ABSA)
For additional information, refer to
“Active
. Rear Cross Traffic Alert (RCTA)
Blind Spot Assist
(ABSA)” (P.5-51),
“Lane
. Traffic Sign Recognition (TSR)
Departure Warning
(LDW)” (P.5-33),
“Lane
. Forward Collision Mitigation System
Departure Prevention (LDP)” (P.5-38) or “Traf-
(FCM)
fic Sign Recognition (TSR)” (P.5-30).
2-36
Instruments and controls
33. Forward Driving Aids Tempora-
34. Unavailable Side Radar Ob-
. When not holding the steering wheel or
when there is no steering wheel operation.
rily Disabled Front Sensor Blocked
struction warning
Hold on the steering wheel immediately. When
This warning appears when the Blind Spot
the steering operation is detected, the warning
If the front radar sensor area is covered with dirt
Warning
(BSW), Active Blind Spot Assist
turns off and the Lane Keep Assist
(LKA)
or obstructed, making it impossible to detect a
(ABSA) or Rear Cross Traffic Alert (RCTA)
function is automatically restored. For addi-
vehicle ahead, Forward Collision Mitigation
system becomes unavailable because a radar
tional information, refer to “MI-PILOT Assist”
System (FCM), Predictive Forward Collision
blockage is detected. (See “Blind Spot Warning
(P.5-90).
Warning
(PFCW), Adaptive Cruise Control
(BSW)” (P.5-43),
“Active Blind Spot Assist
(ACC) or MI-PILOT Assist system is auto-
(ABSA)” (P.5-51) or “Rear Cross Traffic Alert
37. Rear Seat Alert is Activated
(RCTA)” (P.5-62).)
matically turned off if the vehicle is equipped
When the system is enabled, this message
with them. The warning message will appear in
appears when the Rear Seat Alert system is
35. Press Brake Pedal warning
the multi-information display. If the warning
active and can remind the driver to check the
message appears, park the vehicle in a safe
This indicator appears in the following situa-
back seat.
location and turn the engine off.
tions:
. Using the steering switch, a driver can
Check to see if the front radar sensor area is
. The driver tries to release the electric
select
“Dismiss Message” to clear the
blocked. If the front radar sensor area is
parking brake manually without depressing
display for a period of time. If no selection
blocked, remove the blocking material. Restart
the brake pedal.
is made, this message automatically turns
the engine. If the warning message continues to
. The vehicle is stopped on a steep hill and
off after a period of time.
appear, have the Forward Collision Mitigation
there is a possibility of moving backward,
. Using the steering switch, a driver can
System (FCM), Predictive Forward Collision
even if the electric parking brake is applied.
select “Disable Alert” to disable the horn
Warning
(PFCW), Adaptive Cruise Control
. This warning appears if the vehicle moves
alert for the remainder of the current trip.
(ACC) or MI-PILOT Assist system checked. It
while the Brake Auto Hold is activated.
For additional information, see
“Rear Seat
is recommended that you visit an authorized
Alert” (P.2-62).
Mitsubishi Motors dealer for this service.
36. Lane Keep Assist (LKA) alert
For more details, see
“Forward Collision
This message may appear when the Lane Keep
Mitigation System (FCM)” (P.5-126), “Predic-
Assist (LKA) system is engaged.
WARNING
tive Forward Collision Warning (PFCW)” (P.5-
It will be displayed under the following
Selecting
“Dismiss Message” during a stop
135), “Adaptive Cruise Control System (ACC)”
condition:
within a trip temporarily dismisses the message
(P.5-71) or “MI-PILOT Assist” (P.5-90).
for that stop without turning the system off.
Instruments and controls
2-37
Alerts can be provided for other stops during
39. Not Available Bad Weather
41. Not Available Parking Brake On
the trip. Selecting “Disable Alert” turns off the
This message may appear when the Lane Keep
This message may appear when the Adaptive
Rear Seat Alert system for the remainder of a
Assist (LKA) system is engaged.
Cruise Control System (ACC) system is en-
trip and no audible alert will be provided.
gaged.
Under the following conditions, the Lane Keep
Assist (LKA) system is automatically canceled:
Under the following condition, the ACC system
NOTE:
. When the wiper (HI) operates.
is automatically canceled:
This system is disabled until a driver enables
it using the multi-information display. See
. When lane markers in the traveling lane
. The electric parking brake is applied.
“Vehicle Settings” (P.2-26).
cannot be correctly detected for a period of
The above system cannot be used when the
time due to such items as a snow rut,
electric parking brake is activated.
38. Check Rear Seat
reflection of light on a rainy day or several
When the system is enabled, this message
unclear lane markers are present.
42. Not Available Seat Belt Not
appears when the vehicle comes to a complete
If you want to use the Lane Keep Assist (LKA)
Fastened
stop, the shift lever is moved from the D (Drive)
system again, cancel the MI-PILOT Assist
This message may appear when the Adaptive
position to P
(Park) position, and the driver
system and set it again when lane markers are
Cruise Control System (ACC) system is en-
exits the vehicle. This message alerts the driver,
clearly visible.
gaged.
after a period of time, to check for items in the
Under the following condition, the ACC system
rear seat after the audible alert has been
40. Not Available Front Camera
is automatically canceled:
provided.
Obstructed
. When the driver’s seat belt is not fastened.
NOTE:
This message may appear when the Adaptive
The ACC system cannot be used when the
This system is disabled until a driver enables
Cruise Control System (ACC) system is en-
driver’s seat belt is not fastened.
it using the multi-information display. For
gaged.
additional information, see
“Vehicle Set-
Under the following conditions, the ACC
43. Press Brake Pedal
tings” (P.2-26).
system is automatically canceled:
This message may appear when the Adaptive
. The camera area of the windshield is fogged
Cruise Control System (ACC) system is en-
up or covered with dirt, water, drops, ice,
gaged.
snow, etc.
It will be displayed under the following
. Strong light, such as sunlight or high beams
condition:
from oncoming vehicles, enter the front
camera
2-38
Instruments and controls
. While the vehicle is stopped by the ACC ,
47. Driver Attention Alert Malfunc-
51. Neutral hold mode activated
the driver’s door is opened but the electric
tion warning
indicator
parking brake was not activated.
This warning appears when the Driver Attention
This indicator appears when the Neutral hold
Step on the brake immediately.
Alert
(DAA) system malfunctions. For more
mode is activated. To exit the Neutral hold
44. Press Brake Pedal to Operate
details, see
“Driver Attention Alert
(DAA)”
mode, place the vehicle in other than
“N”
(P.5-143).
(Neutral) position.
(See
“Neutral hold mode
Switch warning
function” (P.5-20).)
This warning appears if the Brake Auto Hold
48. Parking Sensor Error: See
switch is pushed without depressing the brake
52. Neutral hold mode was not
pedal while the Brake Auto Hold function is
activated indicator
This warning illuminates when there is a
activated. Depress the brake pedal and push the
malfunction with the parking sensor system.
This indicator appears when the Neutral hold
switch to deactivate the Brake Auto Hold
For additional information, refer to
“Parking
mode is unavailable. To activate
the Neutral
function. For more details, see
“Brake Auto
sensor system” (P.5-164).
hold mode, wait for a while without shifting and
Hold” (P.5-25).
then perform the operations again. (See “Neu-
49. Check Position of Shift Lever
45. Caution Steep Slope indicator
tral hold mode function” (P.5-20).)
This warning appears if the system cannot
This indicator appears when the Brake Auto
detect the shift position. Make sure the vehicle
Hold function is activated while the vehicle is
is placed in a position properly. Have the system
on a steep hill.
checked. It is recommended you contact an
46. Steep Slope Apply Foot Brake
authorized Mitsubishi Motors dealer for this
service.
warning
This warning appears before the electric parking
50. Neutral hold mode guidance
brake is applied and the brake force of the
indicator
Brake Auto Hold function is released when the
This indicator appears when the power switch is
vehicle is on a steep hill, to prevent the vehicle
placed in the “OFF” position while the shift
rolls out.
lever is in the “N” (Neutral) position (Neutral
hold mode is available).
(See
“Neutral hold
mode function” (P.5-20).)
Instruments and controls
2-39

WAC0505X
2-40
Instruments and controls

1. Driver assistance
Manual reset1 can be reset only manually by
using the scroll dial.
The driver assistance mode shows the operating
condition for the following systems if the
Manual reset2 will be reset manually by using
vehicle is equipped with them.
the scroll dial, or automatically reset each time
the ignition is placed in the OFF position.
. Lane Departure Warning (LDW)
Auto Refuel will be reset automatically each
. Lane Departure Prevention (LDP)
time when refueling.
. Blind Spot Warning (BSW)
. Active Blind Spot Assist (ABSA)
3. Drive Computer
. Forward Collision Mitigation System
Average fuel consumption:
(FCM)
The average fuel consumption shows the
. Predictive Forward Collision Warning
average fuel consumption since the last reset.
(PFCW)
WAC0287X
For more details, see “Lane Departure Warning
Average speed:
(LDW)” (P.5-33), “Lane Departure Prevention
TRIP COMPUTER
The average speed shows the average vehicle
(LDP)” (P.5-38), “Blind Spot Warning (BSW)”
speed since the last reset.
Switches for the trip computer are
located on
(P.5-43), “Active Blind Spot Assist (ABSA)”
the left side of the steering wheel.
(P.5-51), “Forward Collision Mitigation System
Trip odometer:
Scroll dial button - navigate through the items
(FCM)”
(P.5-126) and
“Predictive Forward
The trip odometer shows the total distance the
and change or select an item in multi-informa-
Collision Warning (PFCW)” (P.5-135).
vehicle has been driven since the last reset.
tion display
2. Speed and Average speed (model
Elapsed time:
- go back to the previous menu
- change from one display screen to
with type 1 display)
The elapsed time shows the time since the last
the next (i.e. Home, Fuel economy, S-AWC)
The Speed and Average speed mode shows the
reset.
current vehicle speed and the average vehicle
The Drive Computer mode have three modes of
speed since the last reset. The Speed and
operation. You can push the scroll dial to switch
Average speed mode have three modes of
between Manual reset1, Manual reset2 or Auto
operation. You can push the scroll dial to
Refuel.
switch between Manual reset1, Manual reset2
Manual reset1 can be reset only manually by
or Auto Refuel.
using the scroll dial.
Instruments and controls
2-41
Manual reset2 will be reset manually by using
pressure mode by pushing the scroll dial
to
5. Audio
the scroll dial, or automatically reset each time
reveal additional
details
on
the
displayed
The audio mode shows the status of audio
the ignition is placed in the OFF position.
warning.
information.
Auto Refuel will be reset automatically each
time when refueling.
6. Navigation (if so equipped)
When the route guidance is set in the navigation
4. Fuel economy display
system, this item shows the navigation route
Current fuel consumption:
information.
The Fuel economy display mode shows the
7. Compass (if so equipped)
current fuel consumption.
This display indicates the heading direction of
Average fuel consumption:
the vehicle.
The Fuel economy display mode shows the
8. S-AWC operation display (if so
average fuel consumption since the last reset.
equipped)
The Fuel economy display mode have three
When the S-AWC operation display is selected,
modes of operation. You can push the scroll dial
to switch between Manual reset1, Manual reset2
you can view the amount of the yaw moment
or Auto Refuel.
control and the strength of the traction control
between front and rear wheels.
Manual reset1 can be reset only manually by
using the scroll dial.
9. Tire Pressures
Manual reset2 will be reset manually by using
The tire pressure mode shows the pressure of all
the scroll dial, or automatically reset each time
four tires while the vehicle is driven.
the ignition is placed in the OFF position.
With the “Tire Pres ECO advice” function ON,
Auto Refuel will be reset automatically each
when the tire pressure is getting low, ”Check
time when refueling.
Tire Pressures for Best Fuel Economy” appears.
(See “TPMS setting” (P.2-25).)
When the Tire Pressure Low - Add Air /Tire
Pressure Low
- Check Cold Tire warning
appears, the display can be switched to the tire
2-42
Instruments and controls