Mitsubishi L200 (2020 year). Manual in english - page 7

Safe driving techniques
Your driving ability can be seriously im-
Floor mats
z Make sure that infants and small chil-
paired even with blood alcohol levels far be-
dren are properly restrained in accord-
low the legal minimum. If you have been
ance with the laws and regulations, and
WARNING
drinking, don’t drive. Ride with a designated
for maximum protection in case of an
non-drinking driver, call a cab or a friend, or
z
Keep floor mats clear of the pedals by
accident.
correctly laying floor mats that are suita-
use public transportation. Drinking coffee or
z Prevent children from playing in the lug-
ble for the vehicle.
taking a cold shower will not make you so-
gage compartment. It is quite dangerous
To prevent the floor mats from slipping
ber.
out of position, securely retain them using
to allow them to play there while the ve-
Similarly, prescription and nonprescription
the hook etc.
hicle is moving.
drugs affect your alertness, perception and re-
Note that laying a floor mat over a pedal
6
action time. Consult with your doctor or
or laying one floor mat on top of another
Loading luggage
can obstruct pedal operation and lead to a
pharmacist before driving while under the in-
serious accident.
When loading luggage, be careful not to load
fluence of any of these medications.
above the height of seats. This is dangerous
not only because rearward vision will be ob-
WARNING
structed, but also the luggage may be projec-
z NEVER DRINK AND DRIVE.
ted into the passenger compartment under
Your perceptions are less accurate, your
hard braking.
reflexes are slower and your judgment is
impaired.
Running-in
recommendations
Safe driving techniques
During the running-in period for the first
Driving safety and protection against injury
1,000 km (620 miles), it is advisable to drive
cannot be fully ensured. However, we recom-
Carrying children in the vehi-
your new vehicle using the following precau-
mend that you pay extra attention to the fol-
tions as a guideline to aid long life as well as
cle
lowing:
future economy and performance.
z Do not race the engine at high speeds.
z Never leave your vehicle unattended
Seat belts
with the key and children inside the ve-
z Avoid rapid starting, accelerating, brak-
hicle. Children may play with the driv-
ing and prolonged high-speed running.
Before starting the vehicle, make sure that
ing controls and this could lead to an ac-
you and your passengers have fastened your
cident.
seat belts.
Starting and driving
6-03
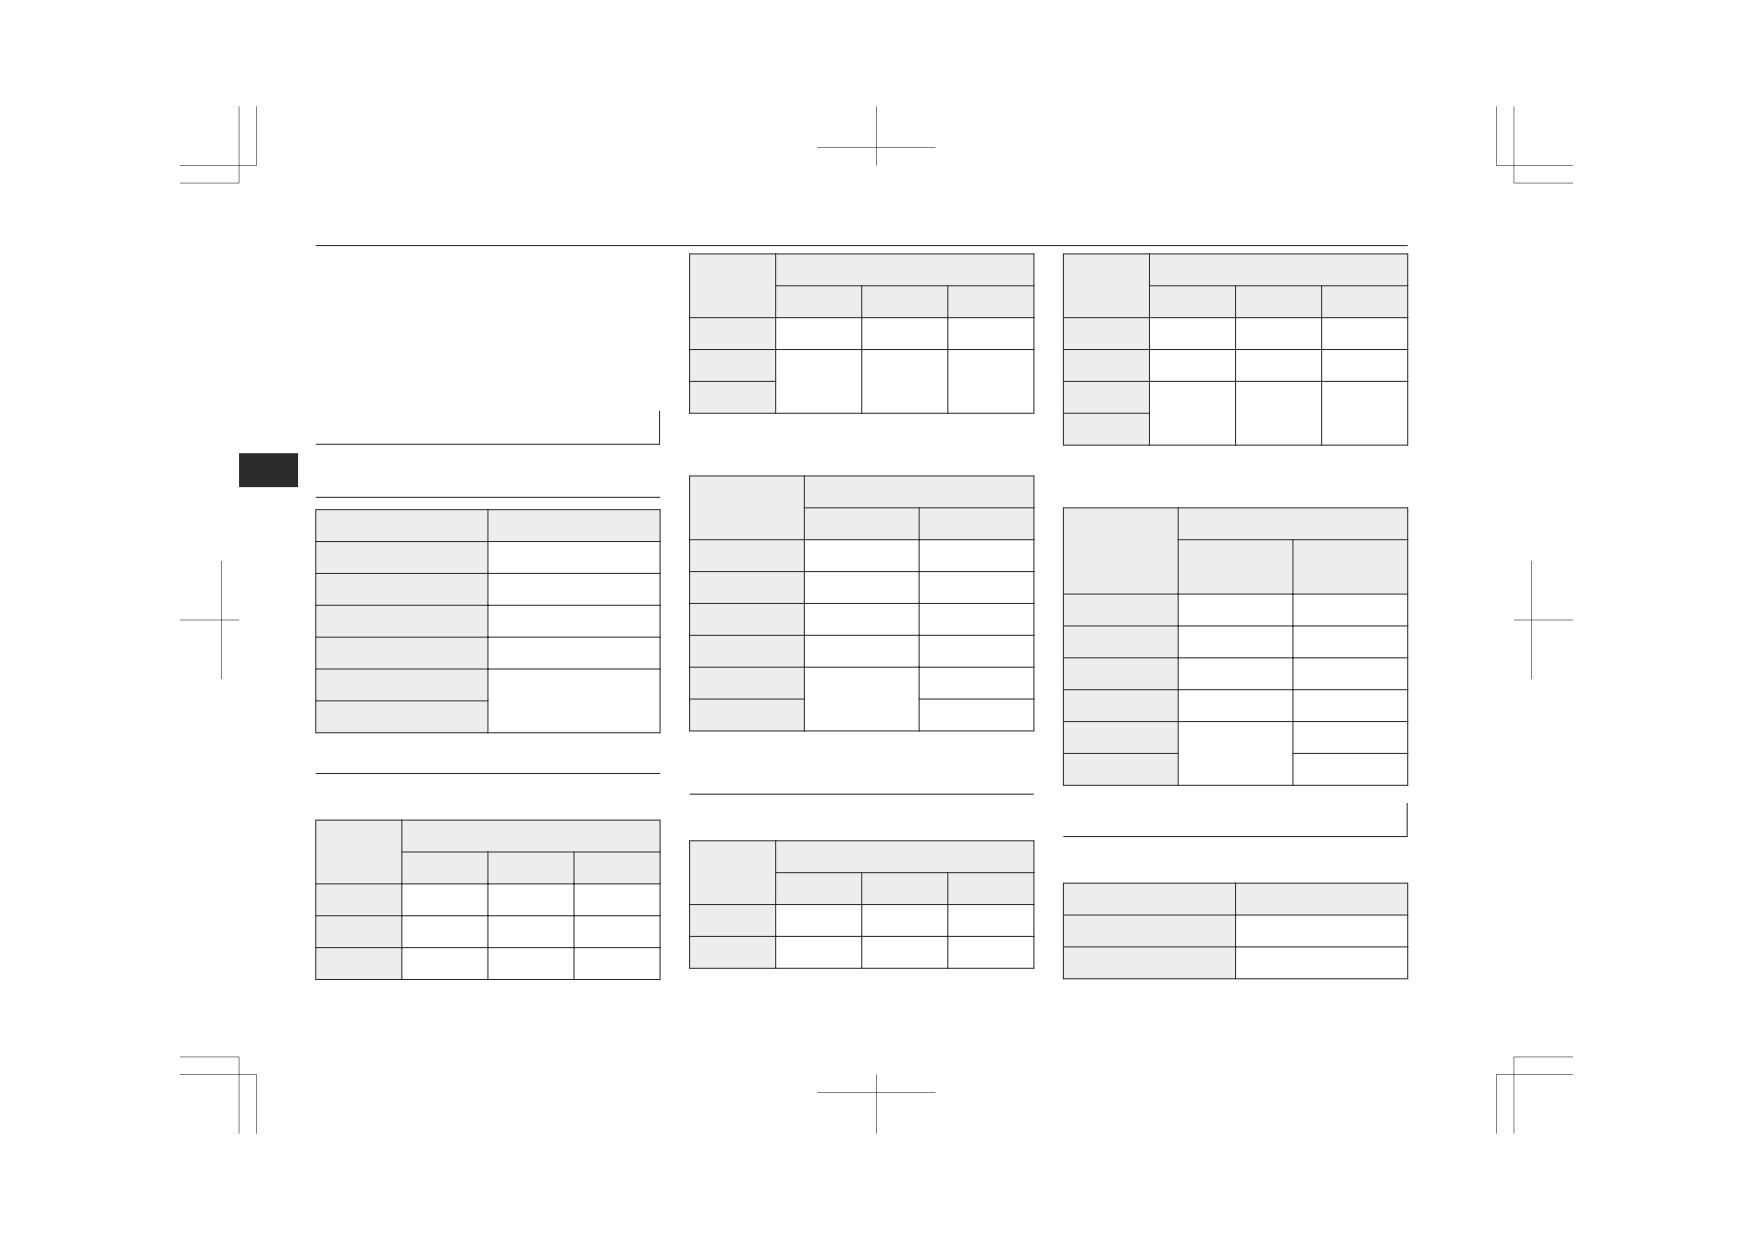
Running-in recommendations
z Keep to the running-in speed limit
Speed limit
Speed limit
Shift
Shift
shown below.
point
2H
4H
4L
point
2H, 4H
4HLc
4LLc
Please note that the legal speed limits
displayed must be adhered to.
4th gear
90 km/h
90 km/h
35 km/h
3rd gear
65 km/h
65 km/h
25 km/h
z Do not exceed loading limits.
5th gear
4th gear
95 km/h
95 km/h
35 km/h
z Refrain from towing a trailer.
115 km/h
110 km/h
45 km/h
6th gear
5th gear
115 km/h
110 km/h
45 km/h
Vehicles with M/T
6th gear
4N15
6
Vehicles with 2WD
4N15
Speed limit
Shift point
Shift point
Speed limit
2H, 4H
4L
Speed limit
1st gear
20 km/h
1st gear
20 km/h
5 km/h
Shift point
2H, 4H,
4LLc
4HLc
2nd gear
40 km/h
2nd gear
40 km/h
15 km/h
1st gear
20 km/h
5 km/h
3rd gear
60 km/h
3rd gear
65 km/h
25 km/h
2nd gear
40 km/h
15 km/h
4th gear
90 km/h
4th gear
95 km/h
35 km/h
3rd gear
70 km/h
25 km/h
5th gear
5th gear
45 km/h
115 km/h
110 km/h
4th gear
100 km/h
35 km/h
6th gear
6th gear
55 km/h
5th gear
50 km/h
115 km/h
Vehicles with Easy Select 4WD
Vehicles with Super Select 4WD
6th gear
60 km/h
II
4N14
4N14
Vehicles with A/T
Shift
Speed limit
point
Shift
Speed limit
4N14 (2WD)
2H
4H
4L
point
2H, 4H
4HLc
4LLc
1st gear
20 km/h
20 km/h
5 km/h
Shift point
Speed limit
1st gear
20 km/h
20 km/h
5 km/h
2nd gear
40 km/h
40 km/h
15 km/h
1st gear
15 km/h
2nd gear
40 km/h
40 km/h
15 km/h
3rd gear
60 km/h
60 km/h
25 km/h
2nd gear
35 km/h
6-04
Starting and driving

Parking brake
Shift point
Speed limit
Speed limit
CAUTION
3rd gear
50 km/h
Shift point
2H, 4H,
Vehicles with 4N14 engine, do not exceed
4LLc
4HLc
following speeds.
4th gear
75 km/h
[Vehicles with Easy Select 4WD]
4th gear
75 km/h
30 km/h
5th gear
• “4H”: approximately 110 km/h
110 km/h
5th gear
• “4L”: approximately 50 km/h
6th gear
110 km/h
45 km/h
[Vehicles with Super Select 4WD II]
6th gear
• “4HLc”: approximately 110 km/h
4N14 (Easy Select 4WD)
• “4LLc”: approximately 50 km/h
4N15
Vehicles with 4N15 engine and A/T, do not
6
Speed limit
exceed speeds of approximately 70 km/h in
Shift point
“4LLc”.
Speed limit
2H, 4H
4L
Shift point
2H, 4H,
1st gear
15 km/h
5 km/h
4LLc
4HLc
Parking brake
2nd gear
35 km/h
10 km/h
1st gear
15 km/h
5 km/h
3rd gear
50 km/h
15 km/h
To park the vehicle, first bring it to a com-
2nd gear
35 km/h
10 km/h
plete stop, fully apply the parking brake suffi-
4th gear
75 km/h
30 km/h
3rd gear
50 km/h
20 km/h
ciently to hold the vehicle.
5th gear
40 km/h
110 km/h
4th gear
75 km/h
30 km/h
To apply
6th gear
45 km/h
5th gear
110 km/h
45 km/h
6th gear
4N14 (Super Select 4WD II)
Speed limit
CAUTION
Shift point
2H, 4H,
4LLc
z On 4WD vehicles, the “4L” (Easy Select
4HLc
4WD), “4LLc” (Super Select 4WD II) range
gives maximum torque for low-speed driv-
1st gear
15 km/h
5 km/h
ing on steep slopes, as well as sandy, muddy,
2nd gear
35 km/h
10 km/h
and other difficult surfaces.
3rd gear
50 km/h
20 km/h
Starting and driving
6-05
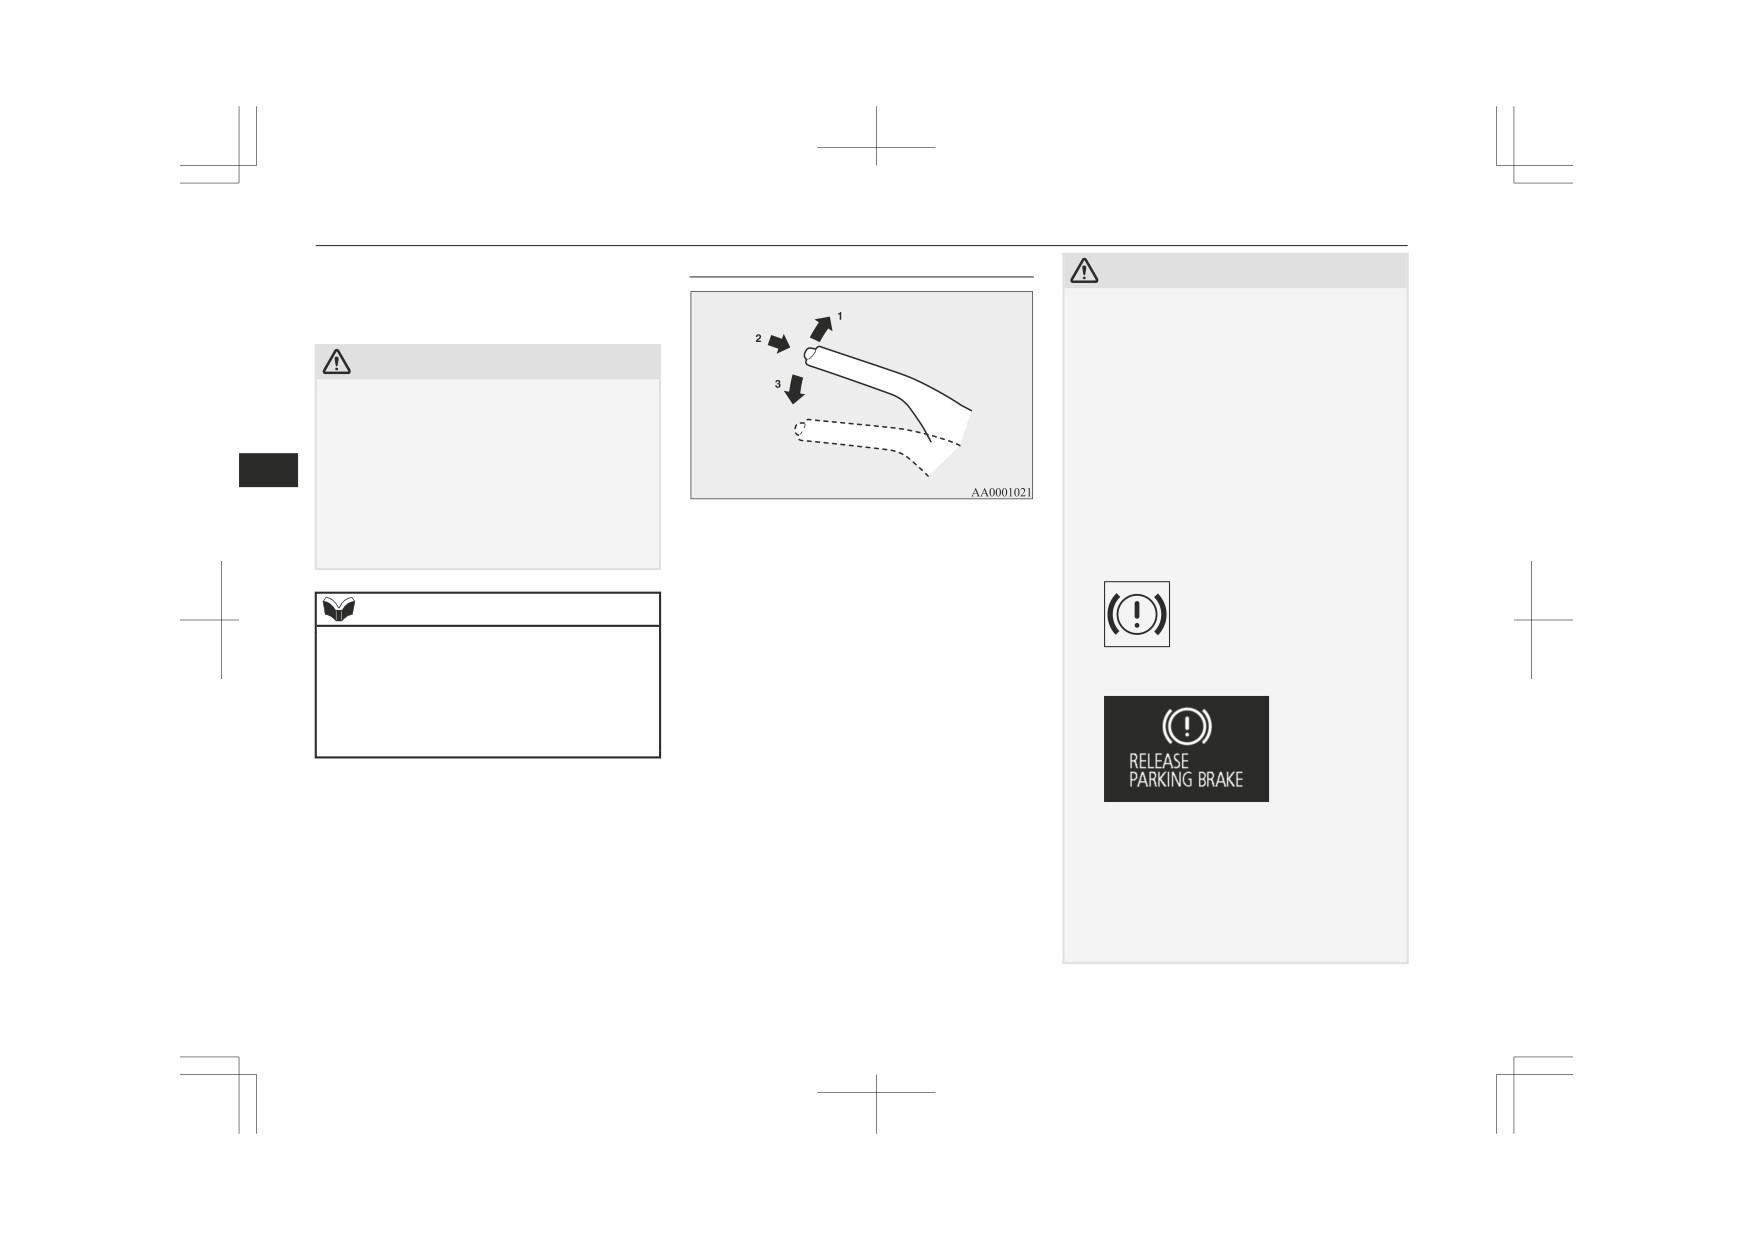
Parking brake
1- Firmly depress and hold the brake pedal,
To release
CAUTION
then pull the lever up without pushing
z
Before driving, be sure that the parking
the button at the end of hand grip.
brake is fully released and brake warning
lamp is off.
CAUTION
If you drive without the parking brake fully
released, the warning display will appear on
z
When you intend to apply the parking brake,
the information screen in the multi informa-
firmly press the brake pedal to bring the ve-
tion display and a buzzer sounds when the
hicle to a complete stop before pulling the
vehicle speed exceeds 8 km/h.
parking brake lever.
If a vehicle is driven without releasing the
6
Pulling the parking brake lever with the ve-
parking brake, the brake will be overheated,
hicle moving could make the rear wheels
resulting in ineffective braking and possible
lock up, thereby making the vehicle unsta-
1- Firmly depress and hold the brake pedal,
brake failure.
ble. It could also make the parking brake
then pull the lever up slightly.
malfunction.
2- Push the button at the end of hand grip.
Warning lamp
3- Lower the lever fully.
NOTE
z
Apply sufficient force to the parking brake
lever to hold the vehicle stationary after the
Warning display
foot brake is released.
z
If the parking brake does not hold the vehi-
cle stationary after the foot brake is released,
have your vehicle checked immediately.
z If the brake warning lamp does not extin-
guish when the parking brake is fully re-
leased, the brake system may be abnormal.
Have your vehicle checked immediately.
For details, refer to “Brake warning lamp”
on page 5-51.
6-06
Starting and driving

Parking
Parking on an uphill slope
NOTE
WARNING
Turn the front wheels away from the kerb and
z To prevent the parking brake from being re-
z Leaving the engine running risks injury
leased unintentionally, the lever must be
move the vehicle back until the kerb side
or death from accidentally moving the
pulled up slightly before it can be pushed
wheel gently touches the kerb.
gearshift lever (with M/T) or the selector
down. Simply pressing the button does not
On vehicles equipped with M/T, apply the
lever (with A/T) or the accumulation of
enable the lever to be pushed down.
toxic exhaust fumes on the passenger
parking brake and place the gearshift lever
compartment.
into the 1st position.
Parking
On vehicles equipped with A/T, apply the
Where you park
parking brake and place the selector lever in-
6
To park the vehicle, fully engage the parking
to the “P” (PARK) position.
If necessary, apply chocks to wheels.
WARNING
brake, and then move the gearshift lever to 1st
or “R” (Reverse) position for vehicles equip-
z Do not park your vehicle in areas where
combustible materials such as dry grass
ped with M/T, or set the selector lever to “P”
NOTE
or leaves can come in contact with a hot
(PARK) position for vehicles equipped with
z If your vehicle is equipped with A/T, be sure
exhaust, since a fire could occur.
A/T.
to apply the parking brake before moving se-
lector lever to the “P” (PARK) position. If
When leaving the vehicle
Parking on a hill
you move selector lever to the “P” (PARK)
position before applying the parking brake,
Always carry the key and lock all doors when
To prevent the vehicle from rolling, follow
it may be difficult to disengage selector lever
these procedures:
from the “P” (PARK) position when next
leaving the vehicle unattended.
you drive the vehicle, requiring application
Always try to park your vehicle in a well lit
Parking on a downhill slope
of a strong force the selector lever to move
area.
from the “P” (PARK) position.
Turn the front wheels towards the kerb and
Steering wheel height and
move the vehicle forward until the kerb side
Parking with the engine run-
wheel gently touches the kerb.
reach adjustment
ning
On vehicles equipped with M/T, apply the
parking brake and place the gearshift lever
1. Release the lever while holding the
Never leave the engine running while you
into the “R” (Reverse) position.
steering wheel up.
take a short sleep/rest. Also, never leave the
On vehicles equipped with A/T, apply the
2. Adjust the steering wheel to the desired
engine running in a closed or poorly ventila-
parking brake and place the selector lever in-
position.
ted place.
to the “P” (PARK) position.
3. Securely lock the steering wheel by pull-
If necessary, apply chocks to wheels.
ing the lever fully upward.
Starting and driving
6-07

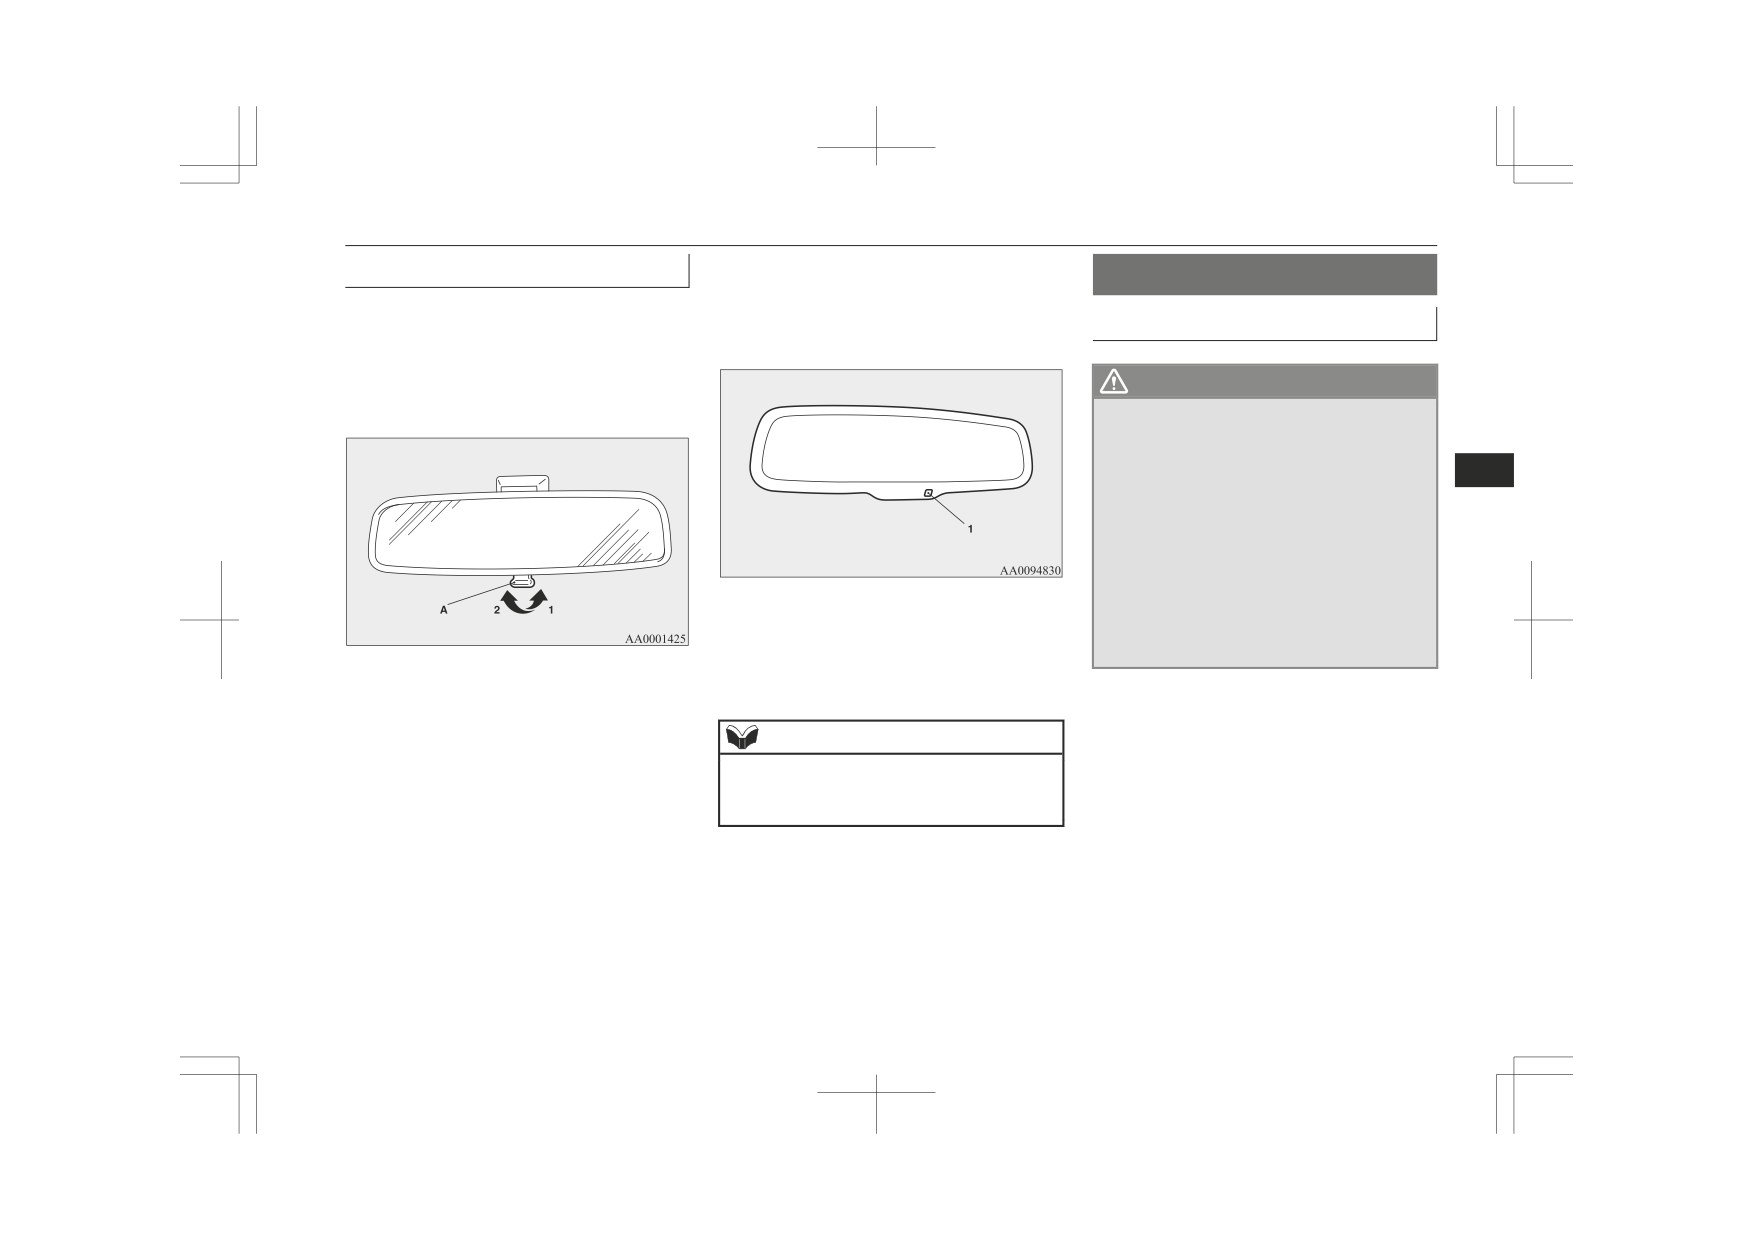
Inside rear-view mirror
Inside rear-view mirror
To adjust the vertical mirror
position
Adjust the rear-view mirror only after making
any seat adjustments so you have a clear
It is possible to move the mirror up and down
view to the rear of the vehicle.
to adjust its position.
Type 1
6
A- Locked
B- Release
Type 2
*: Vehicles equipped with the reach adjust-
ment
WARNING
To adjust the mirror position
z Do not attempt to adjust the steering
WARNING
It is possible to move the mirror up/down and
wheel while you are driving the vehicle.
z Do not attempt to adjust the rear-view
left/right to adjust its position.
mirror while driving. This can be danger-
ous.
Always adjust the mirror before driving.
Adjust the rear-view mirror to maximize the
view through the rear window.
6-08
Starting and driving
Outside rear-view mirrors
To reduce the glare
When the headlamps of the vehicles behind
Outside rear-view mirrors
you are very bright, the reflection factor of
Type 1
the rear-view mirror is automatically changed
To adjust the mirror position
The lever (A) at the bottom of the mirror can
to reduce the glare.
be used to adjust the mirror to reduce the
glare from the headlamps of vehicles behind
WARNING
you during night driving.
z
Do not attempt to adjust the rear-view
mirrors while driving. This can be dan-
gerous.
Always adjust the mirrors before driving.
6
z
Your vehicle is equipped with convex type
mirrors.
Please take into consideration, that ob-
jects you see in the mirror will look small-
er and farther away compared to a nor-
mal flat mirror.
Do not use this mirror to estimate dis-
When the ignition switch is turned to the
tance of following vehicles when changing
“ON” position or the operation mode is put in
lanes.
1- Normal
ON, the reflection factor of the mirror is au-
2- Anti-glare
tomatically changed.
Type 2
NOTE
z Do not hang items on, or spray glass cleaner
on the sensor
(1), as reduced sensitivity
could result.
Starting and driving
6-09

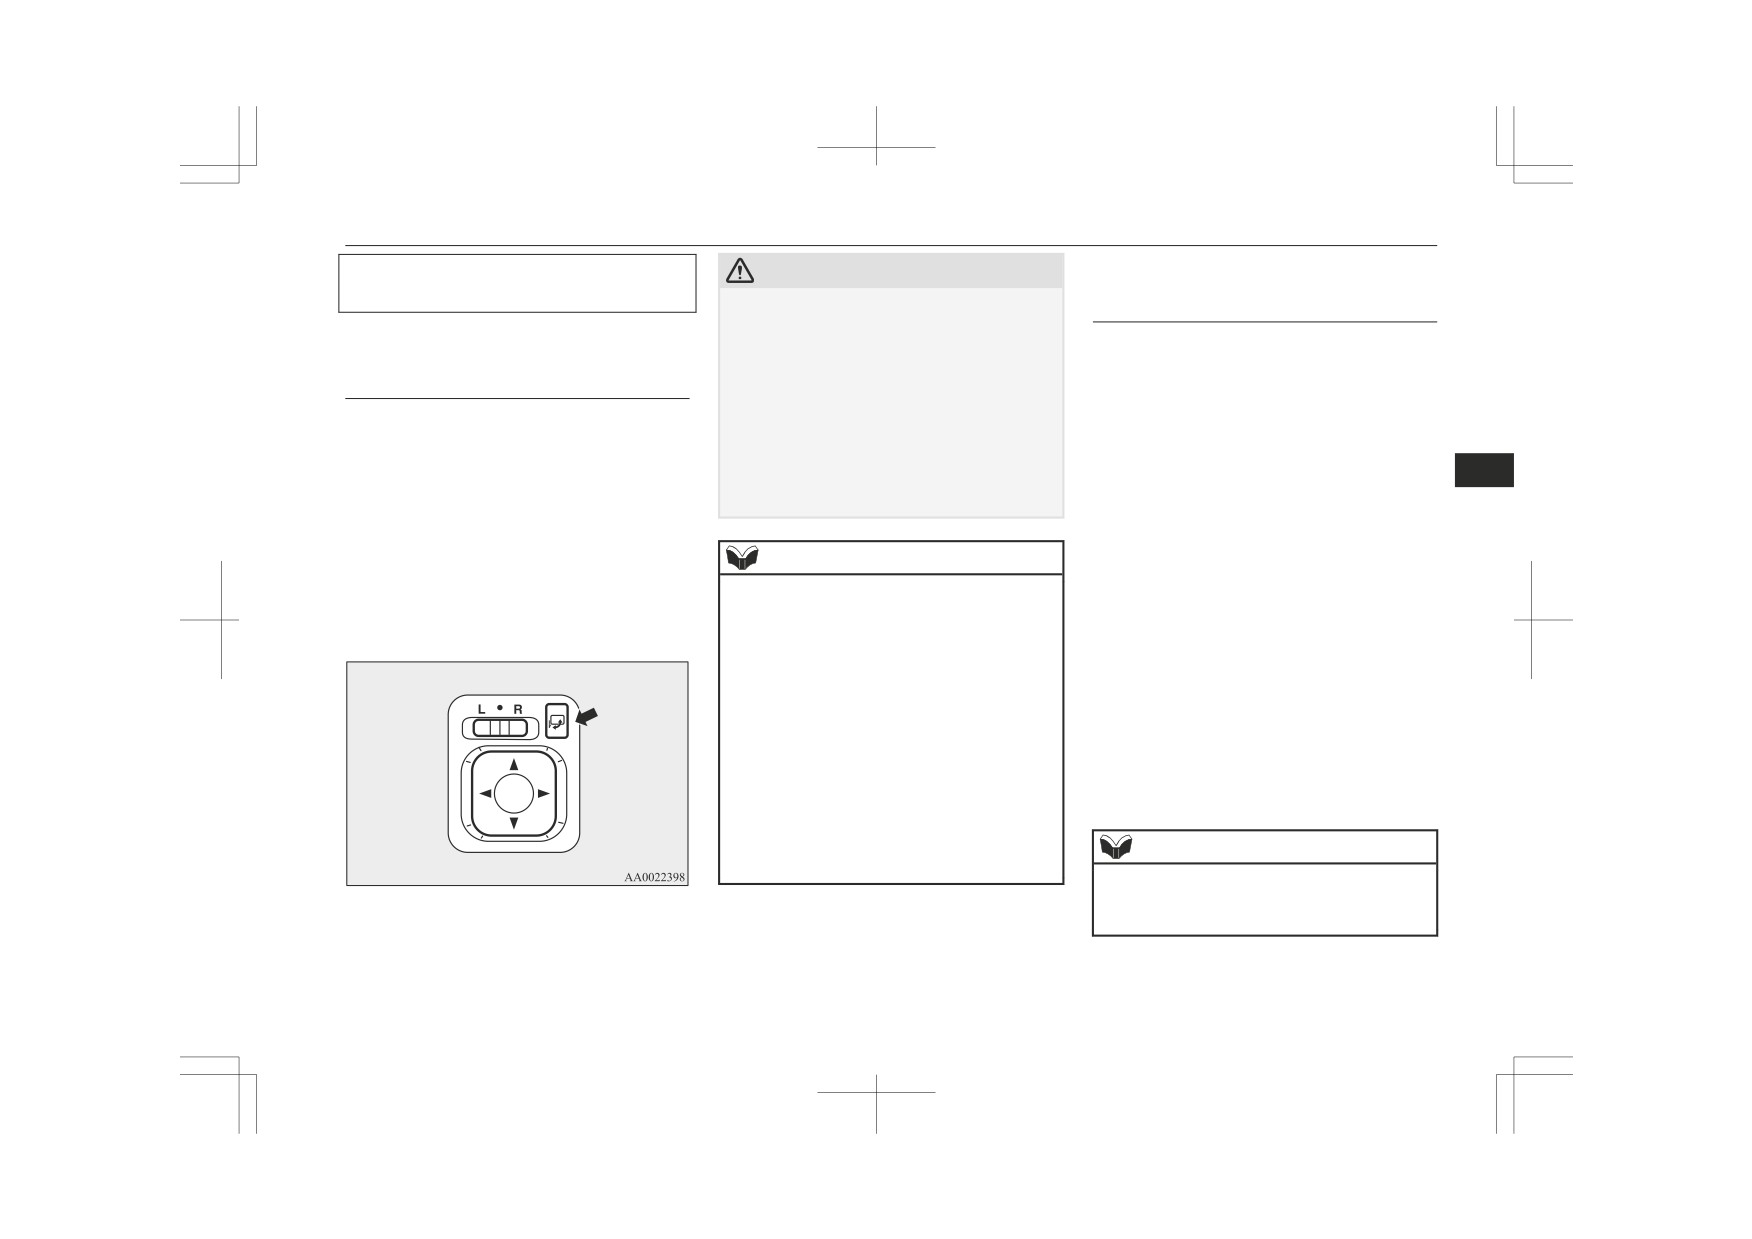
Outside rear-view mirrors
Manual outside rear-view mir-
1. Place the lever (A) to the same side as
Retracting and extending the
rors*
the mirror whose adjustment is desired.
outside mirrors
Adjust the mirror surface by hands as indica-
The outside mirror can be retracted in to-
ted by the arrows.
wards the side window to prevent damage
Except for vehicles
when parking in narrow areas.
equipped with the mirror
retractor switch
CAUTION
z Do not drive the vehicle with the mirror re-
6
tracted in.
The lack of rearward visibility normally pro-
Vehicles equipped with
the mirror retractor switch
vided by the mirror could lead to an acci-
dent.
Except for vehicles equipped
with the mirror retractor switch
Push the mirror towards the back of the vehi-
Electric remote-controlled out-
L- Left outside mirror adjustment
side rear-view mirrors*
cle with your hand to retract it in. When ex-
R- Right outside mirror adjustment
tending the mirror, pull it out towards the
The electric remote-controlled outside rear-
front of the vehicle until it clicks to lock in
view mirrors can be operated when the igni-
2. Press the switch (B) to the left, right, up
place.
tion switch is in the “ON” or “ACC” position
or down to adjust the mirror position.
or the operation mode is put in ON or ACC.
1- Up
2- Down
3- Right
4- Left
3. Return the lever (A) back to the middle
position (•).
6-10
Starting and driving
Outside rear-view mirrors
For vehicles equipped with the mirror re-
CAUTION
Retracting and extending the
tractor switch
mirrors without using the mir-
z
It is possible to retract and extend the mir-
ror retractor switch
rors by hand. After retracting a mirror using
Retracting and extending the
the mirror retractor switch, however, you
[Except for vehicles equipped with the key-
mirrors using the mirror retrac-
should extend it by using the switch again,
less entry key or the keyless operation key]
not by hand. If you extended the mirror by
tor switch
The mirrors automatically extend when the
hand after retracting it using the switch, it
vehicle speed reaches 30 km/h (19 mph).
With the ignition switch or the operation
would not properly lock in position. As a re-
[Vehicles equipped with keyless entry key]
mode in ON or ACC, push the mirror retrac-
sult, the mirror could move because of the
wind or vibration while you are driving, and
The mirrors automatically retract or extend
tor switch to retract the mirrors.
6
this may limit the driver’s rearward visibili-
when the doors are locked or unlocked using
Push it again to extend the mirrors to their
ty.
the key switches of the keyless entry system.
original positions.
Refer to
“Keyless entry system” on page
After turning the ignition switch to the
3-04.
“LOCK” position or putting the operation
NOTE
[Vehicles equipped with the keyless operation
mode in OFF, it is possible to retract and ex-
z
Be careful not to get your hands trapped
key]
tend the mirrors using the mirror retractor
while a mirror is moving.
The mirrors automatically retract or extend
switch for about 30 seconds.
z
If you move a mirror by hand or it moves af-
when the doors are locked or unlocked using
ter hitting a person or object, you may not be
the key switches or the keyless operation
able to return it to its original position using
function of the keyless operation system.
the mirror retractor switch. If this happens,
push the mirror retractor switch to place the
Refer to
“Keyless entry system” on page
mirror in its retracted position and then push
3-04.
the switch again to return the mirror to its
Refer to “Keyless operation system: To oper-
original position.
ate using the keyless operation function” on
z
When freezing has occurred and mirrors fail
page 3-10.
to operate as intended, please refrain from
repeated pushing of the retractor switch as
this action can result in burn-out of the mir-
NOTE
ror motor circuits.
z Functions can be modified as stated below.
Please consult a MITSUBISHI MOTORS
Authorized Service Point.
Starting and driving
6-11
Ignition switch*
NOTE
NOTE
Type 2
• Automatically extend when the driver’s
mately 30 seconds, the outside rearview mir-
door is closed, and then the following op-
rors will extend again.
eration is performed.
[Except for vehicles equipped with key-
less operation system]
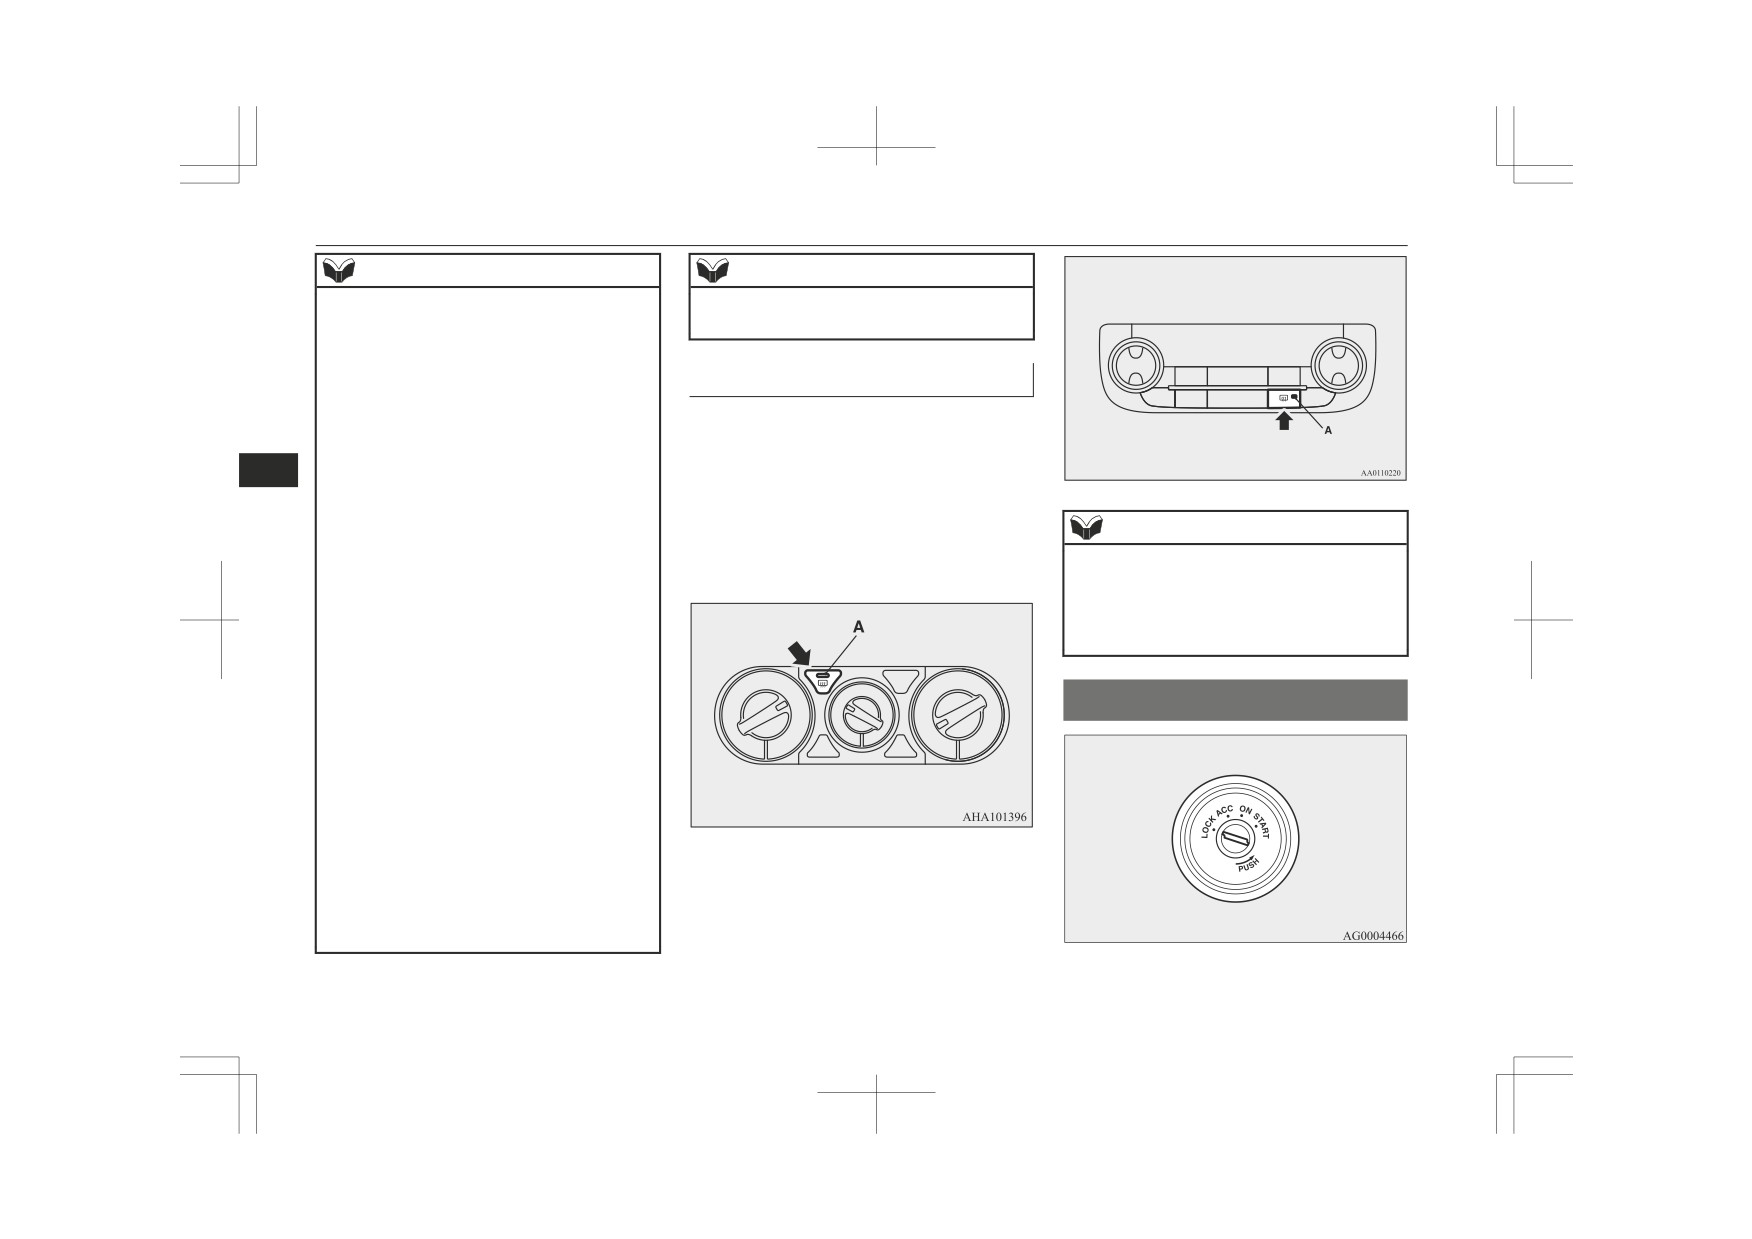
Heated mirror*
Turn the ignition switch to the “ON” posi-
To demist or defrost the outside rear-view
tion.
mirrors, press the rear window demister
[Vehicles equipped with keyless operation
switch.
system]
6
The indication lamp (A) will illuminate while
Put the operation mode in ON.
• Automatically retract when the ignition
the demister is on.
switch is turned to the “LOCK” or “ACC”
The heater will be turned off automatically in
NOTE
position or the operation mode is put in
about 20 minutes depending on the outside
OFF or ACC, and the driver’s door is then
temperature.
z The heater mirrors can be turned on auto-
opened.
matically.
• Automatically extend when the vehicle
For further information, we recommend you
speed reaches approximately
30 km/h
Type 1
to consult a MITSUBISHI MOTORS Au-
(19 mph).
(vehicles equipped with the
thorized Service Point.
keyless entry key or the keyless operation
key)
• Deactivate the automatic extension func-
Ignition switch*
tion.
The outside rear-view mirrors can be retrac-
ted or extended by the following operations,
even if changing to any of the above.
After pressing the “LOCK” switch to lock
the doors, if the “LOCK” switch is pressed
again twice in a row within approximately
30 seconds, the outside rear-view mirrors
will retract.
After pressing the “UNLOCK” switch to un-
lock the doors, if the “UNLOCK” switch is
pressed again twice in a row within approxi-
6-12
Starting and driving
Engine switch*
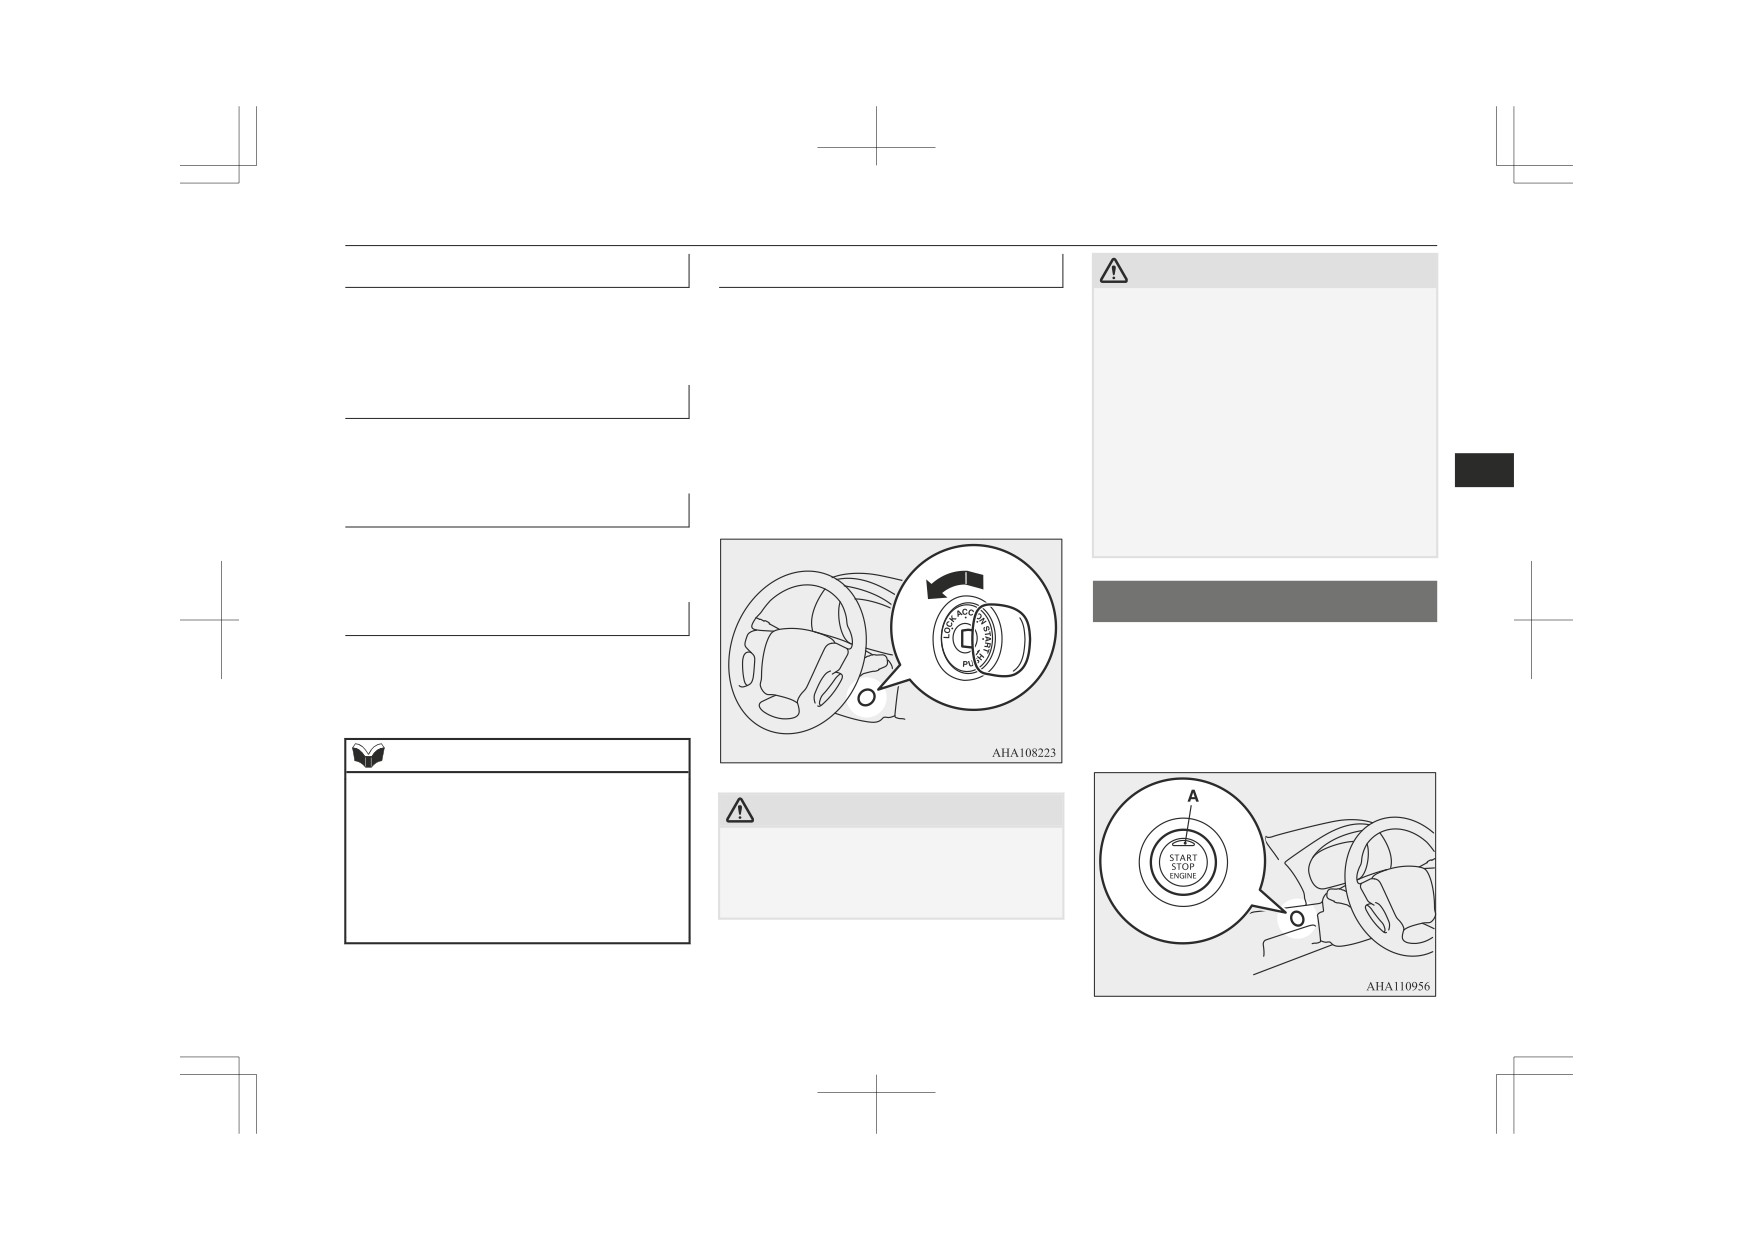
LOCK
To remove the key
CAUTION
For vehicles with M/T, when removing the
The engine is stopped and the steering wheel
z If the engine is stopped while driving, the
key, push the key in at the “ACC” position
brake servomechanism will cease to function
locked. The key can only be inserted and re-
and keep it depressed until it is turned to the
and braking efficiency will deteriorate. Also,
moved in this position.
“LOCK” position and remove it.
the power steering system will not function
and it will require greater manual effort to
For vehicles with A/T, when removing the
ACC
operate the steering.
key, first set the selector lever to the
“P”
z
Do not leave the key in the “ON” position
(PARK) position, and push the key in at the
The engine is stopped, but the audio system
for a long time when the engine is not run-
“ACC” position and keep it depressed until it
ning, doing so will cause the battery to be
and other electric devices can be operated.
6
is turned to the
“LOCK” position, and re-
discharged.
move it.
z Do not turn the key to the “START” position
ON
while the engine is running. Doing so could
damage the starter motor.
All the vehicle’s electrical devices can be op-
erated.
Engine switch*
START
In order to prevent theft, the engine will not
The starter motor operates. After the engine
start unless a preregistered keyless operation
has started, release the key and it will auto-
key is used. (Engine immobilizer function)
matically return to the “ON” position.
If you are carrying the keyless operation key,
you can start the engine.
NOTE
z If your vehicle is equipped with an electron-
ic immobilizer.
CAUTION
To start the engine, the ID code transmitted
by the transponder inside the key must
z Do not remove the ignition key from the ig-
match the code registered in the immobilizer
nition switch while driving. The steering
wheel will be locked, causing loss of con-
computer.
Refer to “Electronic immobilizer (Anti-theft
trol.
starting system)” on page 3-03.
Starting and driving
6-13

Engine switch*
CAUTION
Operation mode of the engine
Changing the operation mode
switch and its function
If you press the engine switch without de-
z
The indication lamp (A) will flash orange
when there is a problem or malfunction in
pressing the brake pedal (A/T) or the clutch
the keyless operation system. Never drive if
OFF
pedal (M/T), you can change the operation
the indication lamp on the engine switch is
The indication lamp on the engine switch
mode in the order of OFF, ACC, ON, OFF.
flashing orange. Immediately contact a
turns off.
MITSUBISHI MOTORS Authorized Serv-
The operation mode cannot be put in OFF
ice Point.
when the selector lever is in any position oth-
z
If the engine switch operation is not smooth
er than the “P” (PARK) position (A/T).
and feels like it is sticking, do not operate
6
the switch. Immediately contact a
MITSUBISHI MOTORS Authorized Serv-
ACC
ice Point.
Electrical devices such as the audio and ac-
cessory socket can be operated.
The indication lamp on the engine switch il-
NOTE
luminates orange.
z
When operating the engine switch, press the
switch all the way in. If the switch is not
ON
fully pressed, the engine may not start or the
All vehicle’s electrical devices can be operat-
CAUTION
operation mode may not change. If the en-
ed.
gine switch is pressed correctly, there is no
z
When the engine is not running, put the op-
The indication lamp on the engine switch il-
need to hold the engine switch down.
eration mode in OFF. Leaving the operation
luminates green. The indication lamp turns
z
When the battery in the keyless operation
mode in ON or ACC for a long time when
off when the engine is running.
key has worn out, or the keyless operation
the engine is not running may cause the bat-
key is out of the vehicle, warning display
tery to be discharged, making it impossible
will appear.
to start the engine, lock and unlock the steer-
NOTE
ing wheel.
z Your vehicle is equipped with an electronic
immobilizer..
To start the engine, the ID code transmitted
by the transponder inside the key must
match the code registered in the immobilizer
computer. Refer to “Electronic immobilizer
(Anti-theft starting system)” on page 3-03.
6-14
Starting and driving

Engine switch*
CAUTION
NOTE
NOTE
z
When the battery is disconnected, the cur-
2 One of the other causes could be low
• The ACC power auto-cutout function can
rent operation mode is memorized. After re-
. battery voltage. If this occurs, the
be deactivated.
connecting the battery, the memorized mode
For details, we recommend you to consult
keyless entry system, keyless opera-
is selected automatically. Before disconnect-
a MITSUBISHI MOTORS Authorized
tion function and steering lock will
ing the battery for repair or replacement,
Service Point.
also not operate. Contact a
make sure to put the operation mode in OFF.
Be careful if you are not sure which opera-
MITSUBISHI MOTORS Authorized
tion mode the vehicle is in when the battery
Service Point.
Operation mode OFF reminder
is run down.
system
6
z
The operation mode cannot be changed from
OFF to ACC or ON if the keyless operation
ACC power auto-cutout func-
key is not detected to be in the vehicle. Refer
tion
to
“Keyless operation system: Operating
After about 30 minutes have elapsed with the
range for starting the engine and changing
the operation mode” on page 3-10.
operation mode in ACC, the function auto-
When there is the keyless operation key in
matically cuts out the power for the audio
z
the vehicle and the operation mode isn’t
system and other electric devices that can be
/>
change, the keyless operation key may have
operated with that position. (only when the
worn out.
When the operation mode is in any mode oth-
driver’s door has been closed and the selector
er than OFF, if you try to lock the doors by
lever is in the “P” (PARK) position)
pressing the driver’s or front passenger’s
When you open driver’s door or the engine
NOTE
door lock/unlock switch, a warning display
switch operate again, the power is supplied
If the operation mode cannot be changed to
will appear and the outer buzzer will sound
z
again.
OFF, perform the following procedure.
and you cannot lock the doors.
1 Move the selector lever to the “P”
(PARK) position, and then change
NOTE
Operation mode ON reminder
the operation mode to OFF. (For ve-
system
z When the ACC power supply automatically
hicles with A/T)
stops, the steering wheel can’t lock and you
If the driver’s door is opened with the engine
can’t lock and unlock the doors by the key-
stopped and the operation mode in any mode
less entry system.
other than OFF, the operation mode ON re-
z It is possible to modify functions as follows:
minder inner buzzer sounds intermittently to
• The time until the power cuts out can be
changed to approximately 60 minutes.
remind you to put the operation mode in
OFF.
Starting and driving
6-15
Steering wheel lock
CAUTION
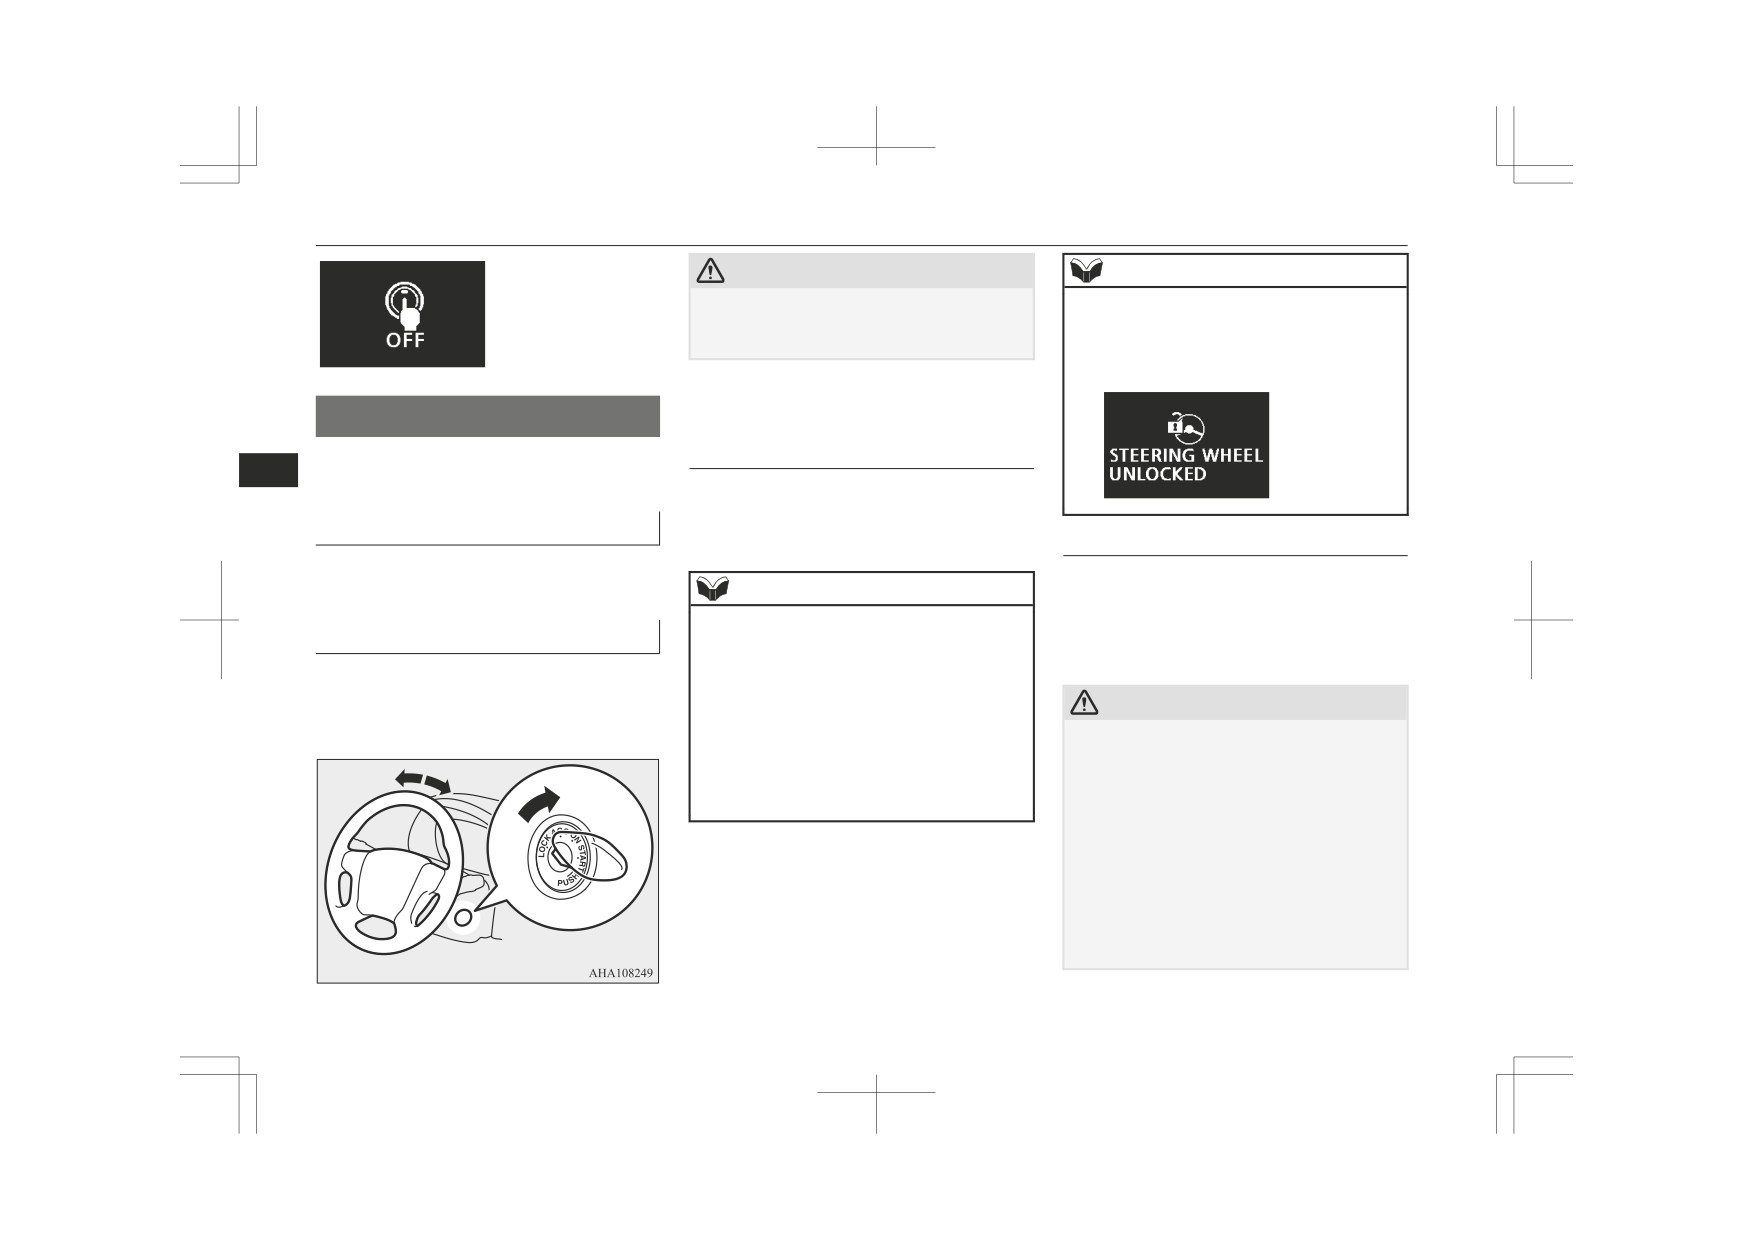
NOTE
z Remove the key when leaving the vehicle.
z When the driver’s door is opened while the
In some countries, it is prohibited to leave
steering wheel does not lock, a warning dis-
the key in the vehicle when parked.
play will appear and the buzzer sounds to
alert the steering wheel is unlocked.
For vehicles equipped with the keyless op-
Steering wheel lock
eration system
Except for vehicles equipped with the key-
To lock
6
less operation system
After pressing the engine switch and opera-
tion mode in OFF, when driver’s door is
To lock
opened, the steering wheel is locked.
To unlock
Remove the key at the “LOCK” position.
The following methods can be used to unlock
Turn the steering wheel until it is locked.
NOTE
the steering wheel.
z When the following operation is performed
z Put the operation mode in ACC.
To unlock
with the operation mode in OFF and the se-
z
Start the engine.
lector lever is in the “P” (PARK) position
Turn the key to the “ACC” position while
(A/T), the steering wheel is locked.
moving the steering wheel slightly right and
• Open or close the driver’s door.
CAUTION
left.
• Close all the doors.
z If the engine is stopped while driving, do not
• Open one of the doors when all the doors
open a door or press the LOCK switch on
are closed.
the key until the vehicle stops in a safe
• Lock all the doors with the keyless entry
place. This could cause the steering wheel to
system or the keyless operation function.
lock, making it impossible to operate the ve-
hicle.
z Carry the key with you when leaving the ve-
hicle.
If your vehicle needs to be towed, unlock the
steering wheel.
Refer to “Towing: Emergency towing” on
page 8-23.
6-16
Starting and driving

Starting and stopping the engine
NOTE
NOTE
WARNING
z
When the steering wheel does not unlock,
z If there is a fault in the steering wheel lock,
z
Never run the engine in a closed or poorly
the warning will be displayed on the infor-
the warning display will appear. Immediate-
ventilated area any longer than is needed
mation screen in the multi information dis-
ly stop the vehicle in a safe place and con-
to move your vehicle in or out of the area.
play. Press the engine switch again while
tact your nearest a MITSUBISHI MOTORS
Carbon monoxide gases are odourless and
moving the steering wheel slightly right and
Authorized Service Point.
can be fatal.
left.
CAUTION
z
Never attempt to start the engine by pushing
6
or pulling the vehicle.
z
Do not run the engine at high speeds or drive
the vehicle at high speeds until the engine
has had a chance to warm up.
z
When the steering wheel lock is abnormal,
z
Release the ignition key as soon as the en-
the warning display will appear and the in-
Starting and stopping the
gine starts to avoid damaging the starter mo-
ner buzzer will sound. Put the operation
engine
tor.
mode in OFF and then press the lock switch
of the keyless operation key. And then press
z
If your vehicle is equipped with a turbo-
charger, do not stop the engine immediately
the engine switch. If the warning lamp illu-
minates again, contact a MITSUBISHI
Tips for starting
after high-speed or uphill driving. First al-
low the engine to idle to give the turbocharg-
MOTORS Authorized Service Point.
er a chance to cool down.
Except for vehicles equipped
with the keyless operation sys-
For vehicles equipped with the
tem
keyless operation system
z Do not operate the starter motor continu-
z The operation mode can be in any mode
ously longer than 10 seconds; doing so
to start the engine.
could run down the battery. If the engine
does not start, turn the ignition switch
back to “LOCK”, wait a few seconds,
and then try again. Trying repeatedly
with the starter motor still turning will
damage the starter mechanism.
Starting and driving
6-17

Starting and stopping the engine
z
The starter motor will be turning for up
On vehicles equipped with A/T, make
CAUTION
to approximately 15 seconds if the en-
sure the selector lever is in the
“P”
gine switch is released at once. Pressing
z If your vehicle is equipped with a turbo-
(Park) position.
charger, do not stop the engine immediately
the engine switch again while the starter
after high-speed or uphill driving. First al-
motor is still turning will stop the starter
low the engine to idle to give the turbocharg-
Vehicles
Vehicles
motor. The starter motor will be turning
er a chance to cool down.
with 6M/T
with A/T
for up to approximately
30 seconds
while the engine switch is pressed.
Starting the engine
If the engine does not start, wait for a
while and then attempt to start the en-
6
gine again. Trying repeatedly with the
Except for vehicles equipped
starter motor still turning will damage
with the keyless operation sys-
the starter mechanism.
tem
1. Insert the ignition key and fasten the seat
WARNING
belt.
2. Make sure the parking brake is applied.
5. Turn the ignition key to the “ON” posi-
z
Never run the engine in a closed or poorly
ventilated area any longer than is needed
3. Press and hold the brake pedal down
tion.
to move your vehicle in or out of the area.
firmly with your right foot.
The diesel preheat indication lamp will
Carbon monoxide gases are odourless and
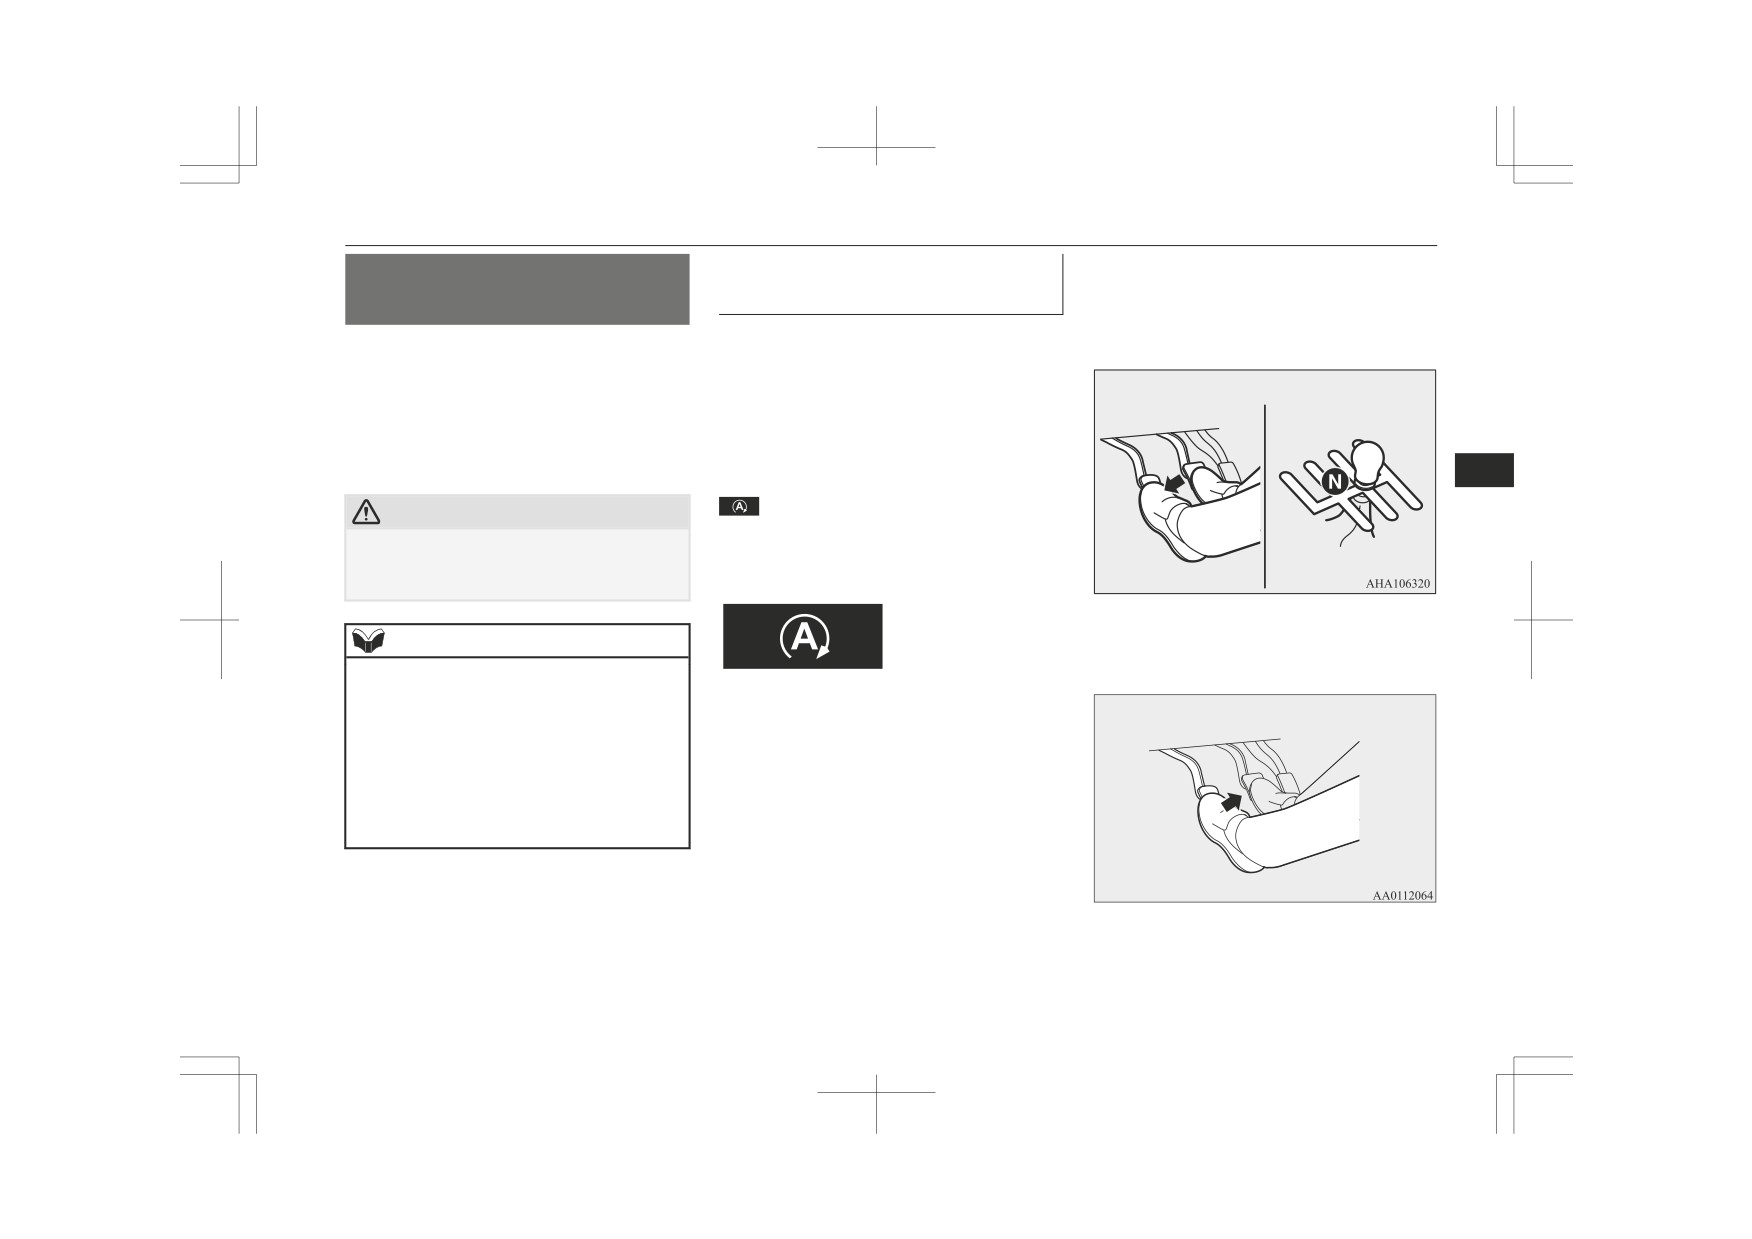
4. On vehicles equipped with M/T, depress
first illuminate, and then after a short
can be fatal.
the clutch pedal all the way and place
time go out, indicating that preheating is
the gearshift lever in the “N” (Neutral)
completed.
position.
CAUTION
NOTE
z
Never attempt to start the engine by pushing
or pulling the vehicle.
If the engine is cold, the diesel preheat indi-
z
z
Do not run the engine at high speeds or drive
cation lamp is on for a longer time.
the vehicle at high speeds until the engine
When the engine has not been started within
z
has had a chance to warm up.
approximately 5 seconds after the diesel pre-
heat indication lamp went out, return the ig-
nition switch to the “LOCK” position. Then,
turn the switch to the “ON” position to pre-
heat the engine again.
6-18
Starting and driving

Starting and stopping the engine
NOTE
NOTE
NOTE
z
When the engine is warm, the diesel preheat
z When the engine is not started, it may be-
z
If the engine is cold, the diesel preheat indi-
indication lamp does not come on even if the
come hard to depress the brake pedal and the
cation lamp is on for a longer time.
ignition key is placed in the “ON” position.
vehicle may not be able to detect the pedal
z
Putting the operation mode in ON will also
Start the engine by turning the ignition key
operation.
start preheating the engine. When the engine
right to the “START” position.
Therefore the engine may not be started. In
has not been started within approximately 5
such a case, depress the brake pedal more
seconds after the diesel preheat indication
firmly than usual.
lamp went out, put the operation mode in
6. Turn the ignition key to the “START”
OFF. Then, attempt the engine start proce-
position without depressing the accelera-
dure to preheat the engine again.
tor pedal, and release it when the engine
4. On vehicles with M/T, depress the clutch
6
z
Minor noises may be heard on engine start-
starts.
pedal all the way and place the gearshift
up. These will disappear as the engine
lever in the “N” (Neutral) position.
warms up.
On vehicles with A/T, make sure the se-
z
Vehicles with 4N15 engine, when the ambi-
NOTE
lector lever is in the “P” (PARK) posi-
ent temperature is low even after the engine
has been warmed up, and when the gearshift
z
Minor noises may be heard on engine start-
tion.
up. These will disappear as the engine
lever is put in the
“N” (Neutral) position
(M/T) or the selector lever is put in the “P”
warms up.
Vehicles
Vehicles
(PARK) position or “N” (NEUTRAL) posi-
z
Vehicles with 4N15 engine, when the ambi-
with 6M/T
with A/T
tion (A/T), the idling speed may increase.
ent temperature is low even after the engine
has been warmed up, and when the gearshift
It does not indicate a malfunction.
lever is put in the
“N” (Neutral) position
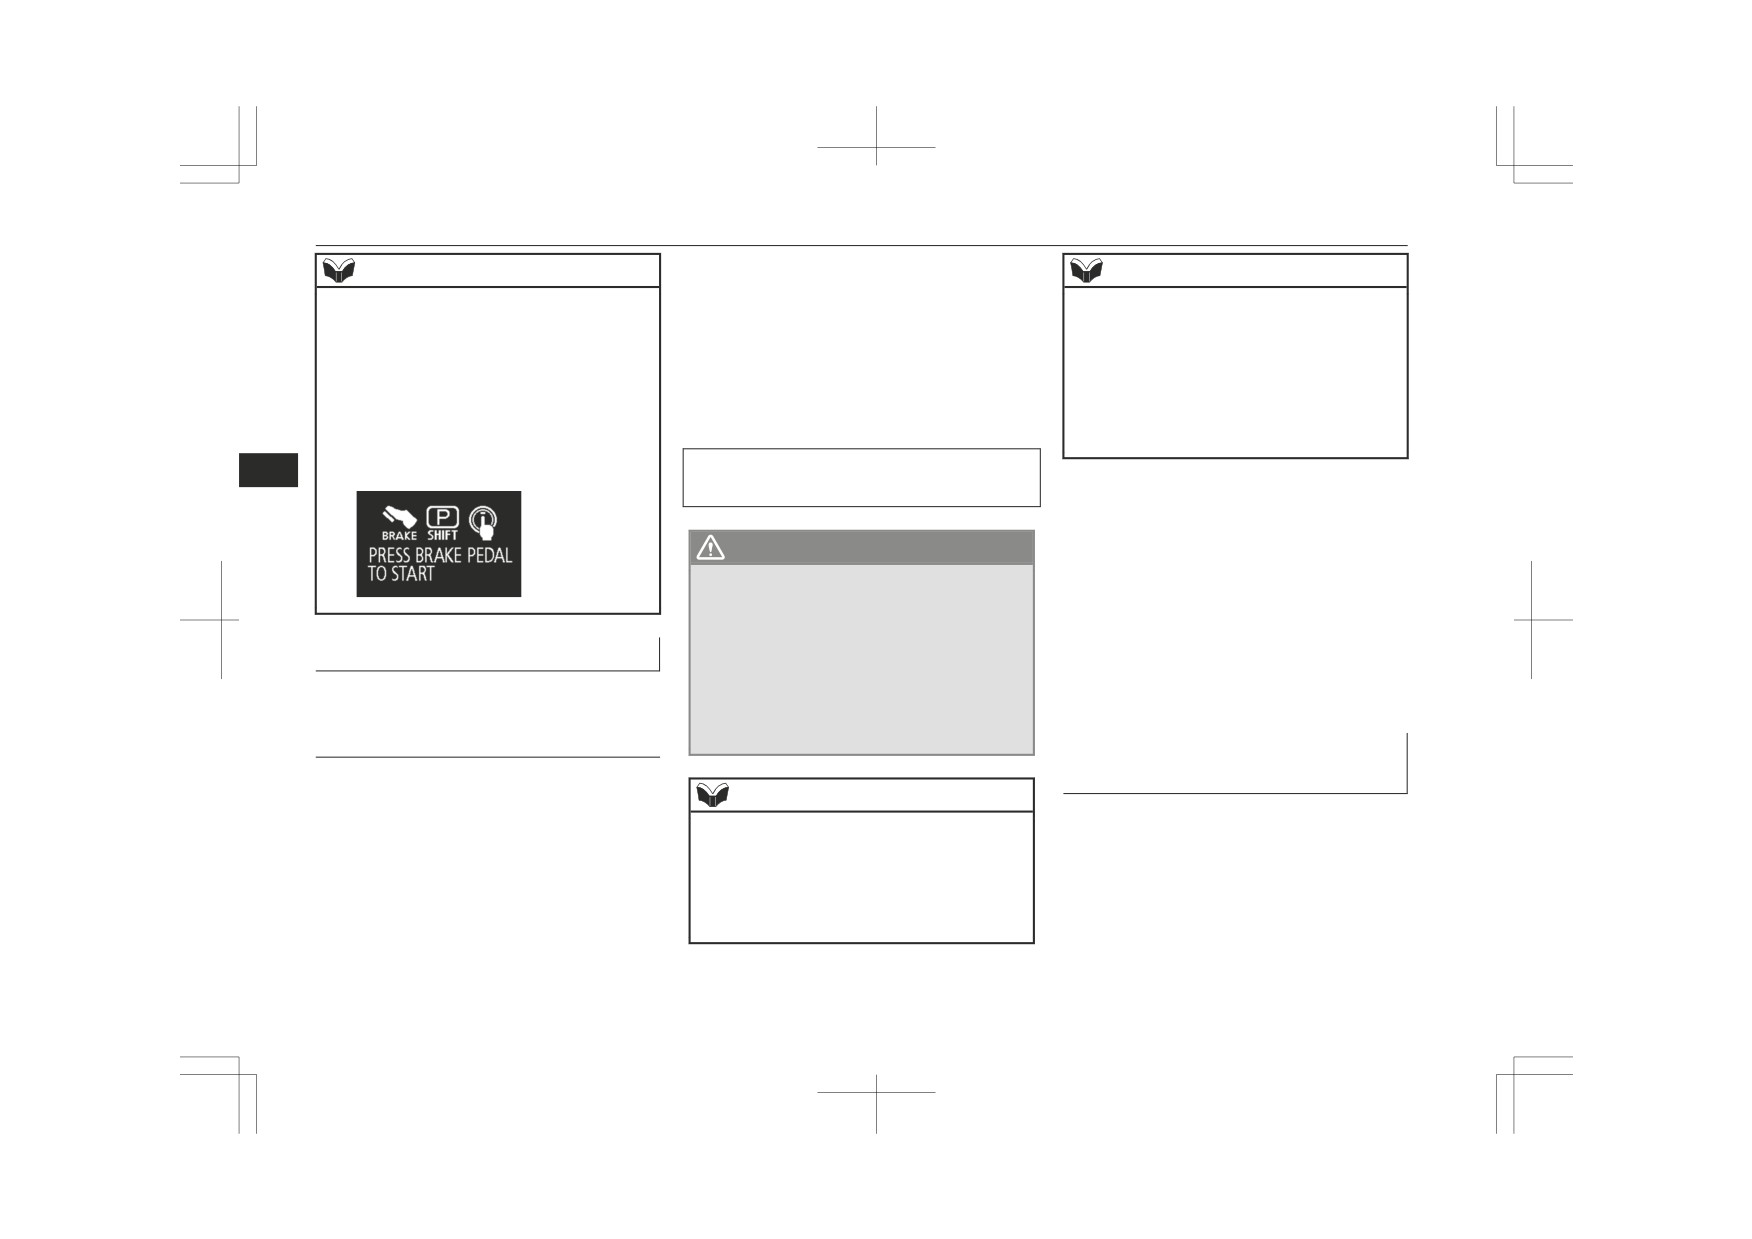
z
When starting the engine, you pressed the
(M/T) or the selector lever is put in the “P”
engine switch without depressing the clutch
pedal, warning display will appear. (M/T)
(PARK) position or “N” (NEUTRAL) posi-
tion (A/T), the idling speed may increase.
Warning display (colour liquid crystal dis-
It does not indicate a malfunction.
play)
For vehicles equipped with the keyless op-
eration system
1. Fasten the seat belt.
5. Press the engine switch.
2. Make sure the parking brake is applied.
The diesel preheat indication lamp will
3. Press and hold the brake pedal down
first illuminate, and then after a short
firmly with your right foot.
time go out, indicating that preheating is
completed. The engine will start.
Starting and driving
6-19
Starting and stopping the engine
3. For vehicles equipped with M/T, turn the
NOTE
NOTE
ignition switch to the “LOCK” position
z When starting the engine, if the selector lev-
z
Do not stop the engine with the selector lev-
to stop the engine, and then move the
er is in a position other than the “P” (PARK)
er in any position other than the “P” (PARK)
gearshift lever to the 1st (on a uphill) or
or the
“N” (NEUTRAL) position, or you
position (A/T). If the engine is stopped with
“R” (Reverse) (on a downhill) position.
pressed the engine switch without depress-
the selector lever in any position other than
ing the brake pedal, the warning display will
For vehicles equipped with A/T, place
the “P” (Park) position, the operation mode
appear. (A/T)
the selector lever in the “P” (PARK) po-
will go to ACC rather than OFF.
sition, and stop the engine.
Put the operation mode in OFF after placing
Warning display (colour liquid crystal dis-
the selector lever in the “P” (Park) position.
play)
For vehicles equipped with the keyless op-
6
eration system
1. Stop the vehicle.
2. Fully engage the parking brake while de-
pressing the brake pedal.
WARNING
3. On vehicles with M/T, press the engine
z
Do not operate the engine switch while
switch to stop the engine, move the gear-
driving except in an emergency. If the en-
shift lever to the 1st (on a uphill) or “R”
gine is stopped while driving, the brake
(Reverse) (on a downhill) position.
servomechanism will cease to function
Stopping the engine
On vehicles with A/T, move the selector
and braking efficiency will deteriorate.
Also, the power steering system will not
lever to the “P” (PARK) position, press
Except for vehicles equipped
function and it will require greater man-
the engine switch to stop the engine.
ual effort to operate the steering. This
with the keyless operation sys-
could result in a serious accident.
tem
Fuel injection amount learning
1. Bring the vehicle to a complete stop.
process
2. Fully engage the parking brake while de-
NOTE
To keep exhaust emissions and engine noise
pressing the brake pedal.
If you have to bring the engine to an emer-
low, the engine very occasionally performs a
z
gency stop while driving, press and hold the
learning process for the fuel injection
engine switch for
3 seconds or more, or
amount.
press it quickly 3 times or more. The engine
The engine sounds slightly different from
will stop and the operation mode will go to
usual while the learning process is taking
ACC.
place. The change in the engine sound does
not indicate a fault.
6-20
Starting and driving

Diesel particulate filter (DPF)
If the keyless operation key is
NOTE
Diesel particulate filter
not operating properly
z Do not insert into the key slot anything other
(DPF)
Insert the keyless operation key into the key
than the keyless operation key. This could
cause damage or a malfunction.
slot. Starting the engine and changing the op-
The diesel particulate filter (DPF) is a device
eration mode should now be possible.
z Remove the object or additional key from
that captures most of the particulate matter
the the keyless operation key before insert-
Remove the keyless operation key from the
(PM) in the exhaust emissions of the diesel
ing the key into the key slot. The vehicle
key slot after starting the engine or changing
engine. The DPF automatically burns away
may not be able to receive the registered ID
the operation mode.
code from the registered key. Therefore, the
trapped PM during vehicle operation. Under
engine may not start and the operation mode
certain driving conditions, however, the DPF
6
may not change.
is not able to burn away all of the trapped PM
Type 1
z The keyless operation key is fixed, if the key
and, as a result, an excessive amount of PM
is inserted in the key slot as illustrated.
accumulates inside it.
When pulling out the key, pull out in the
state.
WARNING
Keyless operation key remind-
z The DPF reaches very high temperatures.
Do not park your vehicle in areas where
er*
combustible materials such as dry grass
or leaves can come in contact with a hot
exhaust system since a fire could occur.
Type 2
CAUTION
z Do not use any type of fuel or engine oil that
is not specified for your vehicle. Also, do
If the operation mode is in OFF and the driv-
not use any moisture-removing agent or oth-
er’s door is opened with the keyless operation
er fuel additive. Such substances could have
key in the key slot, the outer buzzer sounds
a detrimental effect on the DPF.
for approximately 3 seconds, and the inner
Refer to “Fuel selection” on page 2-02 and
“Engine oil” on page 10-05.
buzzer sounds for approximately 1 minute,
and the warning display appears for approxi-
mately 1 minute to remind you to remove the
key.
Starting and driving
6-21
Diesel particulate filter (DPF)
NOTE
If the DPF warning indicator/
If the DPF warning lamp and
warning display appears dur-
check engine warning lamp or
z To minimize the likelihood of excessive ac-
cumulation of PM, try to avoid driving for
ing vehicle operation
the DPF warning display and
long periods at low speeds and repeatedly
check engine warning lamp il-
driving short distances, and try to keep high
Steady illumination of the DPF warning indi-
engine speed driving as much as possible.
luminate at the same time dur-
cator/warning display shows that the DPF has
z The engine sounds slightly different from
ing vehicle operation
not been able to burn away all of the trapped
usual while the DPF automatically burns
PM and that, as a result, an excessive amount
away trapped PM. The change in the engine
of PM has accumulated inside it. To enable
Warning lamp
sound does not indicate a fault.
6
the DPF to burn away the PM, try to drive the
vehicle as follows:
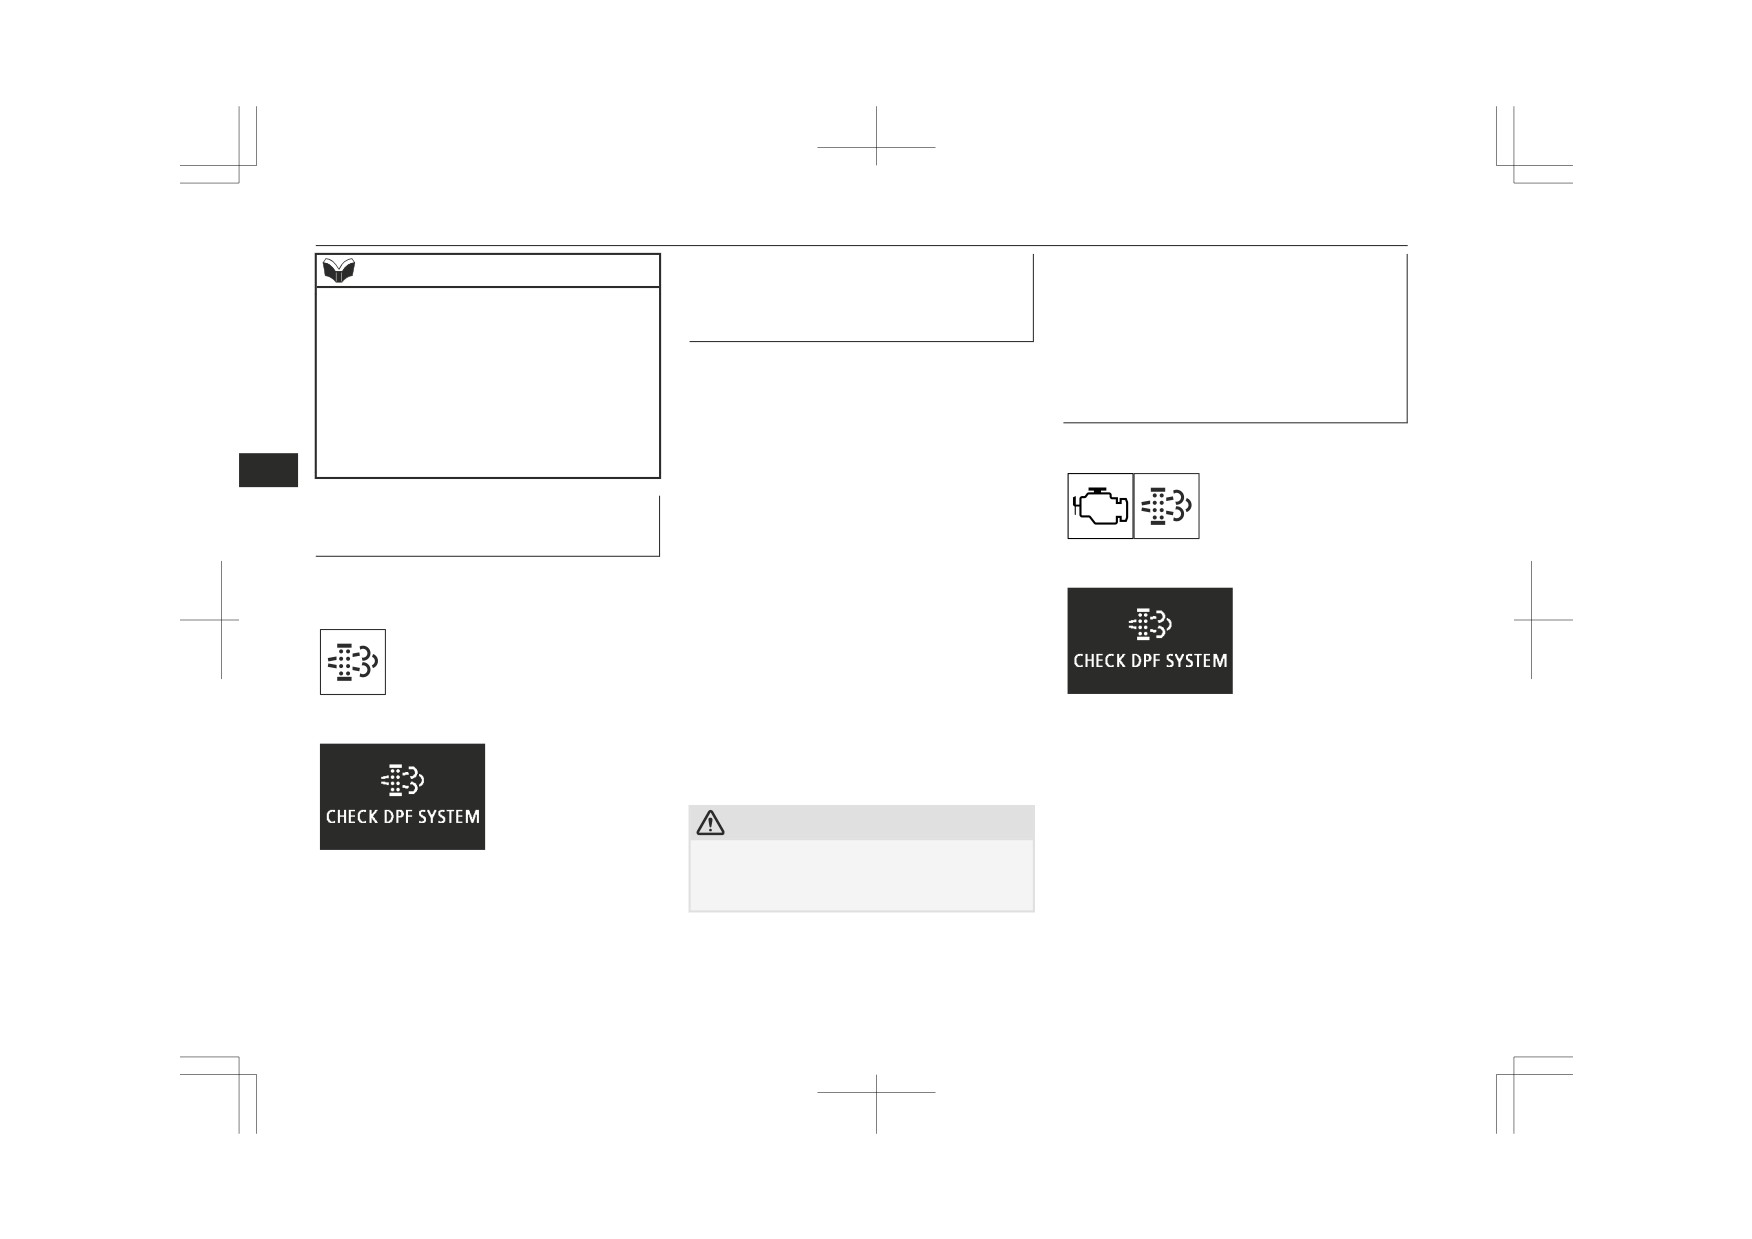
DPF warning lamp/warning
z With the bar graph of engine coolant
display
temperature display stabilized in roughly
the middle of the scale, drive for approx-
Warning display (colour liquid crystal display)
Warning lamp (mono-colour liquid crystal dis-
imately 20 minutes (4N15) or 30 mi-
play)
nutes
(4N14) at a speed of at least
40 km/h (25 mph).
If the DPF warning indicator/warning display
Warning display (colour liquid crystal display)
subsequently stays on, contact your
If an abnormal condition occurs in the DPF
MITSUBISHI MOTORS Authorized Service
system, the DPF warning lamp and check en-
Point.
gine warning lamp or the DPF warning dis-
play and check engine warning lamp illumi-
nate.
CAUTION
Have the system inspected by a
z
You do not have to continuously drive exact-
MITSUBISHI MOTORS Authorized Service
The DPF warning lamp comes on or warning
ly as indicated above. Always strive to drive
Point.
safely in accordance with road conditions.
display will appear in the event of an abnor-
mality in the DPF system.
6-22
Starting and driving

Urea SCR system (AdBlue™-related system)*
AdBlue™ level warning
The displayed driving range is an estimate. If
CAUTION
a warning display appears, replenish
z Continuing to drive with the DPF warning
AdBlue™ as soon as possible.
Warning lamp
display and check engine warning lamp illu-
Refer to “AdBlue™ replenishment” on page
minating could result in engine trouble and
10-11.
DPF damage.
CAUTION
Urea SCR system
Warning display
z When there is no AdBlue™ remaining and
(AdBlue™-related system)*
0 km (0 mile) is displayed for the driving
6
range, the engine cannot be restarted after it
AdBlue™: trademark of the Verband der Au-
is stopped.
tomobilindustrie e.V. (VDA).
The urea SCR system is a system that uses
AdBlue™ to reduce the emissions of nitrogen
oxide (NOx) in the exhaust gas of diesel en-
gines.
Because AdBlue™, like fuel, is consumed as
the vehicle is driven, it must be replenished
according to the distance travelled.
When the driving range is approximately
2,400 km (1,500 miles) or less, a warning
display will appear on the information screen
in the multi-information display. The warning
displays will appear according to the amount
of AdBlue™ remaining.
At the same time, the warning lamp in the
meter will come on or flash.
Starting and driving
6-23

Turbocharger operation*
Urea SCR system warning
CAUTION
Turbocharger
z If the urea SCR system warning lamp comes
The turbocharger increases engine power by
Warning lamp
on and the warning display appears, the ve-
pushing large amounts of air into the engine’s
hicle can travel approximately
600 km
cylinders. The finned parts inside the turbo-
(400 miles) before the engine cannot be re-
started after it is stopped.
charger turn at extremely high speeds and are
subjected to extremely high temperatures.
They are lubricated and cooled by engine oil.
Warning display
NOTE
If the engine oil is not replaced at the speci-
6
z If there is a malfunction in the system, the
fied intervals, the bearings may seize or emit
check engine warning lamp may come on at
abnormal noise.
the same time.
Turbocharger operation*
CAUTION
z Do not run the engine at high speeds (for ex-
ample, by revving it or by accelerating rap-
1- Air compressor
If there is a malfunction in the system, a
idly) immediately after starting it.
2- Compressed air
warning display will appear on the informa-
z Do not stop the engine immediately after
3- Cylinder
high-speed or uphill driving. First allow the
tion screen in the multi-information display
engine to idle to give the turbocharger a
4- Turbo fin
according to the situation. At the same time,
chance to cool down.
5- Turbine
the warning lamp in the meter will flash.
6- Exhaust gas
If a warning display appears, have your vehi-
cle inspected by a MITSUBISHI MOTORS
Authorized Service Point as soon as possible.
6-24
Starting and driving
Auto Stop & Go (AS&G) system*
Auto Stop & Go (AS&G)
Automatically stopping the en-
2. While depressing the brake pedal, fully
depress the clutch pedal and place the
gine
system*
gearshift lever in the “N” (Neutral) posi-
The AS&G system is automatically activated
tion.
The Auto Stop & Go (AS&G) system auto-
when the ignition switch is turned to the
matically stops and restarts the engine with-
“ON” position or the operation mode is put in
out operating the ignition switch or engine
ON.
switch when the vehicle is stopped, such as at
You can deactivate the system by pressing the
a traffic light or in a traffic jam, to reduce ex-
“AS&G OFF” switch.
haust gases, increase fuel efficiency.
Refer to “To deactivate” on page 6-28.
6
When the AS&G system will operate, the
indicator display will turn on to inform
CAUTION
the driver.
z If the vehicle will be stopped for a long time
or if you will leave the vehicle unattended,
Indicator display
stop the engine.
3. Release the clutch pedal. The engine will
NOTE
stop automatically.
z The accumulated time the engine has been
stopped by the AS&G system is displayed in
[For vehicles with M/T]
the multi information display. Refer to “Au-
1. Stop the vehicle.
to Stop & Go monitor” on page 6-29.
z If the AS&G system does not operate or it
operates less frequently, the battery capacity
may have decreased. Have your vehicle in-
spected by a MITSUBISHI MOTORS Au-
thorized Service Point.
[For vehicles with A/T]
1. Stop the vehicle.
Starting and driving
6-25