Mitsubishi Lancer. Manual - part 244


  Index      Mitsubishi     Mitsubishi Lancer - service repair manual 2006 year


Search            


Content   ..  242  243  244  245   ..


Mitsubishi Lancer. Manual - part 244


REAR WIPER AND WASHER <Wagon>

EXTERIOR

51-38

2. Disconnect the battery cable from the rear 

windshield wiper motor while it is turning and then 
check to see that the motor stops.

3. Re-connect the battery as shown in Figure (B).
4. Check to see that the rear windshield wiper motor 

runs and then stops at the automatic stop 
position.

REAR WASHER MOTOR CHECK

1

2

AC005900

1. Remove the rear washer tank assembly with the 

washer hose attached. Then fill the washer tank 
with water.

2. Check to see that the water is vigorously sprayed 

when connecting the positive battery terminal to 
terminal number 2 and terminal number 1 to the 
negative battery terminal.

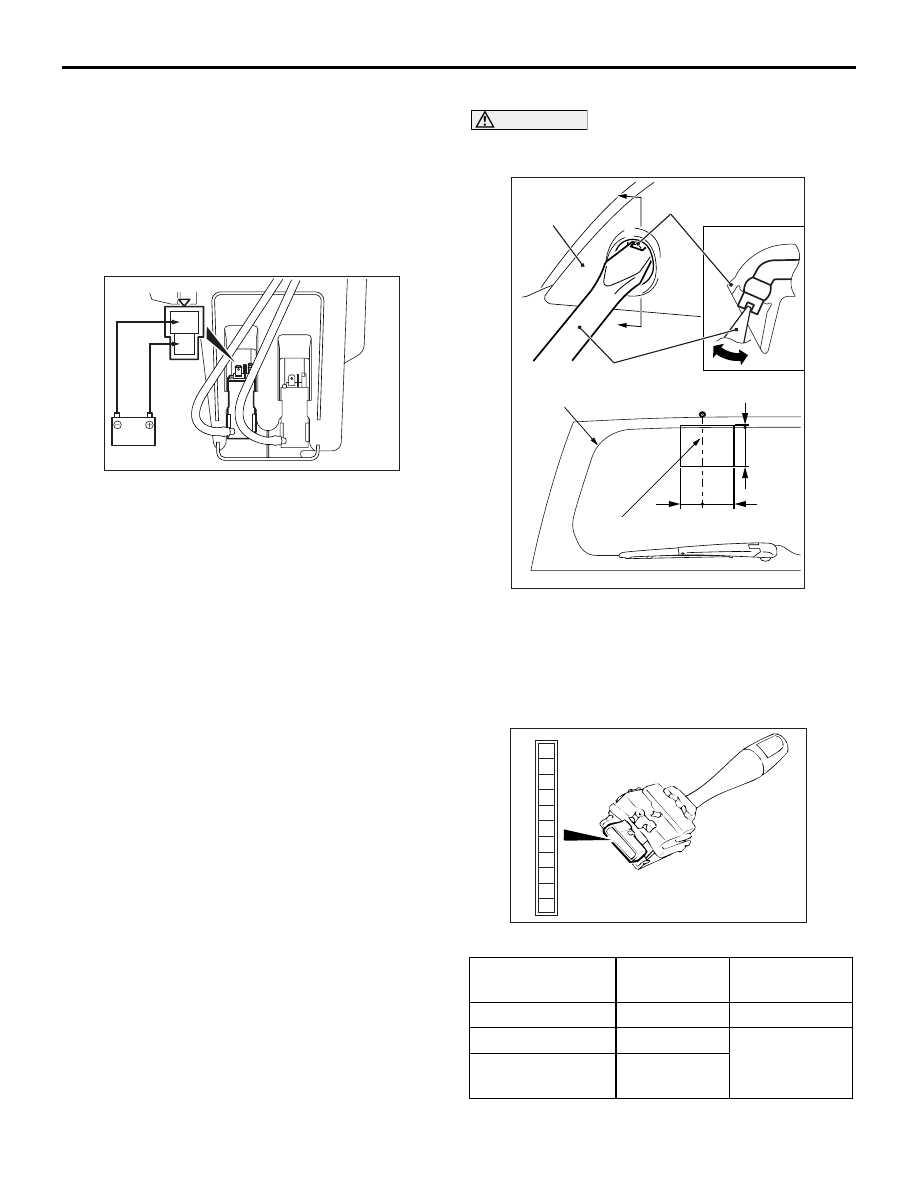
REAR WASHER FLUID EJECTION CHECK

CAUTION

Take care not to damage the nozzle when insert-
ing the flat-tipped screwdriver into it.

AC304544AC

Unit: mm

57 84

125

6

Section A – A

A

A

High-mounted 
stop lamp

Rear washer nozzle

Flat-tipped screwdriver

Ceramic line terminal

Washer nozzle 
perpendicular

For the vertical aiming of washer nozzle, insert the 
flat-tipped screwdriver into the nozzle and move it to 
the arrow direction.

REAR WIPER AND WASHER SWITCH 
CHECK

1

6

8

11

10

9

7

5

4

3

2

AC000417

Check continuity between the switch terminals.

Switch position

Tester 
connection

Specified 
condition

OFF

− 6, 5 − 6

Open circuit

Rear wiper switch 4 

− 6

Less than 2 
ohms

Rear washer 
switch

− 6

HEADLAMP WASHER <LH drive vehicles>

EXTERIOR

51-39

HEADLAMP WASHER <LH drive vehicles>

TROUBLESHOOTING

M1511000700356

The headlamp washer is controlled by the Smart Wir-
ing System (SWS). For troubleshooting, refer to 
GROUP 54B, Troubleshooting 

P.54B-15

 or GROUP 

54C, Troubleshootin

P.54C-4

.

HEADLAMP WASHER

REMOVAL AND INSTALLATION

M1511009700063

AC304608

AB

10

N

2

4

5

6

8

7

1

9

11

9

1

10

N

4.9 ± 0.7 N·m

4.9 ± 0.7 N·m

3

Removal steps 

Washer fluid draining

1.

Headlamp washer hose connection

2.

Under cover side panel (RH)

3.

Splash shield mounting clip (RH)

4.

Headlamp washer motor 
connection

5.

Headlamp washer joint

6.

Headlamp washer hose

7.

Headlamp washer motor

Removal steps (Continued)

HEADLAMP WASHER <LH drive vehicles>

EXTERIOR

51-40

INSPECTION

M1511009800082

HEADLAMP WASHER MOTOR CHECK

AC304136 AB

1 2

1. Remove the headlamp washer motor connector.
2. Check to see that the water is vigorously sprayed 

when connecting the positive battery terminal to 
terminal number 1 and terminal number 2 to the 
negative battery terminal.

8.

Headlamp washer gasket

Front bumper (Refer to 

P.51-3

).

9.

Headlamp washer actuator 
assembly

10. O-ring
11. Headlamp washer hose assembly

Removal steps (Continued)

MARK

EXTERIOR

51-41

MARK

REMOVAL AND INSTALLATION

M1511011801435

AC504923

1

1

2

2

3

AC

<Sedan>

<Wagon>

3

Removal 

>>A<<

1. Front three-diamond mark (Refer to 

P.51-4

)

>>

A

<< 2. Rear three-diamond mark

>>

A

<< 3. Lancer mark

INSTALLATION SERVICE POINT
>>A<< MARK APPLICATION

1. Installation position 

Attach each mark to the position shown in the 
illustration.


Content   ..  242  243  244  245   ..