Mitsubishi Evolution X. Manual - part 509


  Index      Mitsubishi     Mitsubishi Evolution X - service repair manual 2008 year


Search            


Content   ..  507  508  509  510   ..


Mitsubishi Evolution X. Manual - part 509


DOOR

TSB Revision

BODY

42A-139

REMOVAL SERVICE POINTS

.

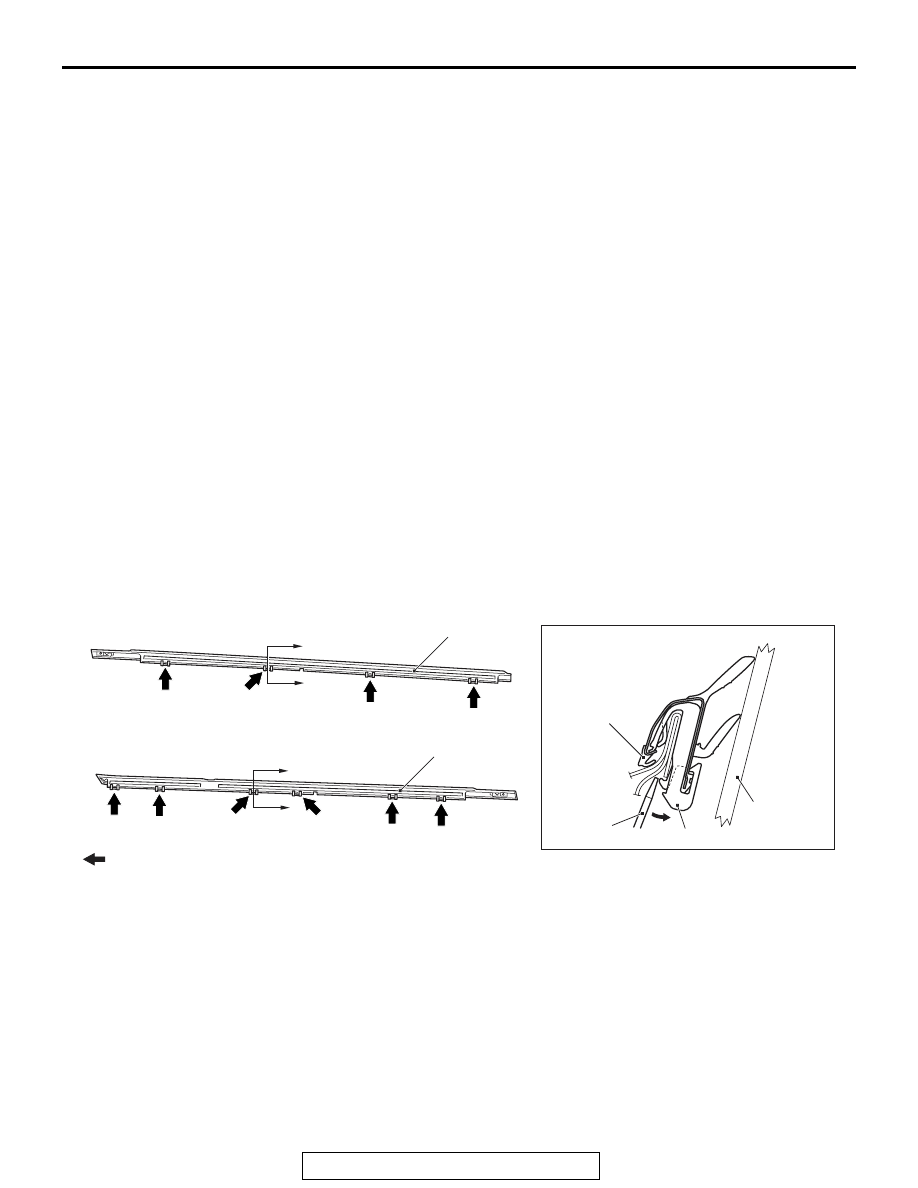
<<A>> DOOR BELTLINE MOLDING REMOVAL

Pry the door beltline molding clip positions with the flat-tipped 
screwdriver and remove the door beltline molding.

.

4.

Door speaker cover <Vehicles with 
rockford fosgate premium sound 
system>

<<

A

>>

5.

Door beltline molding
Door speaker bracket removal 
steps <Vehicles with rockford 
fosgate premium sound 
system> 

Door trim assembly (Refer to 
GROUP 52A, Door Trim 

P.52A-15

.)

>>

B

<<

4.

Waterproof film

6.

Door speaker bracket
Door opening weatherstrip inner 
removal steps 

Rear scuff plate (Refer to GROUP 
52A, Trim 

P.52A-11

.)

7.

Door opening weatherstrip inner
Door opening weatherstrip outer 
removal 

8.

Door check connecting bolt (Refer 
to 

P.42A-121

.)

<<

B

>>

>>

A

<<

9.

Door opening weatherstrip outer

Door beltline molding removal 
steps <MR> (Continued)

AC706920

AC710642

AC707403

AC706921

AC706919

Clip

Flat-tipped 
screwdriver

Door window 
glass assembly

Door beltline molding

Door beltline 
molding

Section A – A

NOTE
         : Clip positions

<Front door>

<Rear door>

A

A

A

A

AB

Door beltline molding

DOOR

TSB Revision

BODY

42A-140

<<B>> DOOR OPENING WEATHERSTRIP OUTER 
REMOVAL

Make the tool as shown in the figure, and remove the weather-
strip from the door panel.

INSTALLATION SERVICE POINTS

.

>>A<< DOOR OPENING WEATHERSTRIP OUTER 
INSTALLATION

The clip color identifies the left and right weatherstrips so be 
sure to see the colors so as to install correctly.

.

>>B<< WATERPROOF FILM INSTALLATION

CAUTION

When a waterproof film is applied, guide the butyl rubber 
tape under the inner panel drain hole.
Apply the specified adhesive to the waterproof film as shown in 
the figure and stick the film.

Butyl rubber tape: 3M

 AAD Part number 8633 or 

equivalent

.

>>C<< DOOR WINDOW GLASS RUNCHANNEL 
INSTALLATION

Apply soapy water to the tip of the door window glass runchan-
nel, and then install it to the door.

ACX00555

15 mm (0.6 in)

8 mm 
(0.3 in)

4 mm (0.2 in)

Thickness:
1 mm (0.04 in)

Fabricated tool

AD

Applicable side

Identification color

Left door

Yellow

Right door

Purple

AC706339

AC608530

AC

<Front door>

Waterproof film

Inner panel water drain hole 

Inner panel water drain hole 

<Rear door>

Waterproof film

DOOR

TSB Revision

BODY

42A-141

PROTECTOR FILM

REMOVAL AND INSTALLATION

M1421007800206

AC705564AC

1

N

Removal 

>>

A

<<

1.

Protector film

DOOR

TSB Revision

BODY

42A-142

INSTALLATION SERVICE POINT

.

>>A<< PROTECTOR FILM INSTALLATION

 Installation point

CAUTION

• The ambient temperature should be 20 to 38° C (68  

100

° F). Ensure that the working area is clean.

• If ambient temperature is less than 20° C (60° F), heat 

the protector film and application surface to a tempera-
ture of 20 to 30

° C (68  86° F).

• Be careful that air bubbles are not formed under the 

protector film.

Installation procedure
1. Use 3M

™ AAD Part number 8906 or equivalent to clean the 

protector film installation surfaces on the body.

AC705565AB

3.0 mm (0.12 in)

A

B

B

A

Application film

Application film

Application film

Section A – A

Section B – B

Protector film

Rear door

Rear door

Rear door 
end line

Rear door 
end line

Protector film

Install the protector film at the 
position 3.0 mm (0.12 in) away 
from the rear door end line.

Side panel 
outer press line

Align application film 
with the side panel 
outer press line.


Content   ..  507  508  509  510   ..