Mitsubishi Lancer Evolution VI. Manual - part 16


  Index      Mitsubishi     Mitsubishi Lancer Evolution VI - service repair manual


Search            


Content   ..  14  15  16  17   ..


Mitsubishi Lancer Evolution VI. Manual - part 16


ENGINE  – 

Rocker Arms and Camshaft

11-39

"

D

A

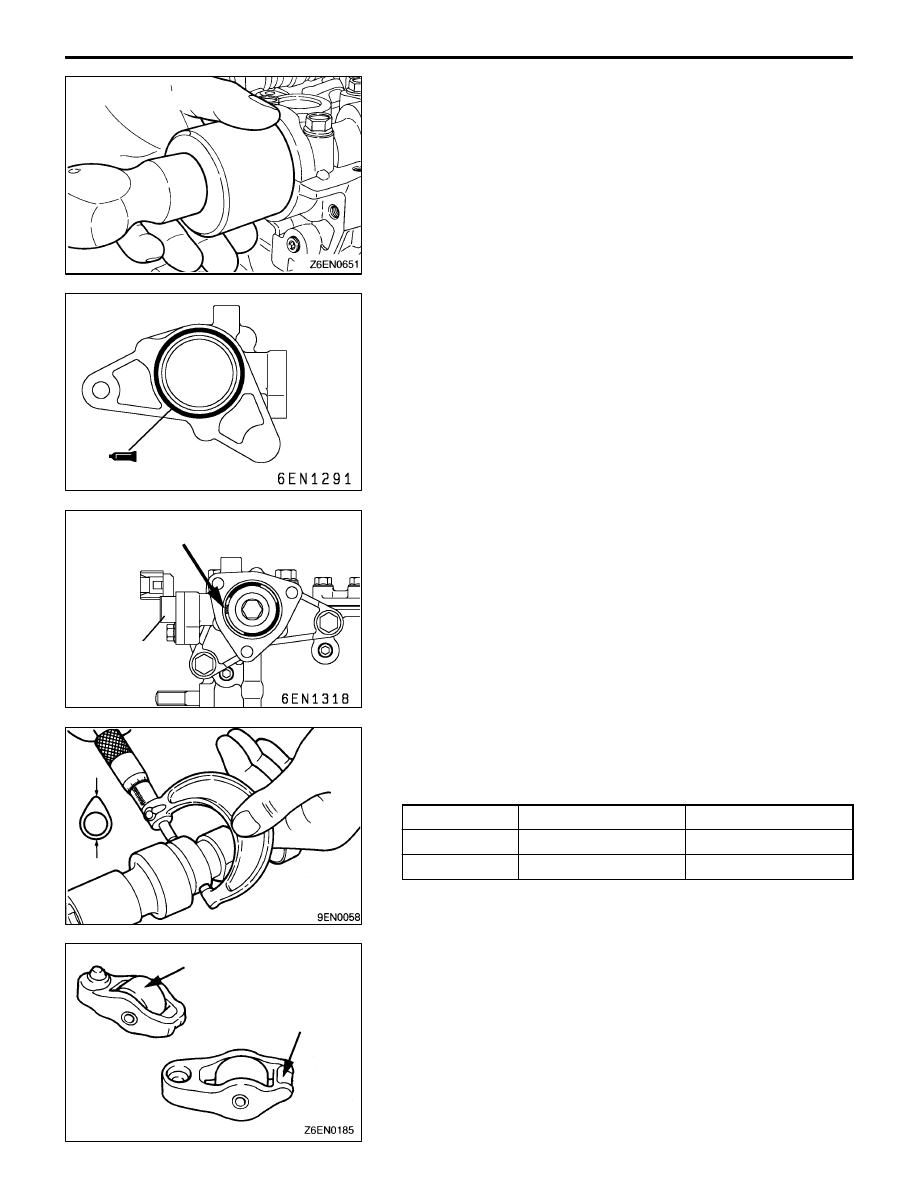
CAMSHAFT OIL SEAL INSTALLATION

(1) Apply engine oil to lib area of the oil seal and the front

end outside diameter of the camshaft.

(2) Using special tool install the camshaft oil seals.

"

E

A

CAMSHAFT POSITION SENSOR SUPPORT
INSTALLATION

Apply 3 mm diameter of form-in-place gasket (FIPG) to the
location shown in the illustration.

Specified sealant:

Mitsubishi Genuine Part No. MD970389 or equivalent

"

F

A

CAMSHAFT POSITION SENSING CYLINDER
INSTALLATION

(1) Set the No. 1 cylinder to the compression top dead center

position (so that dowel pin of the exhaust camshaft is
at the top).

(2) Install the camshaft position sensing cylinder so that the

white paint mark is facing in the direction shown in the
illustration.

INSPECTION

CAMSHAFT

Measure the cam height.

Item

Standard value mm

Limit mm

Intake

35.79

35.29

Exhaust

35.49

34.99

ROCKER ARM

(1) Check the roller surface. If any dents, damage or seizure

is evident, replace the rocker arm.

(2) Check rotation of the roller. If it does not rotate smoothly

or if looseness is evident, replace the rocker arm.

(3) Check the inside diameter. If damage or seizure is evident,

replace the rocker arm.

MD998713

Camshaft
position
sensor

Paint mark

Roller

Tip

ENGINE  – 

Rocker Arms and Camshaft

11-40

LASH ADJUSTER

Caution
(1) The lash adjusters are precision-engineered

mechanisms. Do not allow them to become
contaminated by dirt or other foreign substances.

(2) Do not attempt to disassemble the lash adjusters.
(3) Use only fresh diesel fuel to clean the lash adjusters.

(1) Prepare three containers and approximately five liters

of diesel fuel. Into each container, pour enough diesel
fuel to completely cover a lash adjuster when it is standing
upright. Then, perform the following steps with each lash
adjuster.

(2) Place the lash adjuster in container A and clean its outside

surface.

NOTE
Use a nylon brush if deposits are hard to remove.

(3) While gently pushing down the internal steel ball using

wire (0.5 mm in diameter) or special tool MD998442,
move the plunger through 5 to 10 strokes until it slides
smoothly. In addition to eliminating stiffness in the plunger,
this operation will remove dirty oil.

Caution
The steel ball spring is extremely weak, so the lash
adjuster’s functionality may be lost if the air bleed
wire is pushed in hard.

NOTE
If the plunger remains stiff or the mechanism appears
otherwise abnormal, replace the lash adjuster.

Outside
cleaning

Inside
cleaning

Filling with
diesel fuel

A

B

C

Diesel
fuel

MD998442

Diesel fuel

ENGINE  – 

Rocker Arms and Camshaft

11-41

(4) Removal the lash adjuster from the container. Then, push

down the steel ball gently and push the plunger to eliminate
diesel fuel from the pressure chamber.

Caution
Make sure the oil hole in the side of the body is pointing
toward container A. Do not point the oil hole at yourself
or other people.

(5) Place the lash adjuster in container B. Then, gently push

down the internal steel ball using wire (0.5 mm in diameter)
or special tool MD998442 and move the plunger through
5 to 10 strokes until it slides smoothly. This operation
will clean the lash adjuster’s pressure chamber.

Caution
The steel ball spring is extremely weak, so the lash
adjuster’s functionality may be lost if the air bleed
wire is pushed in hard.

(6) Remove the lash adjuster from the container. Then, push

down the steel ball gently and push the plunger to eliminate
diesel fuel from the pressure chamber.

Caution
Make sure the oil hole in the side of the body is pointing
toward container A. Do not point the oil hole at yourself
or other people.

(7) Place the lash adjuster in container C. Then, gently push

down the internal steel ball using wire (0.5 mm in diameter)
or special tool MD998442.

Caution
Do not use container C for cleaning. If cleaning is
performed in container C, foreign matter could enter
the pressure chamber when chamber is filled with
diesel fuel.

(8) Stand the lash adjuster with its plunger at the top, then

push the plunger downward firmly until it moves through
its greatest possible stroke. Return the plunger slowly,
then release the steel ball and allow the pressure chamber
to fill with diesel fuel.

MD998442

Diesel fuel

MD998442

Diesel fuel

MD998442

Diesel fuel

MD998442

Diesel fuel

MD998442

Diesel fuel

ENGINE  – 

Rocker Arms and Camshaft

11-42

(9) Remove the lash adjuster from the container, then stand

the lash adjuster with its plunger at the top. Push the
plunger firmly and check that it does not move. Also,
check that the lash adjuster’s height matches that of a
new lash adjuster.

NOTE
If lash adjuster contracts, perform the operations (7)
through (9) again to fill it with diesel fuel completely.
Replace the lash adjuster if it still contracts after performing
these steps.

(10)Stand the lash adjuster upright to prevent diesel fuel from

spilling out. Do not allow the lash adjuster to become
contaminated by dirt or other foreign matter. Fit the lash
adjuster onto the engine as soon as possible.


Content   ..  14  15  16  17   ..