Mitsubishi Colt Ralliart. Manual - part 594


  Index      Mitsubishi     Mitsubishi Colt Ralliart - service repair manual


Search            


Content   ..  592  593  594  595   ..


Mitsubishi Colt Ralliart. Manual - part 594


REAR WIPER AND WASHER

EXTERIOR

51-38

INSTALLATION SERVICE POINTS
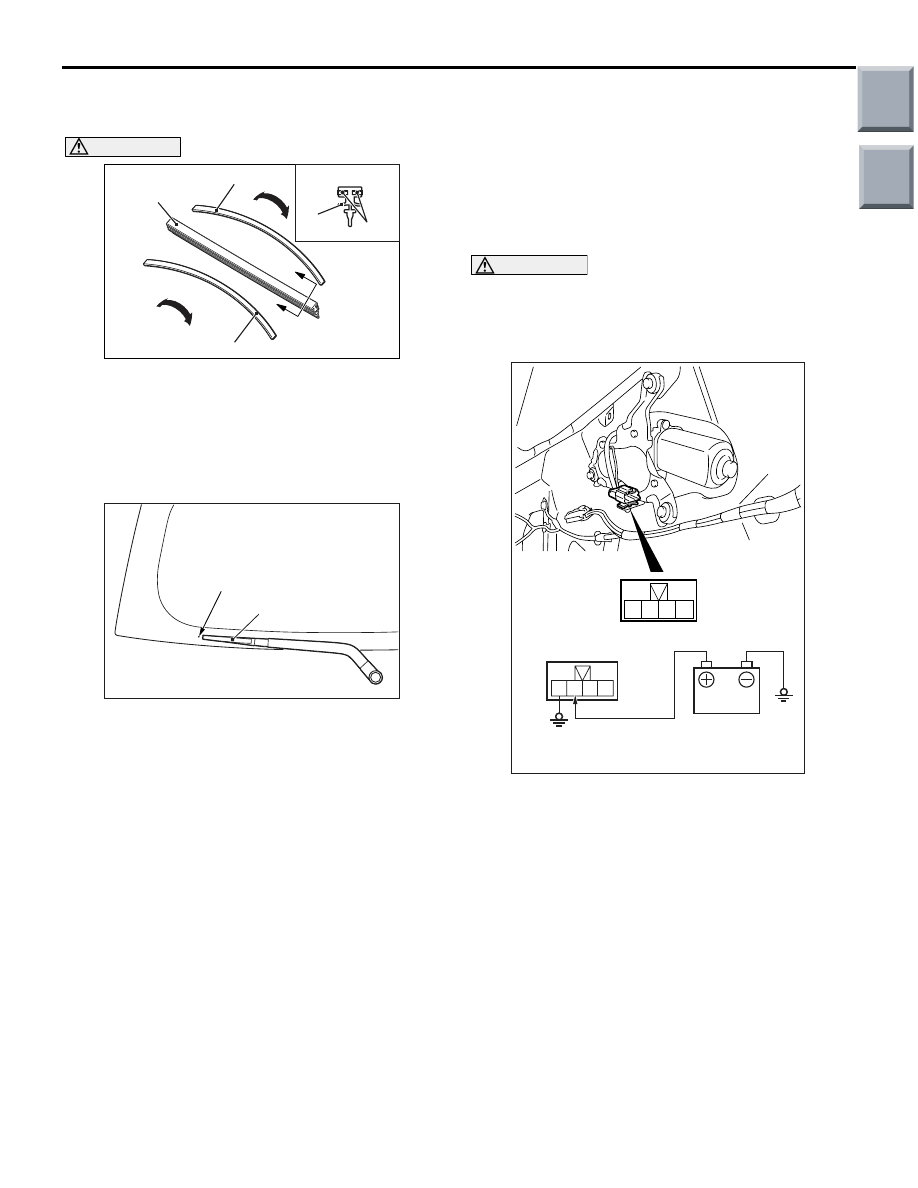
>>A<< WIPER BLADE INSTALLATION

AC101090

AE

A

A

Wiper blade

Backing

Backing

Section A – A

Wiper
blade

Backing

CAUTION

Ensure that the backings are bent in the shown 
direction, and then install the backings to the 
wiper blade.

>>B<< REAR WIPER ARM AND BLADE 
ASSEMBLY

AC207142AB

Wiper blade

Mating mark

Install the wiper arm and blade assembly so that the 
blade end stops at the mating mark.

INSPECTION

M1511019101504

REAR WIPER MOTOR CHECK

Inspect the rear wiper motor by removing the har-
ness connector with the motor attached to the vehi-
cle.

OPERATION CHECK OF THE REAR 
WIPER MOTOR

CAUTION

Before operating the rear wiper motor, apply 
water to the tailgate glass to avoid damage to the 
tailgate glass surface or the wiper blade due to 
dry wiping.

AC208436

1 2 3 4

1 2 3 4

Check the motor operation by connecting the battery 
to the rear wiper motor as shown.

Main

Index

Group

TOC

REAR WIPER AND WASHER

EXTERIOR

51-39

CHECK OF STOP POSITION OF THE 
REAR WIPER MOTOR

CAUTION

Before operating the rear wiper motor, apply 
water to the tailgate glass to avoid damage to the 
tailgate glass surface or the wiper blade due to 
dry wiping.

AC208436

1 2 3 4

1 2 3 4

1. Connect the battery to the rear wiper motor as 

shown.

2. Disconnect the battery cable from the rear 

windshield wiper motor while it is turning and then 
check to see that the motor stops.

AC208441

1 2 3 4

1 2 3 4

3. Re-connect the battery as shown.
4. Check to see that the rear windshield wiper motor 

runs and then stops at the automatic stop 
position.

REAR WASHER FLUID EJECTION CHECK

AC510261AB

Unit: mm

40

80

25

15

83

5

Ceramic line

Rear washer nozzle

Rear washer nozzle perpendicular

Move the nozzle to adjust the position so that the 
spray is in the area shown in the illustration.

Main

Index

Group

TOC

MARK

EXTERIOR

51-40

MARK

REMOVAL AND INSTALLATION 

M1511011801833

AC600667AB

1

4

5

N

N

2

6

3

1.

Front three-diamond mark (Refer to 

P.51-2

)

2.

RALLIART icon mark <RALLIART> 
(Refer to 

P.51-2

)

>>A<<

3.

Front step plate <RALLIART>

>>A<<

4.

Rear three-diamond mark

>>A<<

5.

COLT mark

>>A<<

6.

RALLIART mark <RALLIART>

INSTALLATION SERVICE POINT
>>A<<MARK APPLICATION

1. Installation position 

Attach each mark to the position shown in the 
illustration.

AC403306

A

A

285 mm

20 mm

AH

Scuff plate

Front step plate

Section A - A

Front seat attaching 
nut

3. Front step plate <RALLIART>

Main

Index

Group

TOC

AC403267

106 mm

AB

Centre line of vehicle

Tailgate outer panel press line

Rear three-diamond mark

4. Rear three-diamond mark

AC206522

9 mm

36 mm

AF

Tailgate outer panel end

Tailgate outer panel press line

Combination lamp end

5. COLT mark

AC403269AC

12 mm

50 mm

RALLIART mark

Tailgate outer panel end

Tailgate outer panel press line

6. RALLIART mark <RALLIART>

MARK

EXTERIOR

51-41

2. Installation procedure

(1) Use 3M ATD part number 8906 or equivalent 

to clean the mark installation surfaces on the 
body.

CAUTION

When attaching the marks, the ambient tempera-
ture should be 20 

 38°C and the air should be 

completely free of dust. If the ambient tempera-
ture is lower than 20

°C, the marks and the places 

on the vehicle body where the marks are to be 
attached should be heated to 20 

 30°C.

(2) Peel off the protection sheet on the back of the 

marks to paste it on the installation position.

Main

Index

Group

TOC


Content   ..  592  593  594  595   ..