Mitsubishi Grandis. Manual - part 824


  Index      Mitsubishi     Mitsubishi Grandis - service repair manual


Search            


Content   ..  822  823  824  825   ..


Mitsubishi Grandis. Manual - part 824


REAR WIPER AND WASHER

EXTERIOR

51-31

INSTALLATION SERVICE POINTS
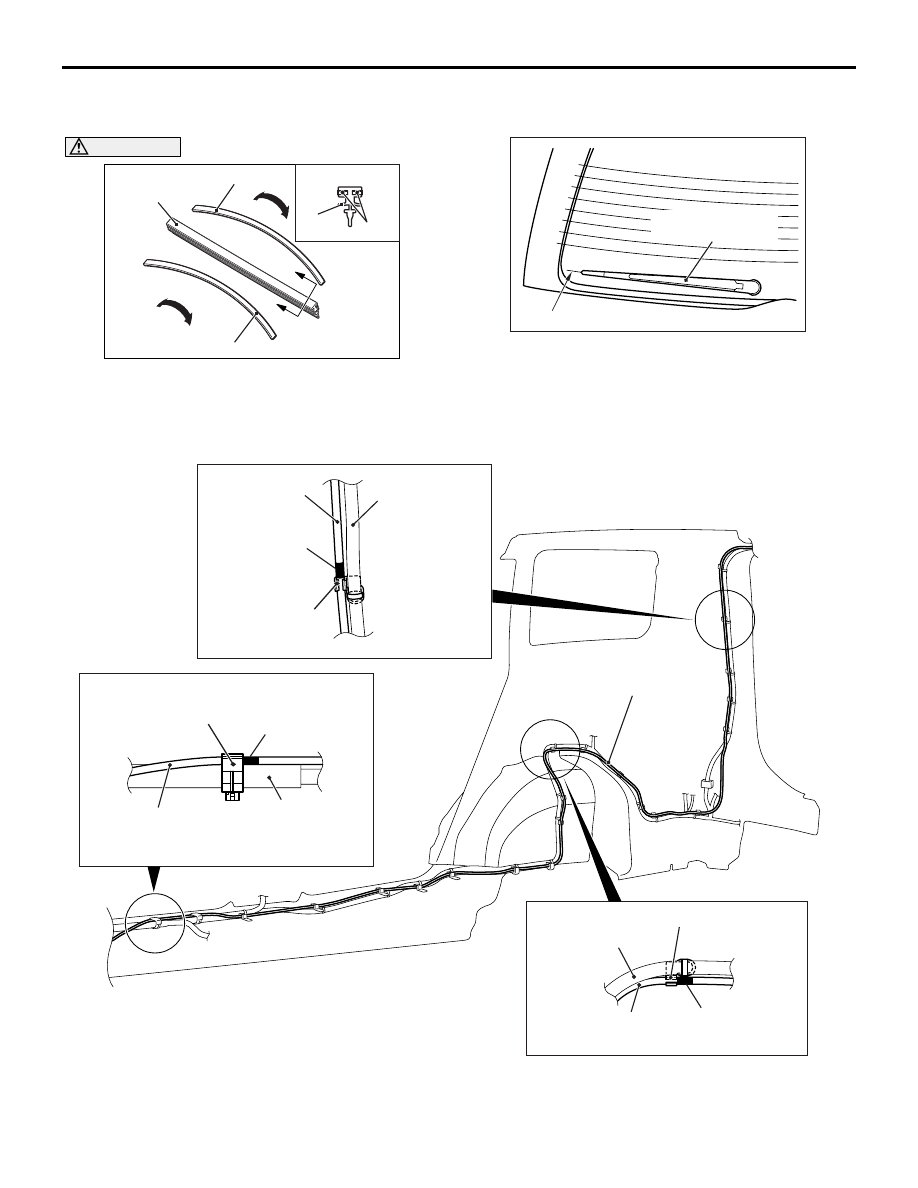
>>A<< WIPER BLADE INSTALLATION

CAUTION

Use a curved backing like that shown for the 
backing of a wiper blade to ensure sustained 
wiper wiping performance.

>>B<< REAR WIPER ARM AND BLADE 
ASSEMBLY

Install the rear wiper arm/blade assembly so that its 
tip is positioned at the rear window defogger heater 
element of the tailgate as shown.

>>C<< Rear washer hose routing

Route the rear washer hose so that its markings are 
aligned with the clips as shown.

AC101090

AE

A

A

Wiper blade

Backing

Backing

Section A – A

Wiper
blade

Backing

AC302129AB

Rear wiper arm and 
blade assembly

Defogger pattern

AC303544

AC303220

AC303218

AC303219

AB

Rear washer hose

Clip

Harness

Rear washer hose

Marking (Yellow)

Clip

Harness

Rear washer hose

Marking (Yellow)

Clip

Harness

Rear washer hose

Marking (Yellow)

REAR WIPER AND WASHER

EXTERIOR

51-32

INSPECTION

M1511019100512

REAR WIPER MOTOR CHECK

Inspect the rear wiper motor by removing the 
harness connector with the motor attached to the 
vehicle.

Operation check of the rear wiper motor

CAUTION

Before operating the rear wiper motor, apply 
water to the tailgate glass to avoid damage to the 
tailgate glass surface or the wiper blade due to 
dry wiping.

Check the motor operation by connecting the battery 
to the rear wiper motor as shown.

Check of stop position of the rear wiper 
motor

CAUTION

Before operating the rear wiper motor, apply 
water to the tailgate glass to avoid damage to the 
tailgate glass surface or the wiper blade due to 
dry wiping.

1. Connect the battery to the rear wiper motor as 

shown.

2. Disconnect the battery cable from the rear 

windshield wiper motor while it is turning and then 
check to see that the motor stops.

1

3

2

4

AC302656

1

3

2

4

1

3

2

4

AC302656

1

3

2

4

REAR WIPER AND WASHER

EXTERIOR

51-33

3. Re-connect the battery as shown.

4. Check to see that the rear windshield wiper motor 

runs and then stops at the automatic stop 
position.

REAR WASHER FLUID EJECTION CHECK

Move the nozzle to adjust the position so that the 
spray is in the area shown in the illustration.

1

3

2

4

AC302657

1

3

2

4

AC302130

AB

82

100

12

50

Ceramic line terminal

Rear washer nozzle

perpendicular

Rear wiper attaching hole

perpendicular

Unit: mm

Rear washer nozzle

HEADLAMP WASHER

EXTERIOR

51-34

HEADLAMP WASHER

TROUBLESHOOTING

M1511000700516

The headlamp washer is controlled by the Smart 
Wiring System (SWS). For troubleshooting, refer to 
GROUP 54B, Troubleshooting 

P.54B-74

 or GROUP 

54C, Troubleshootin

P.54C-44

.

HEADLAMP WASHER

REMOVAL AND INSTALLATION

M1511009700074

REMOVAL SERVICE POINT
<<A>> WASHER FLUID DRAINING

When draining the washer fluid, remove the two 
screws securing the splash shield to the front 
bumper and the front air dam in order to provide 
sufficient clearance. Refer to 

P.51-3

.

AC310931

4

3

2

1

7

6

5

6

8

N

N

7

5

AB

Removal steps

Under cover side panel (RH)

<<A>>

Washer fluid draining

1.

Headlamp washer hose connection

2.

Headlamp washer motor connector

3.

Headlamp washer motor

4.

Headlamp washer motor packing

Front bumper (Refer to 

P.51-3

.)

5.

Headlamp washer cove assembly

6.

O-ring

7.

Headlamp washer pop-up unit 
assembly

8.

Headlamp washer hose assembly


Content   ..  822  823  824  825   ..