Mitsubishi Grandis. Manual - part 676


  Index      Mitsubishi     Mitsubishi Grandis - service repair manual


Search            


Content   ..  674  675  676  677   ..


Mitsubishi Grandis. Manual - part 676


DOOR

BODY

42-32

INSTALLATION SERVICE POINT
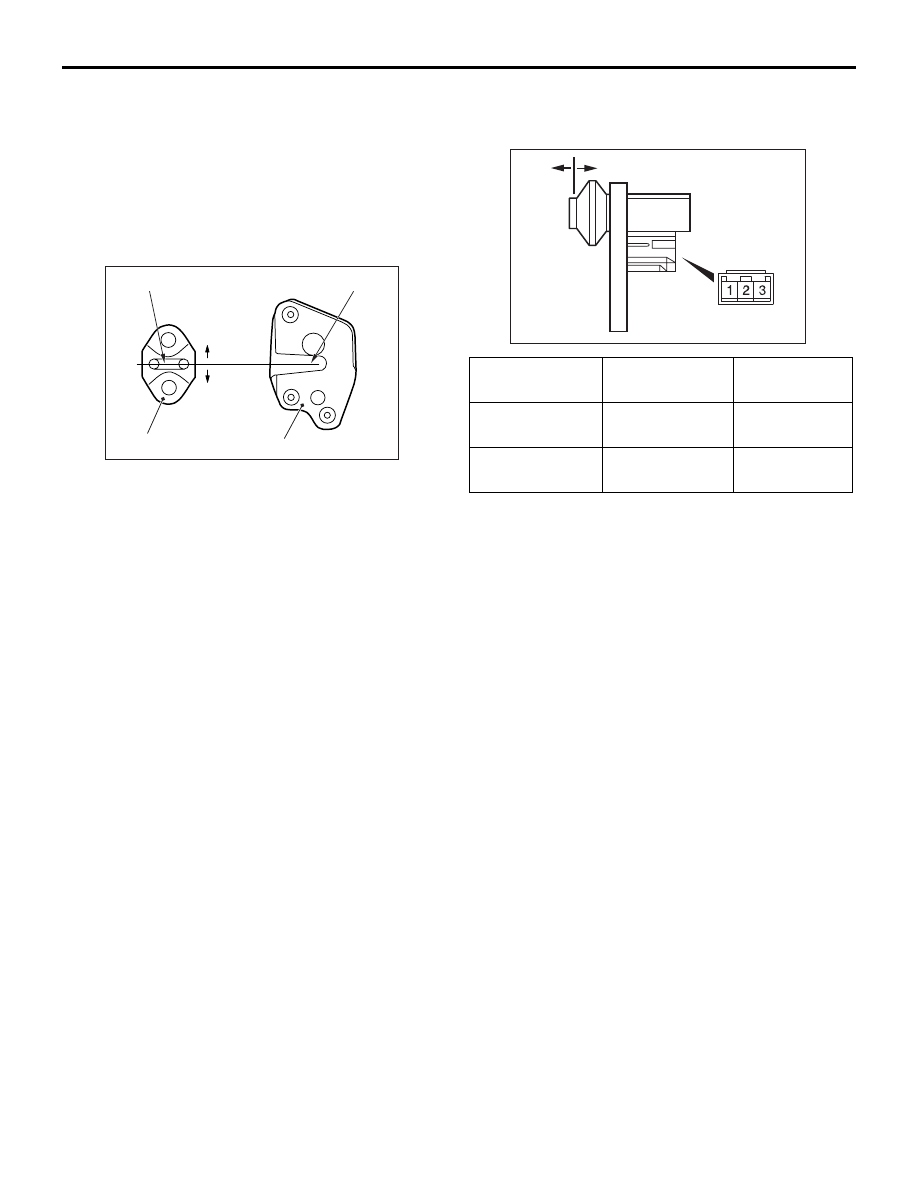
>>A<< STRIKER INSTALLATION

Align the centre of the striker and latch within 

±1.5 

mm, and install.

INSPECTION

M1423006000388

DOOR SWITCH CHECK

Striker removal steps

>>A<<

9.

Striker

10. Striker shim

Door switch removal steps

11. Door switch cover
12. Door switch

AC006126AC

+1.5 mm

-1.5 mm

Striker centre

Striker

Latch centre

Latch

Switch position Tester 

connection

Specified 
condition

Released (ON)

− switch body, 

− switch body 

Less than 2 
ohms

Depressed 
(OFF)

− switch body, 

− switch body 

Open circuit

AC303195 AB

ON

OFF

DOOR

BODY

42-33

DOOR GLASS AND REGULATOR

REMOVAL AND INSTALLATION

M1429001300456

Pre-removal Operation
• Door Trim Assembly Removal (Refer to GROUP 52A, 

Door Trim 

P.52A-12

).

• Waterproof Film Removal (Refer to 

P.42-40

).

Post-installation Operation
• Door Window Glass Adjustment (Refer to 

P.42-25

).

• Waterproof Film Installation (Refer to 

P.42-40

).

• Door Trim Assembly Installation (Refer to GROUP 52A, 

Door Trim 

P.52A-12

).

AC310917

AC302998

AC302970

AC301997

AB

<Front door>

5.0 ± 1.0 N·m

5.4 ± 1.4 N·m

9.0 ± 2.0 N·m

9.0 ± 2.0 N·m

1

2

3

4

4

5

6

7

Power switch removal

1.

Power window main switch 
<Driver’s side> and power window 
sub switch <Passenger’s side> 
(Refer to GROUP 52A, Door Trim 

P.52A-14

).

Door window glass assembly 
removal steps

Door beltline moulding and Door 
beltline inner weatherstrip (Refer to 

P.42-40

).

2.

Door window glass assembly

3.

Glass holder
Power window regulator removal 
steps

>>A<<

Post-installation operation check

<<A>>

4.

Power window regulator

5.

Power window motor

DOOR

BODY

42-34

Front lower sash removal steps

2.

Door window glass assembly

<<A>>

4.

Power window regulator

Door window glass runchannel 
(Refer to 

P.42-40

).

>>B<<

6.

Front lower sash
Rear lower sash removal steps

2.

Door window glass assembly

<<A>>

4.

Power window regulator

Door window glass runchannel 
(Refer to 

P.42-40

).

7.

Rear lower sash

AC302971

AC302999

AC310918

AC301998

1

2

3

4

5

5

6

AB

<Rear door>

5.4 ± 1.4 N·m

9.0 ± 2.0 N·m

5.0 ± 1.0 N·m

Power window sub switch 
removal

1.

Power window sub switch (Refer to 
GROUP 52A, Door Trim 

P.52A-14

).

Door window glass assembly 
removal steps

Door beltline moulding and Door 
beltline inner weatherstrip (Refer to 

P.42-40

).

>>B<<

2.

Rear lower sash

3.

Door window glass assembly

4.

Glass holder

DOOR

BODY

42-35

REMOVAL SERVICE POINT
<<A>> POWER WINDOW REGULATOR 
REMOVAL

1. Remove the door window glass installation bolts.

CAUTION

If tinting film is adhered to the door window 
glass, attach special tool window glass holder 
MB990480 to the outside of the glass to prevent 
the film from peeling off.
2. Lift the door window glass, and attach special tool 

window glass holder MB990480 to the glass as 
shown to prevent the glass from falling.

3. Remove the window regulator.

INSTALLATION SERVICE POINTS
>>A<< POST-INSTALLATION OPERATION 
CHECK

When the following procedures are carried out, make 
the power window switch learn the fully closed 
position of the power window (Refer to 

P.42-35

).

• Power window regulator removal or replacement

• Power window switch removal or replacement

>>B<< REAR LOWER SASH AND FRONT 
LOWER SASH INSTALLATION

Engage the rear lower sash and the front lower sash 
with the window sash (door) securely.

INSPECTION

M1429001400378

HOW TO MAKE THE POWER WINDOW 
SWITCH LEARN THE FULLY CLOSED 
POSITION OF THE POWER WINDOW
HOW TO MAKE THE POWER WINDOW 
SWITCH LEARN THE FULLY CLOSED 
POSITION WHEN THE POWER WINDOW 
SWITCH IS REMOVED, OR THE POWER 
WINDOW REGULATOR ASSEMBLY IS 
REMOVED OR REPLACED

1. If the anti-trap function (safety mechanism) is 

activated consecutively three times or more, the 
fully closed position that the power window switch 
has learned will be erased (initialised).

2. Operate the power window switch and fully open 

the door window glass.

CAUTION

The anti-trap function does not work until the 
power window switch completes learning the 
fully closed position (It is because the anti-trap 
function is reset).
3. Operate the power window switch and fully close 

the door window glass. The power window 
activates for 0.7 seconds and stops automatically 
when the power window switch is pressed once. 
Repeat this operation until the door window glass 
fully closes and release the switch once. Then, 
hold the power window switch to the fully closed 
side again for one second so that the power 
window switch completes learning the fully closed 
position.
NOTE: If the power window switch is operated to 
open the door window glass while the switch is 
learning, learning will be cancelled. If this 
happens, return to step 2.

HOW TO MAKE THE POWER WINDOW 
SWITCH LEARN THE FULLY CLOSED 
POSITION WHEN THE POWER WINDOW 
SWITCH IS REPLACED WITH A NEW ONE

CAUTION

The anti-trap function does not work until the 
power window switch completes learning the 
fully closed position (It is because the anti-trap 
function is reset).
Operate the power window main switch to fully close 
the door window glass by one-shot up action so that 
the power window switch will complete learning 
(Initialisation is not needed).

Power window regulator removal 
steps

>>A<<

Post-installation operation check

<<A>>

5.

Power window regulator

6.

Power window motor

AC100009AC

MB990480


Content   ..  674  675  676  677   ..