Mitsubishi Grandis. Manual - part 674
 

  Index      Mitsubishi     Mitsubishi Grandis - service repair manual


Search            


Content   ..  672  673  674  675   ..


Mitsubishi Grandis. Manual - part 674


DOOR

BODY

42-24

TROUBLESHOOTING

M1423000700356

The door system is controlled by the Smart Wiring 
System (SWS). For troubleshooting, refer to GROUP 
54B, Troubleshooting 

P.54B-27

 or GROUP 54C, 

Troubleshooting 

P.54C-8

.

ON-VEHICLE SERVICE

DOOR FIT ADJUSTMENT

M1423000900167

CAUTION

• Attach protection tape to the fender and door 

edges where the hinge is installed.

• Do not rotate special tool door hinge 

adjusting wrench MB991164 with a torque of 
over 98 N

m.

1. When the clearance between the door and the 

body is uneven
(1) Remove the fender rear protector <Front 

door> (Refer to 

P.42-6

).

(2) Remove the centre pillar trim <Rear door> 

(Refer to GROUP 52A, Interior Trim 

P.52A-10

).

(3) Use the special tool (door hinge adjusting 

wrench, MB990900 or MB991164) to loosen 
the body-side door hinge mounting bolts.

NOTE: The body-side mounting nuts of the 
rear door upper hinge can be loosened from 
inside the passenger compartment. No special 
tools are required.

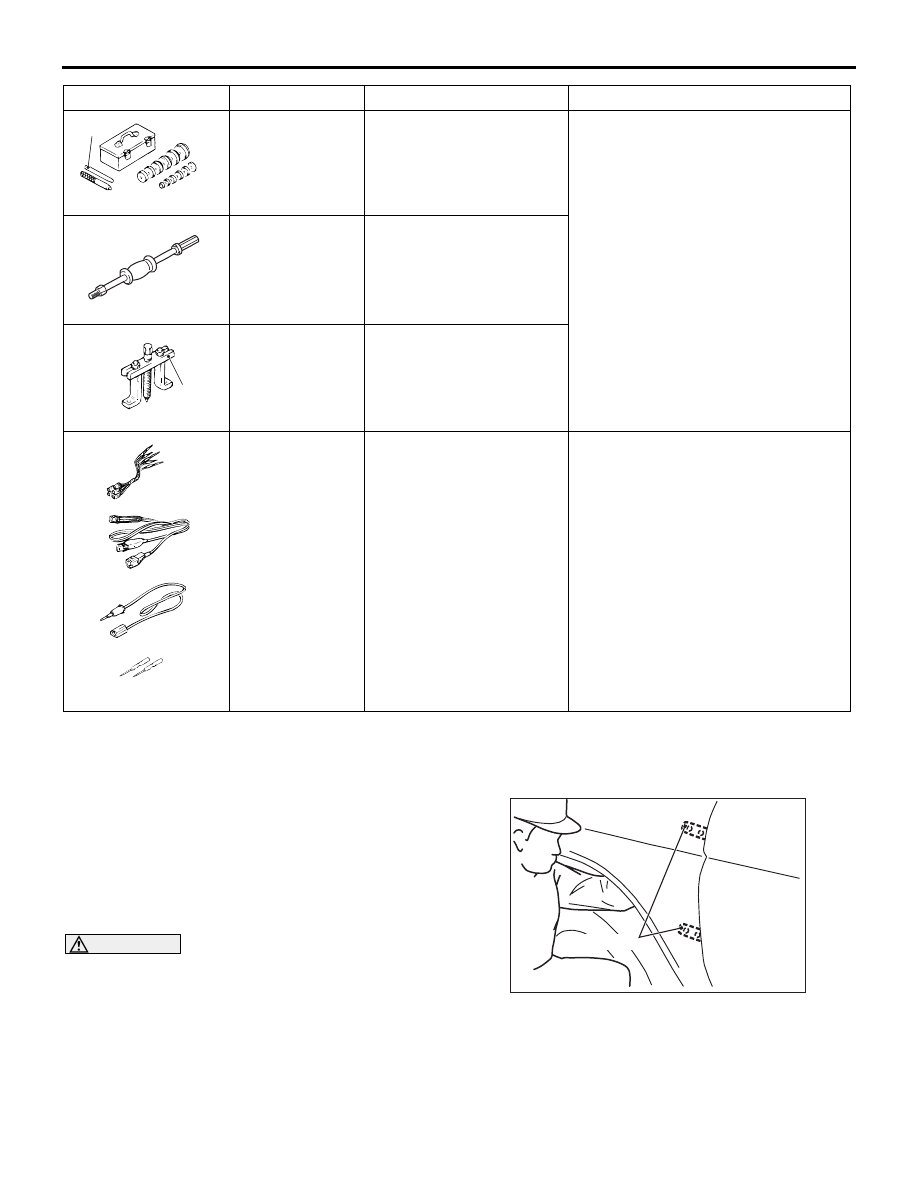
MB990925
A: MB990939

Bearing and oil seal 
installer set
A: Brass bar

Door striker adjustment

MB990211

Sliding hammer

MB990241
A: MB990243

Axle shaft puller
A: Body puller

MB991223
A: MB991219
B: MB991220
C: MB991221
D: MB991222

Harness set
A: Test harness
B: LED harness
C: LED harness adapter
D: Probe

Terminal voltage measurement
A: For checking connector pin contact 
pressure
B: For checking power supply circuit
C: For checking power supply circuit
D: For connecting a locally sourced 
tester

Tool

Number

Name

Use

MB990925AF

A

MB990211

MB990241

A

AE

MB991223

A

D

C

B

AD

AC303387AB

Door hinge

DOOR

BODY

42-25

(4) Move the door to adjust until the clearance 

around the door is even.

2. When the door is not flush with the vehicle body 

surface.
(1) Loosen the door-side hinge mounting bolts.

NOTE: 

If the door hinge mounting bolt washers are 
welded, grind off the welding according to the 
procedure below beforehand.

.

a. Remove the door hinge (Refer to 

P.42-31

).

b. Use a chisel or grinder to release the door 

hinge mounting bolt washer, which is 
welded to the door hinge.

c. On completion, paint the affected area with 

a suitable touch-in brush to prevent 
corrosion.

d. Install the door hinge (Refer to 

P.42-31

).

(2) Move the door to adjust until the door is flush 

with the vehicle body.

3. When the door is stiff to lock and unlock:

(1) Adjustment by using the striker (toward the 

inside of the vehicle and vertical direction)
Install an temporary bolts instead of the striker 
mounting bolt, and use special tool brass bar 
(MB990939) and a hammer to tap the bolt to 
the desired direction.

(2) Adjustment by using the striker (toward the 

outside of the vehicle)
Use special tools sliding hammer (MB990211) 
and body puller (MB990243) to pull the striker 
toward the outside of the vehicle.

(3) Adjustment by using shims (forward and 

rearward)
Increase or decrease the number of shims so 
that the striker engages with the door latch 
properly.

DOOR WINDOW GLASS ADJUSTMENT

M1423001000383

FRONT DOOR WINDOW GLASS 
ADJUSTMENT

CAUTION

Be careful not to damage the front door window 
glass when the special tool (glass retainer, 
MB991975) is removed and installed.
Check that the front door window glass operates 
smoothly when it is fully raised and fully lowered. If 
there is a problem, adjust by the following procedure.
1. Removal the front door trim assembly. Refer to 

GROUP 52A, Door Trim 

P.52A-12

.

2. Removal the waterproof film. Refer to 

P.42-40

.

3. Loosen the front door window glass mounting 

bolts.

AC206498AB

Washer

Bolt

Door hinge

Bolt

Weld point

Weld point

AC006109AC

MB990939

Striker

Temporary

bolts

AC006110AC

MB990211

MB990243

Striker

AC006111AC

Shim

Striker

DOOR

BODY

42-26

4. Install the special tool (glass retainer, MB99175) 

as shown. Adjust the clearance between the rear 
end of the front door window glass and the door 
window glass runchannel. Finally, tighten the front 
door window glass mounting bolts to 5.0

±1.0 N⋅m.

REAR DOOR WINDOW GLASS 
ADJUSTMENT

CAUTION

Be careful not to damage the rear door window 
glass when the special tool (glass retainer, 
MB991975) is removed and installed.
Check that the rear door window glass operates 
smoothly when it is fully raised and fully lowered. If 
there is a problem, adjust by the following procedure.
1. Removal the rear door trim assembly. Refer to 

GROUP 52A, Door Trim 

P.52A-12

.

2. Removal the waterproof film. Refer to 

P.42-40

.

3. Loosen the rear door window glass mounting 

bolts.

4. Install the special tool (glass retainer, MB99175) 

as shown. Adjust the clearance between the rear 
end of the front door window glass and the door 
window glass runchannel. Finally, tighten the front 
door window glass mounting bolts to 5.0

±1.0 N⋅m.

POWER WINDOW CHECK

M1429004400292

Check the system as described below. If the system 
does not work, carry out troubleshooting. Refer to 
GROUP 54B, Troubleshooting 

P.54B-27

 or GROUP 

54C, Troubleshooting 

P.54C-8

.

• Turn off the power window lock switch of the 

power window main switch, and operate each of 
the power window switches to check that each 
power window operates.

• Turn on the power window lock switch of the 

power window main switch, and operate the front 
and rear passenger's power window sub switches 
to check that the power windows do not work.

• Turn on the power window lock switch of the 

power window main switch, and operate the 
power window main switch to check that each 
power window operates.

AC302057

AC302058

AC310893

A

A

AB

MB991975

Front door

Door window glass runchannel

Door window glass

Section A – A

         : Front of vehicle

AC302057

AC302058

AC302222

A

A

AB

MB991975

Rear door

Door window glass 
runchannel

Door window glass

Section A – A

         : Front of vehicle

DOOR

BODY

42-27

NOTE: The adjustment function allows you to 

change the power window lock switch's setting 
from "All the power window switches can be 
operated when the power window lock switch is 
ON (initial setting)" to "The power window 
switches except the switch at the driver's seat 
can not be operated when the power window lock 
switch is ON". Prior to the check, confirm which 
setting is activated.

GLASS SLIDING MECHANISM CHECK 
AND ADJUSTMENT

M1429000900143

If the window glass automatically starts moving 
downwards at the wrong time while it is being raised, 
carry out the following adjustment or replacement 
procedures.
1. Remove the door trim assembly. (Refer to 

GROUP 52A, Door trim 

P.52A-12

).

2. Remove the waterproof film. (Refer to 

P.42-40

).

3. Remove the window regulator assembly from the 

door window glass, and then raise and lower the 
door window glass by hand to check the operation 
force.
NOTE: Insert a cushion or similar object to 
prevent damage to the glass if it should happen to 
fall down.

4. If the door window glass does not move up and 

down smoothly, check or repair the following 
points.

• Check the installation condition of the 

runchannel.

• Repair any twisting in the door sash.

• Check the installation condition of the lower sash.

5. If repair or adjustment is not possible, replace the 

door assembly.

POWER WINDOW SAFETY MECHANISM 
CHECK

M1429001000325

1. Place a wooden board about 10 mm thick as 

shown. Then, raise the window glass.

2. Check that the window lowers by about 150 mm 

when the window clamps the board. If this doesn’t 
happen, carry out troubleshooting. Refer to 
GROUP 54B, Troubleshooting 

P.54B-27

, or 

GROUP 54C, Troubleshooting 

P.54C-8

.

NOTE: If the anti-trap function (safety 
mechanism) is activated consecutively three 
times or more, make the power window switch 
learn the fully closed position of the power window 
(Refer to 

P.42-35

).

POWER WINDOW TIMER FUNCTION 
CHECK

M1429004300206

Check the system as described below. If the system 
does not work, carry out troubleshooting. Refer to 
GROUP 54B, Troubleshooting 

P.54B-27

, or GROUP 

54C, Troubleshooting 

P.54C-8

.

• Close the door and turn the ignition switch to the 

LOCK (OFF) position, and then check that the 
power windows operate for 30 seconds.

• Close the door and turn the ignition switch to the 

LOCK (OFF) position. While the time is on, open 
the driver's side door and check that the power 
windows operate for 30 seconds. (The timer will 
be extended if the driver's door is opened, but it 
will b switched off if the door is closed)

NOTE: The customisation function allows you to 

change the power window timer period from 30 
seconds (default setting) to 3, 10 minutes or 
"without function". Prior to the check, confirm 
which setting is activated.

• Check that the all of the door windows can be 

operated by using the power window main switch 
while the timer is on.

AC003777

Runchannel

Door 
sash

Lower 
sash

AB

AC103294


Content   ..  672  673  674  675   ..