Mitsubishi L200. Manual - part 490


  Index      Mitsubishi     Mitsubishi L200 - service repair manual 2012 year


Search            


Content   ..  488  489  490  491   ..


Mitsubishi L200. Manual - part 490


AC600964

AC502503

AC104649

AC104650

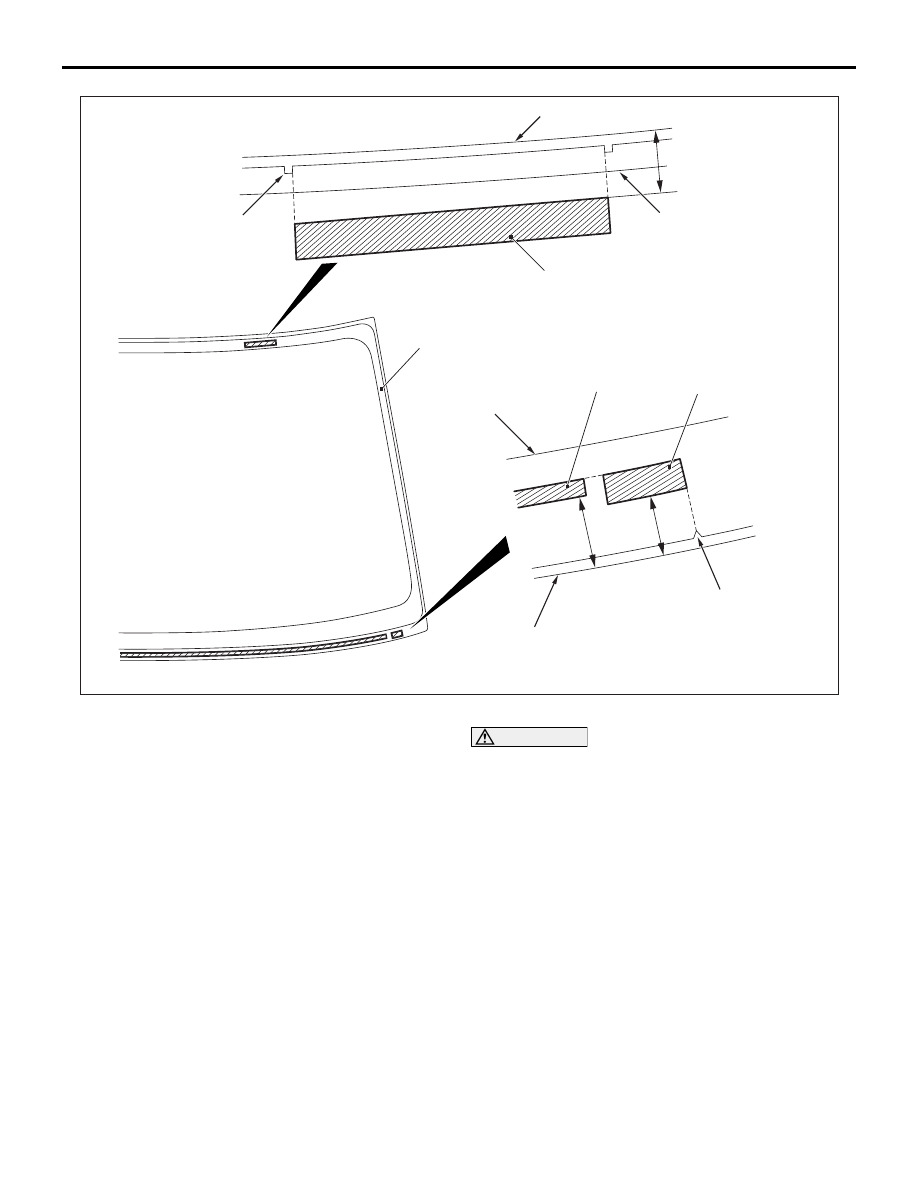
Align the end of the glass 
stopper with the notch 
on the ceramic.

Windshield

Glass stopper

Seal line

Seal line

Windshield spacer

Align the fastener 
end with the 
ceramic notch.

AB

Windshield end line

Windshield end line

16.2 ± 1 mm

13 mm

 mm

15.9

+ 2
– 0

Fastener

Windshield spacer, fastener and glass stopper installation position

WINDOW GLASS

BODY

42-20

2. Install the fastener and the glass stopper to the 

specified position on the windshield glass.

3. Assemble the fastener to the body flange relative 

to the windshield fastener.

4. Position the windshield spacer, ensuring that 

there are no bends or warpage inside the 
windshield glass.

>>B<< WINDSHIELD GLASS INSTALLATION
1. Apply double-sided tapes to the concaved part of 

the windshield moulding.

2. Install the windshield moulding to the windshield 

glass.

3. When replacing the windshield glass, temporarily 

set the windshield glass against the body, and 
place a mating marks on the windshield glass and 
body.

CAUTION

• The primer strengthens the adhesive, so be 

sure to apply it evenly around the entire cir-
cumference. However, a too thick application 
will weaken the adhesive.

• Do not touch the coated surface.
• Do not apply the primer on the remaining 

adhesive because of weakening the adhesive.

4. Soak a sponge in the primer, and apply evenly to 

the windshield glass and the body in the specified 
places. If the old adhesive does not remain on the 
body flange because of the body panel or others, 
also apply the primer to the specified body side.

5. Allow the windshield glass to dry for at least three 

minutes after applying primer.

ACX00480

10 mm

15 mm

AB

WINDOW GLASS

BODY

42-21

6. Fill a sealant gun with adhesive. Then apply the 

adhesive evenly around the windshield glass 
within 30 minutes after applying the primer.
NOTE: Cut the tip of the sealant gun nozzle into a 
V shape to simplify adhesive application.

7. Align the mating marks on the windshield glass 

and the body, and lightly press the windshield 
glass evenly so that it adheres completely.

8. Use spatula or the like to remove any excessive 

adhesive. Then clean the surface with parts 
cleaner (MZ100387 or equivalent).

CAUTION

• Do not move the vehicle unless absolutely 

necessary.

• When testing for water leakage, do not pinch 

the end of the hose to spray the water.

9. Wait 30 minutes or more, and then test for water 

leakage.

SIDE WINDOW GLASS <CLUB CAB>

REMOVAL AND INSTALLATION

M1422002200075

Pre-removal and Post-installation Operation
• Quarter Trim Upper Removal and Installation (Refer to 

GROUP 52A, Interior Trim ).

AC501240

N

N

N

1

2

3

4

4

5

AB

A

A

B

B

B

B

AC503692

AC502515

AC502516

3

2

Primer

Primer

3

2

Primer

4

Adhesive: 3M ATD Part No. 8609 Super Fast Urethane Auto Glass Sealant or equivalent and 3M ATD Part No. 8608
Super Fast Urethane Primer or equivalent

Section A – A

Section B – B

AB

Removal steps 

1. Link
2. Side window glass 

<<

A

>> >>

A

<< 3. Moulding

<<

A

>> >>

A

<< 4. Hinge

5. Weatherstrip

WINDOW GLASS

BODY

42-22

REMOVAL SERVICE POINT

<<A>> MOULDING/HINGE REMOVAL

CAUTION

Prying with a knife may damage the side window 
glass.
1. Using a knife, remove the moulding and hinge.
2. When reusing the side window glass, remove the 

adhesive still adhering to the side window glass, 
and clean with parts cleaner (MZ100387 or 
equivalent).

INSTALLATION SERVICE POINT

>>A<<HINGE/MOULDING INSTALLATION

CAUTION

Leave the degreased parts for 3 or more minutes 
to dry well, before starting on the next step. Do 
not touch the degreased parts.
1. Use parts cleaner (MZ100387 or equivalent) to 

degrease the inside and outside of the side 
window glass.

CAUTION

• The primer strengthens the adhesive, so be 

sure to apply it evenly around the entire cir-
cumference. However, a too thick application 
will weaken the adhesive.

• Do not touch the coated surface.
• Do not apply the primer on the remaining 

adhesive because of weakening the adhesive.

2. Soak a sponge in the primer, and apply evenly to 

the hinge, moulding and side window glass in the 
specified places. If the old adhesive does not 
remain on the side window glass because of the 
side window glass or others, also apply the primer 
to the specified side window glass side.

3. Allow the hinge, moulding and side window glass 

to dry for at least 3 minutes after applying primer.

4. Fill a sealant gun with adhesive. Then apply the 

adhesive evenly around the hinge and moulding 
within 30 minutes after applying the primer.
NOTE: Cut the tip of the sealant gun nozzle into a 
V-shape to simplify adhesive application.

AC502513

Unit: mm

AD

42 ± 0.5

400.8 ± 0.5

Hinges

5. Install the hinges to the specified positions of the 

side window glass.

6. Install the moulding to the specified position of the 

side window glass.

7. Use spatula or the like to remove any excessive 

adhesive. Then clean the surface with parts 
cleaner (MZ100387 or equivalent).

WINDOW GLASS

BODY

42-23

REAR WINDOW GLASS <Vehicles 
without rear panel power window>

REMOVAL AND INSTALLATION

M1422001600467

Pre-removal and Post-installation Operation
• Roof Drip Moulding Removal and Installation (Refer to 

GROUP 51, Moulding ).

• Quarter Upper Trim and Cab Rear End Trim Removal and 

Installation (Refer to GROUP 52A, Interior Trim  <Club 

Cab>).

• Rear Pillar Upper Trim Removal and Installation (Refer to 

GROUP 52A, Interior Trim  <Double Cab>).

AC501241

N

N

N

1

2

3

4

AB

AC502950

AC502504

AC502505

AC502506

AC502507

1

1

1

2

2

2

Unit: mm

15

12

15

12

15

12

AC

A

A

B

B

Apply the primer and adhesive along the fictitious

lines (seal line) between the marks.

Ceramic line

Section A – A

Section B – B

Section C – C

Seal line

Mark

Centre of seal line

Centre of seal line

Centre of seal line

Primer

Primer

Primer

Adhesive: 3M ATD Part No. 8609 Super Fast Urethane Auto Glass Sealant or equivalent and 3M ATD Part No. 8608
Super Fast Urethane Primer or equivalent

C

C


Content   ..  488  489  490  491   ..