Jeep Grand Cherokee WK. Manual - part 1483


  Index      Jeep     Jeep Grand Cherokee WK - service repair manual 2005 year


Search            


Content   ..  1481  1482  1483  1484   ..


Jeep Grand Cherokee WK. Manual - part 1483


18. Using grease, install both Teflon rings in the

groove at the rear of the output shaft so that the
joint stays together.

19. Mount transmission housing on converter housing.

20. Screw in Torx socket bolts through the transmis-

sion housing into the converter housing. Tighten
the bolts to 20 N·m (177 in.lbs.).

NOTE: Verify that there are no nicks or other irreg-
ularities in the surface of the transmission case
that will cause an inaccurate measurement.

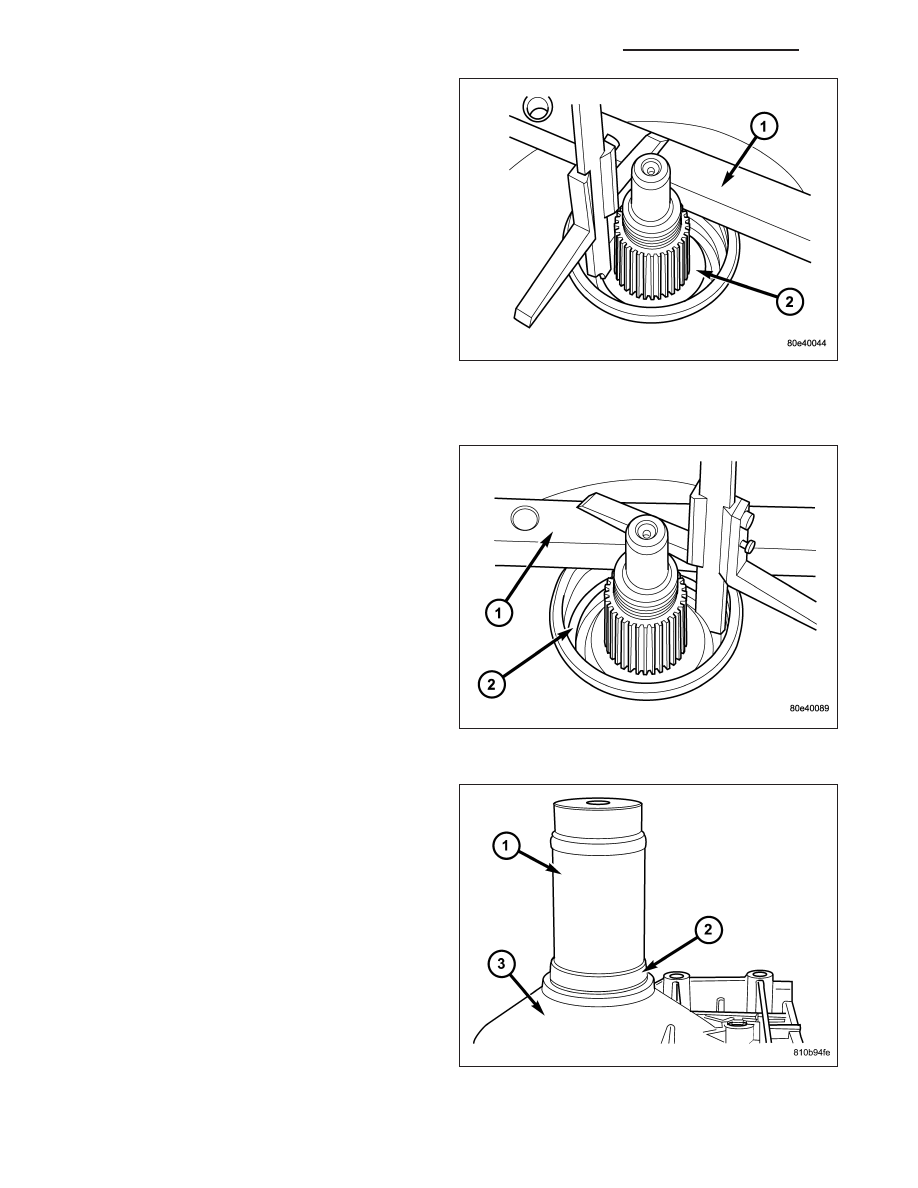
21. Measure end-play between park pawl gear and

grooved ball bearing in order to select the proper
geartrain end-play shim.

22. Place Gauge Bar 6311 (1) on transmission hous-

ing. Using a depth gauge, measure from the gauge bar (1) to the parking lock gear (2).

23. Using a depth gauge, measure from the Gauge

Bar 6311 (1) to the contact surface of the output
shaft bearing (2) in the transmission housing.

24. Subtract the first figure from the second figure to

determine the current end-play of the transmis-
sion. Select a shim such that the end-play will be
0.3-0.5 mm (0.012-0.020 in.). Shims are available
in thicknesses of 0.2 mm (0.008 in.), 0.3 mm
(0.012 in.), 0.4 mm (0.016 in.), and 0.5 mm (0.020
in.).

25. Install the selected end-play shim.

26. Screw in Torx socket bolts through the converter

housing into the transmission housing. Tighten the
bolts to 20 N·m (177 in.lbs.).

27. Install output shaft bearing (2) in rear transmission

housing. Using Bearing Installer 9287 (1), install
the output shaft bearing (2) into the transmission
housing. The closed side of the plastic cage
must point towards the parking lock gear.

21 - 742

AUTOMATIC TRANSMISSION - NAG1 - SERVICE INFORMATION

WK

28. Install the retaining ring (1). Ensure that the

retaining ring is seated correctly in the groove.

29. Check that there is no play between the bearing

and the retaining ring using feeler gauge.

30. There must be no play between the retaining ring

and the bearing. If the ring cannot be installed, a
thinner ring must be used. If there is play between
the ring and the bearing, a thicker ring must be
installed. Retaining rings are available in thick-
nesses of 2.0 mm (0.079 in.), 2.1 mm (0.083 in.),
and 2.2 mm (0.087 in.).

31. Rotate the transmission so that the bellhousing is

pointed upward and ensuring that the output shaft
is allowed to move freely.

32. Measure input shaft end-play.

NOTE: If end-play is incorrect, transmission is
incorrectly assembled, or the geartrain end-play
shim is incorrect. The geartrain end-play shim is
selective.

a. Attach Adapter 8266-18 (2) to Handle 8266-8

(1).

b. Attach dial indicator C-3339 (3) to Handle

8266-8 (1).

c. Install the assembled tool onto the input shaft

of the transmission and tighten the retaining
screw on Adapter 8266-18 to secure it to the
input shaft.

d. Position the dial indicator plunger against a flat

spot on the oil pump and zero the dial indica-
tor.

e. Move input shaft in and out and record reading. End play should be 0.3-0.5 mm (0.012-0.020 in.). Adjust as

necessary.

WK

AUTOMATIC TRANSMISSION - NAG1 - SERVICE INFORMATION

21 - 743

33. Install the output shaft washer onto the output

shaft.

34. Install a new transmission rear seal into the trans-

mission case with Seal Installer 8902A (1).

35. Place the transmission in PARK to prepare for the

installation of the output shaft nut.

36. Inspect the seal protector on the rear of the out-

put shaft flange. Replace the seal protector if
damaged. the seal protector can be removed
using a suitable pry tool and installed with a suit-
able tube style tool.

37. Install the propeller shaft flange onto the output

shaft and install an new flange nut. Tighten the
flange nut to 200 N·m (147.5 ft.lbs.).

38. Place the Staking Tool 9078 (2) and Driver Handle

C-4171 onto the output shaft.

39. Rotate the Staking Tool 9078 (2) until the align-

ment pin (3) engages the output shaft notch (4).

40. Press downward on the staking tool (1) until the

staking pin (3) contacts the output shaft nut flange
(2).

41. Strike the Driver handle C-4171 with a suitable

hammer until the output shaft nut is securely
staked to the output shaft.

21 - 744

AUTOMATIC TRANSMISSION - NAG1 - SERVICE INFORMATION

WK

42. Install electrohydraulic unit (2). Tighten the bolts

to 8 N·m (71 in.lbs.).

43. Install oil filter (4).

44. Install oil pan (5). Tighten the bolts to 8 N·m (71

in.lbs.).

45. Install guide bushing (12).

46. Install the torque converter.

WK

AUTOMATIC TRANSMISSION - NAG1 - SERVICE INFORMATION

21 - 745


Content   ..  1481  1482  1483  1484   ..